Intermediate01:00:00
Understanding and Configuring Layered Security in an AWS VPC
- Click on the Open Console button, and you will get redirected to AWS Console in a new browser tab.
- On the AWS sign-in page, Leave the Account ID as default. Never edit/remove the 12 digit Account ID present in the AWS Console. otherwise, you cannot proceed with the lab. Now copy your User Name and Password in the Lab Console to the IAM Username and Password in AWS Console and click on the Sign in button.
- On the AWS sign-in page,
- Leave the Account ID as default. Never edit/remove the 12 digit Account ID present in the AWS Console. otherwise, you cannot proceed with the lab.
- Now copy your User Name and Password in the Lab Console to the IAM Username and Password in AWS Console and click on the Sign in button.
- Once Signed In to the AWS Management Console, Make the default AWS Region as US East (N. Virginia) us-east-1.
- In this task, we are going to create a new VPC with the required configurations such as name, IPv4 CIDR block.
- Make sure to choose the N.Virginia region in the AWS Management Control dashboard, which is present in the top right corner.
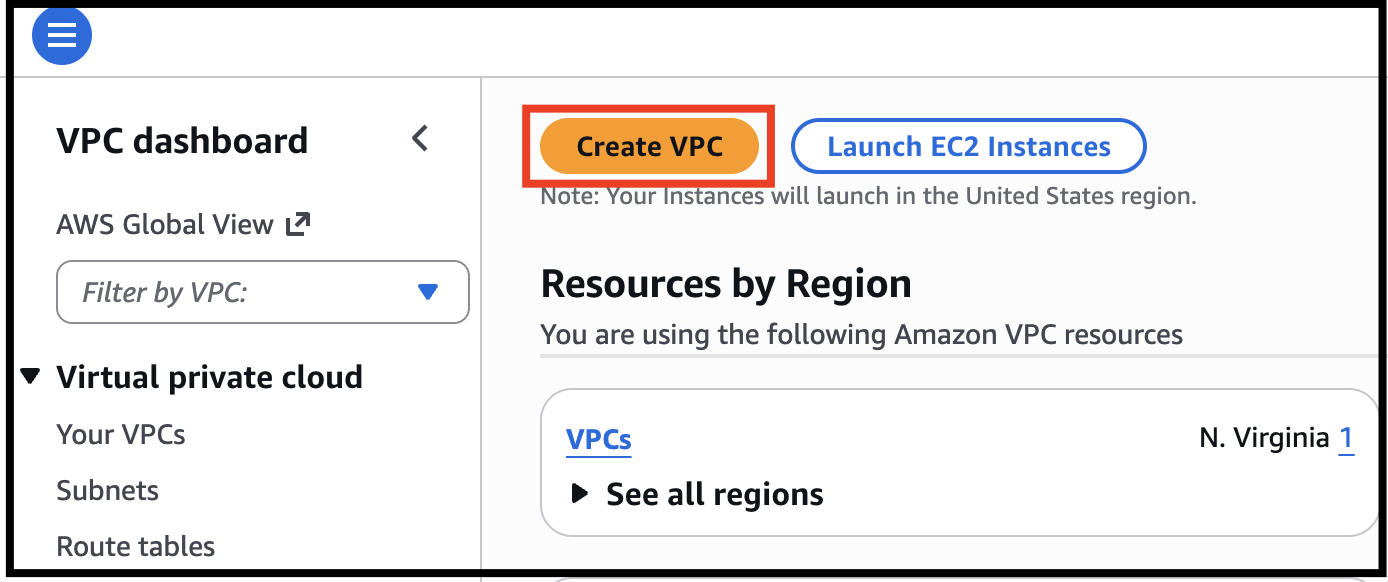
- Navigate and click on VPC which will be available under the Networking & Content Delivery section of Services
- Click on Your VPCs from the left menu and Click on Create VPC button.

- Task 2: Creating a new VPC
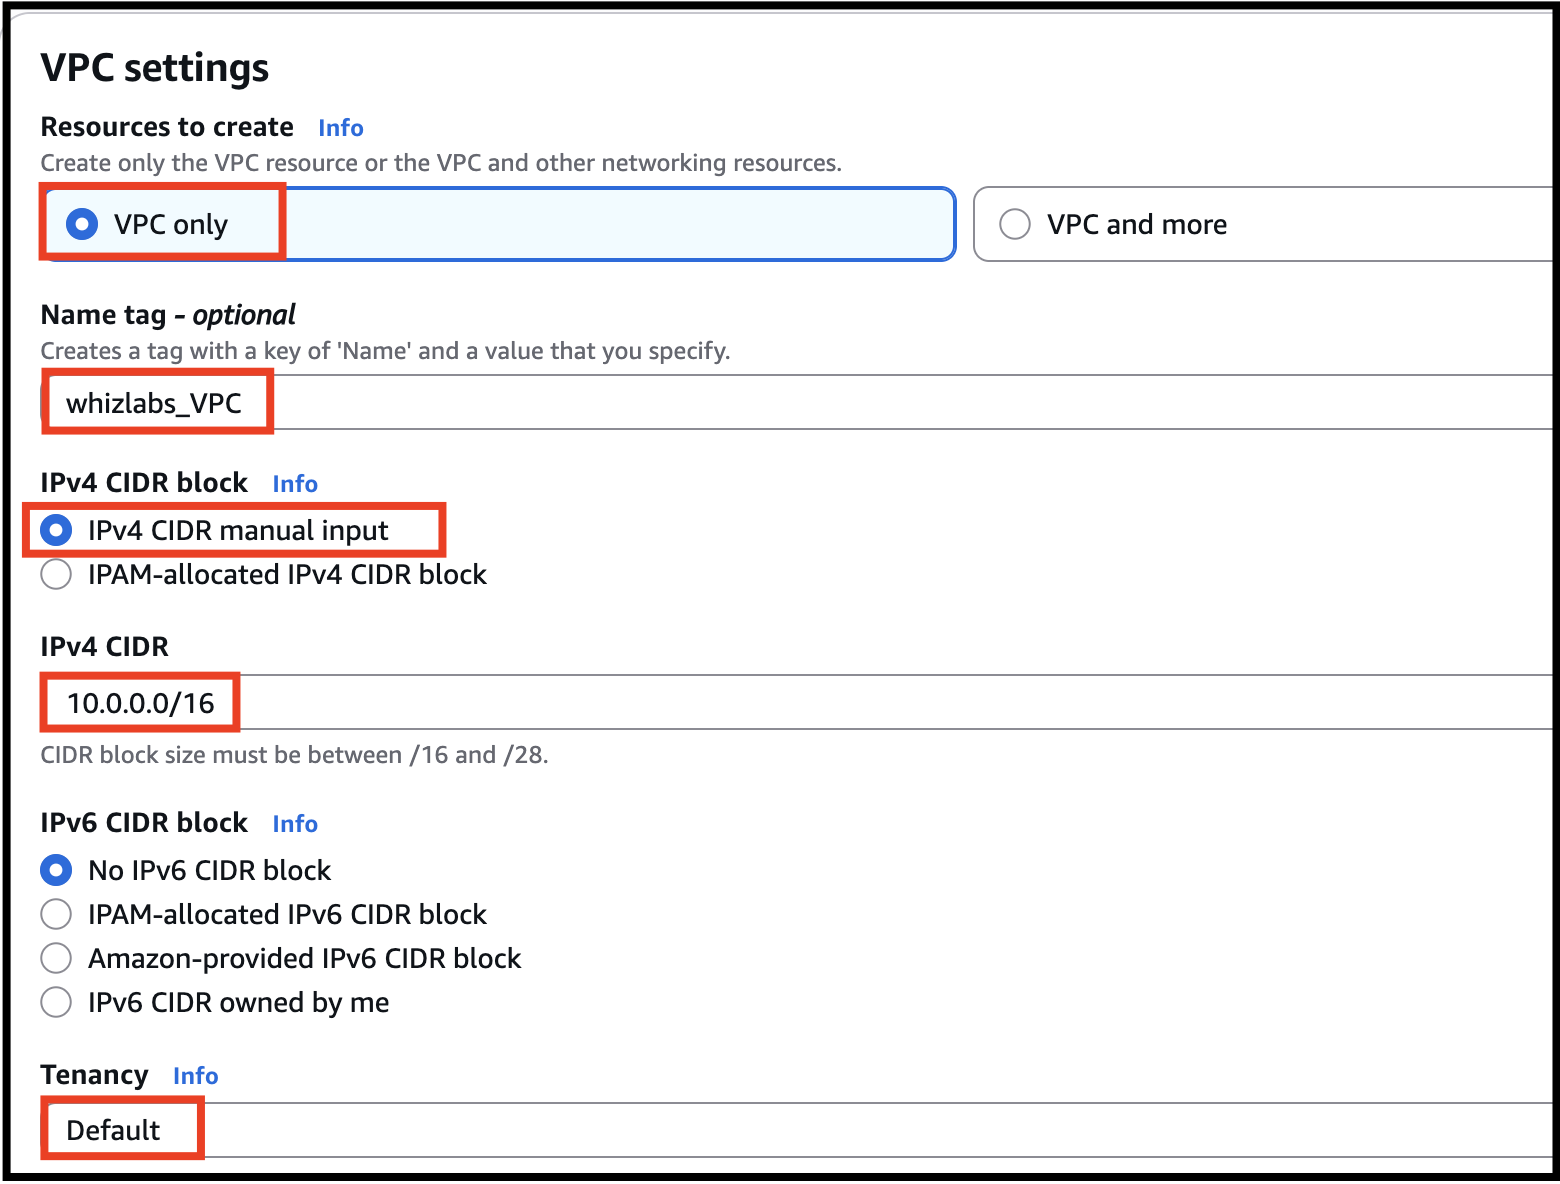
- In Create VPC page fill the following details,
- Select VPC Only
- Name tag: Enter lab_VPC
- IPV4 CIDR Block: Enter 10.0.0.0/16
- IPV6 CIDR block: Select No IPV6 CIDR block
- Tenancy: Default

- Task 2: Creating a new VPC
- Click on Create VPC button.

- IP address ranges using CIDR blocks
- Subnets within the network
- Route tables to control traffic
- Security layers such as Security Groups and Network ACLs
- In this task, we are going to create an internet gateway and will attach it to the created VPC.
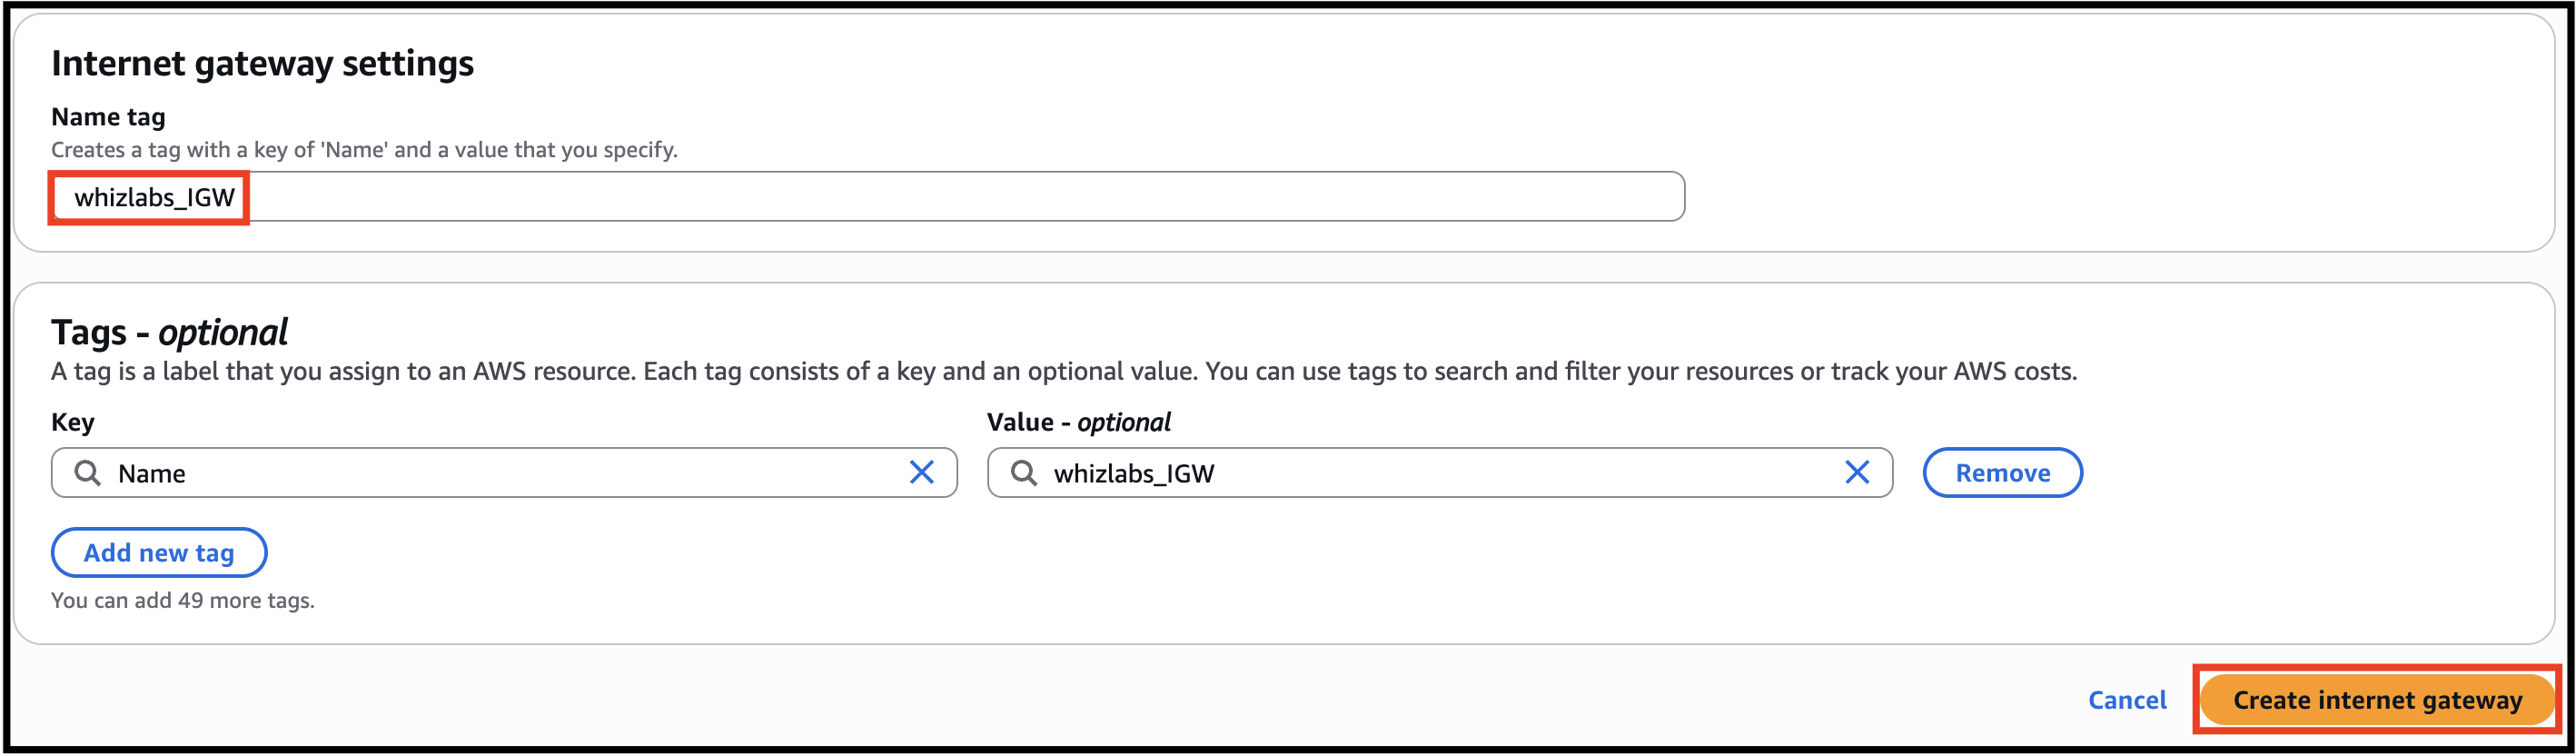
- Click on Internet Gateways from the left menu and click on Create internet gateway button and enter the following details:
- Name tag: Enter lab_IGW
- Click on Create internet gateway button.
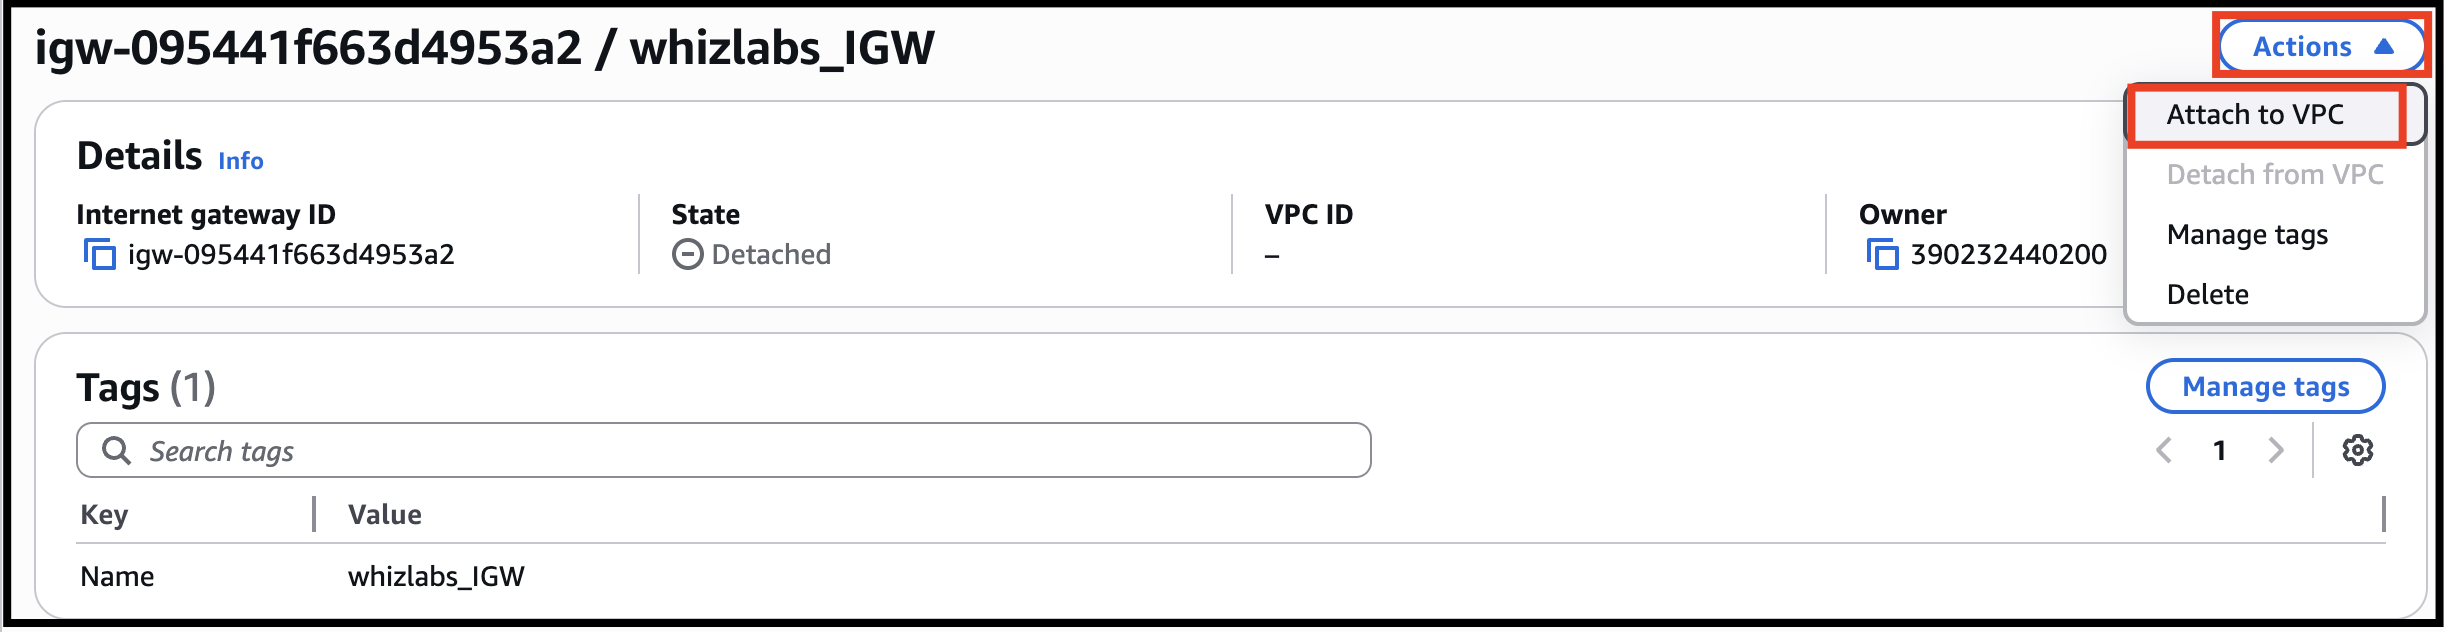
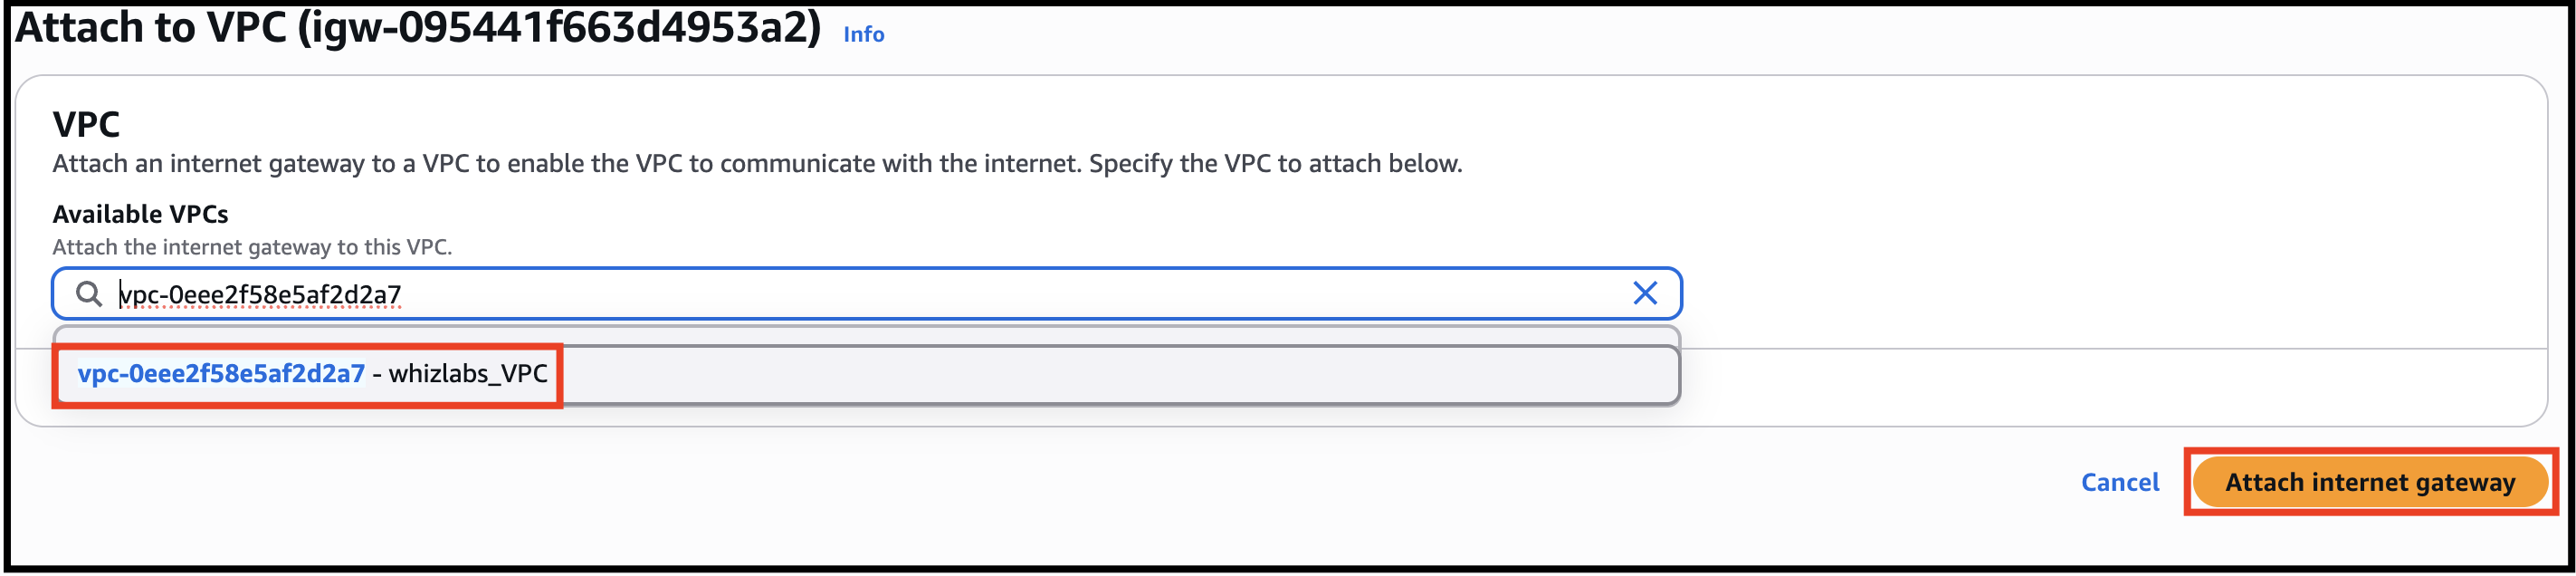
- Select the Internet gateway you created from the list.
- Click on Actions button.
- Click on Attach to VPC button.
- Task 3: Creating and attaching an Internet gateway

- Select MyVPC from the drop-down and click on Attach internet gateway button.
- You will create 2 Subnets, one for public and another for private resources. First, we will create a public subnet.
- For the Public Subnet, click on Subnets from the left menu and click on Create subnet button.
- VPC ID: Select lab_VPC (Select the VPC which you created from the dropdown)
- Name tag: Enter public_subnet
- Availability zone: Select No Preference
- IPv4 CIDR block: Enter 10.0.1.0/24

- Task 4: Creating two Subnets
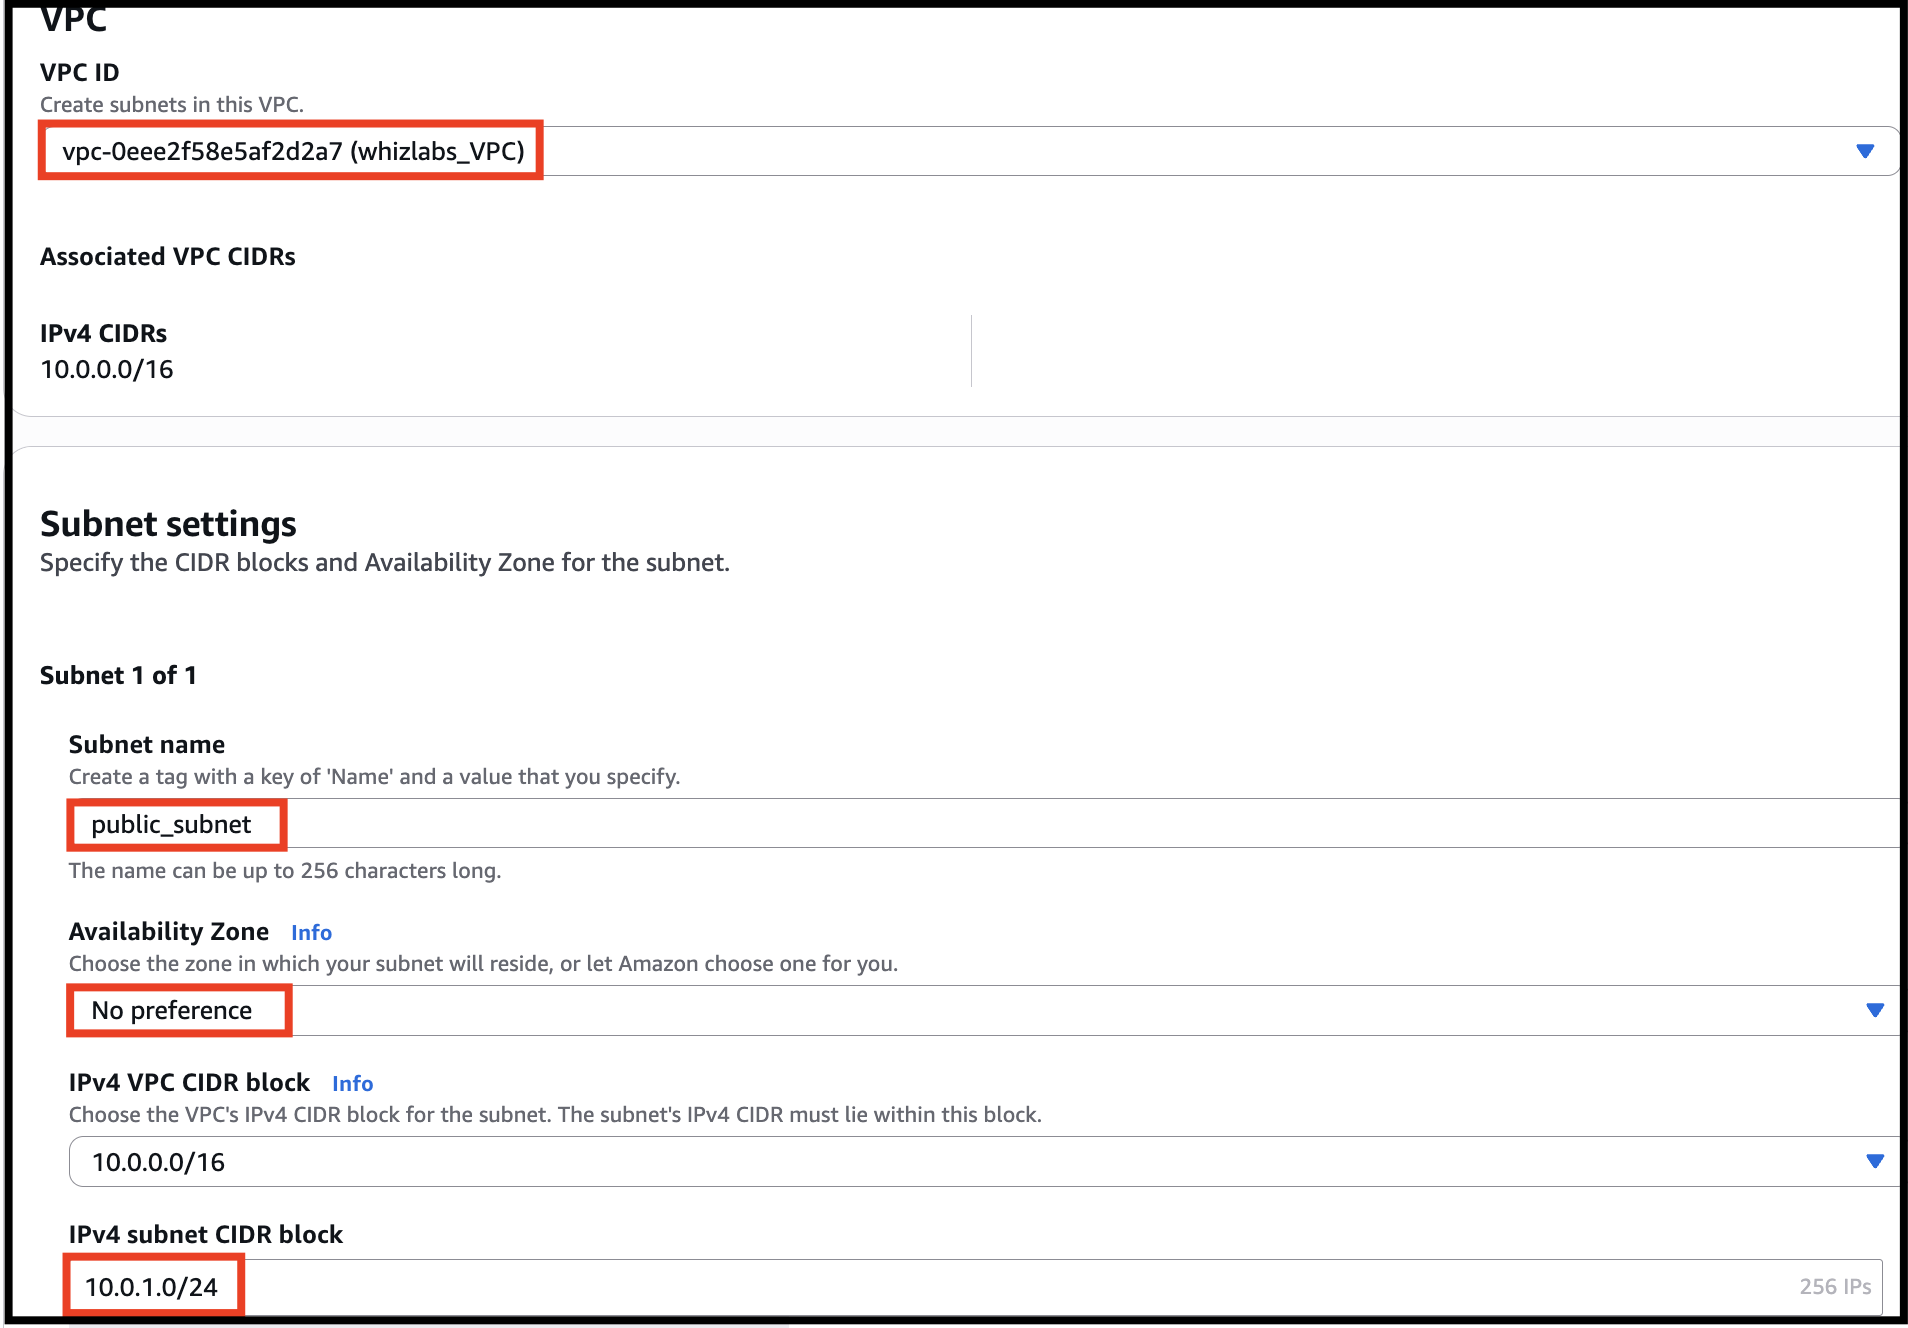
- Click on Create subnet button
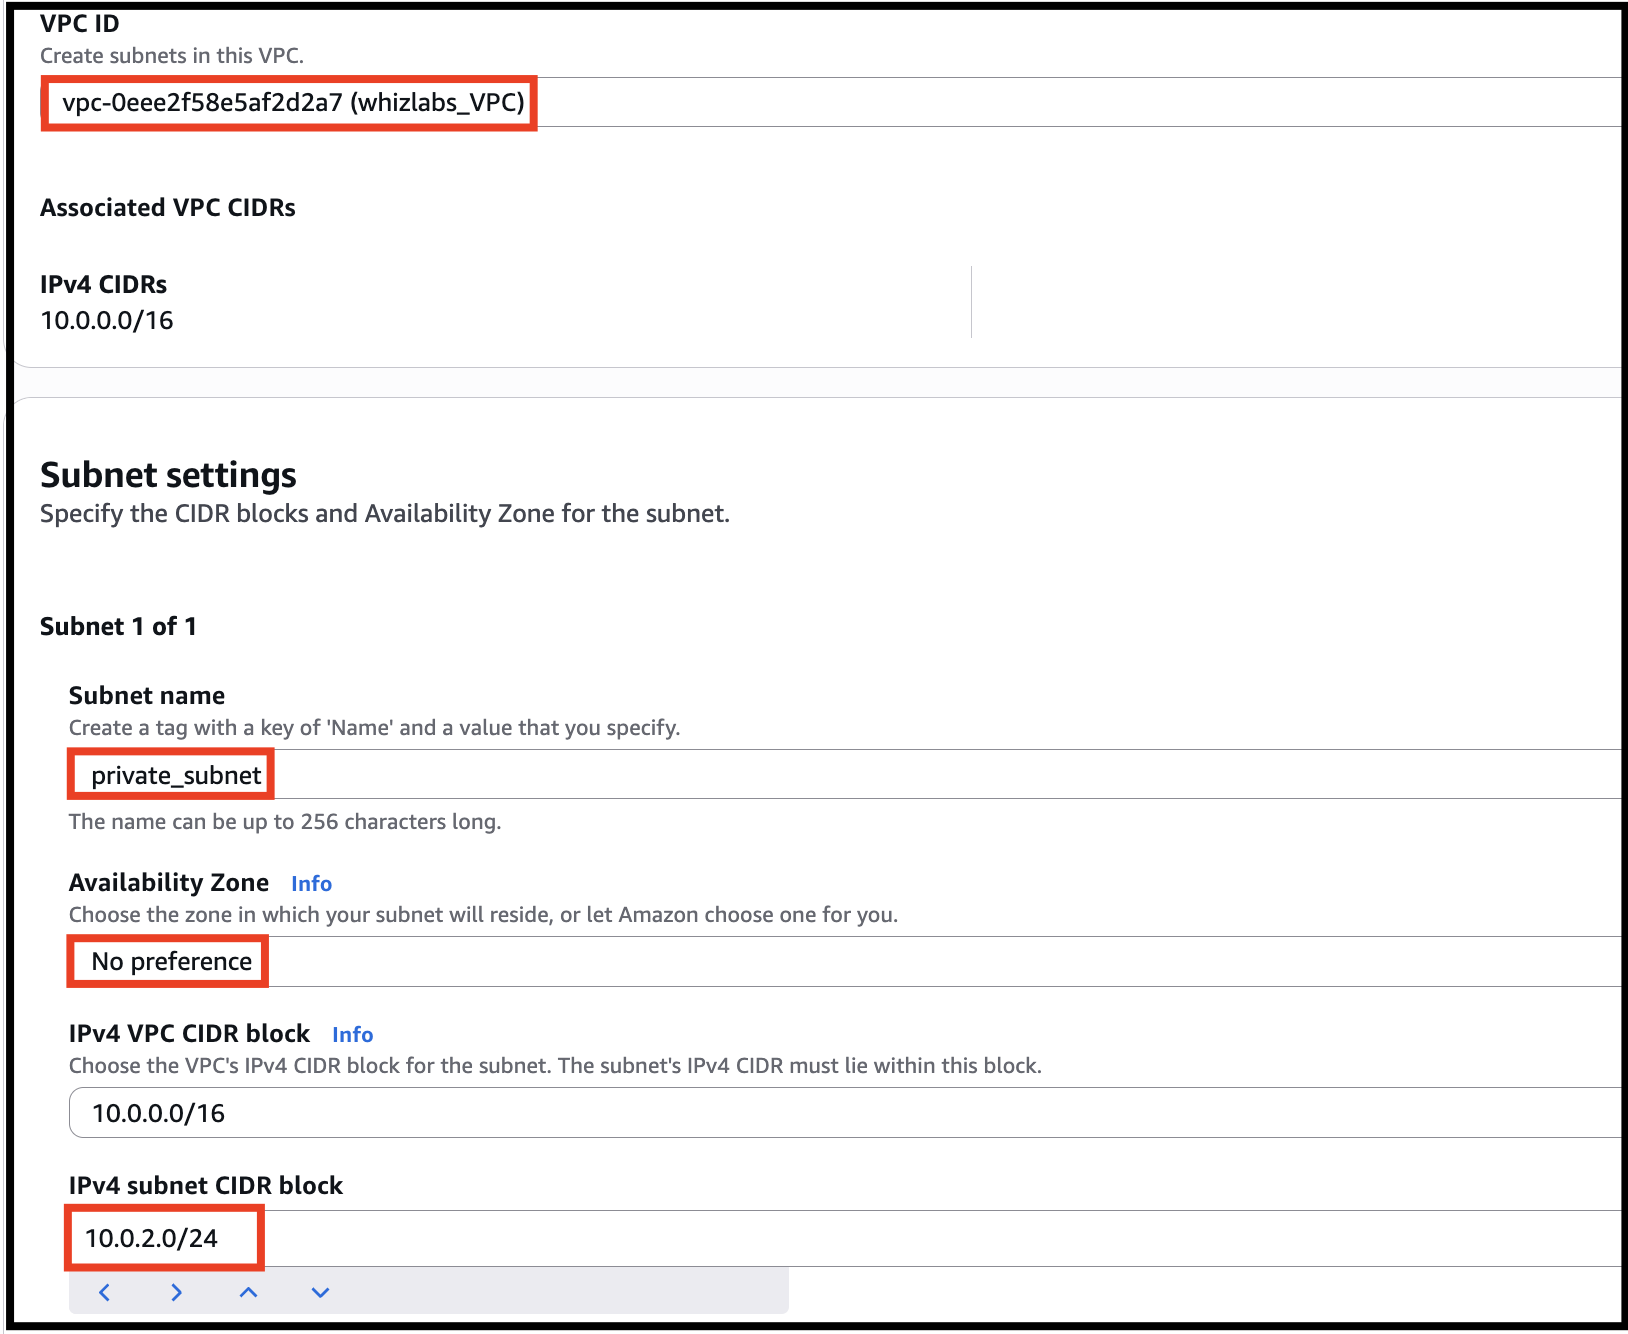
- For Private Subnet, click on Create Subnet again.
- VPC ID: Select lab_VPC (Select the VPC which you created from the dropdown)
- Name tag: Enter private_subnet
- Availability zone: Select No Preference
- IPv4 CIDR block: Enter 10.0.2.0/24
- Click on Create subnet button.

- Public Subnet: Contains resources that must be accessible from the internet, such as web servers. These subnets typically have routes pointing to an Internet Gateway.
- Private Subnet: Contains internal resources such as application servers or databases that should not be directly accessible from the internet.
- You will create 2 route tables, one for public routes and another for private routes.
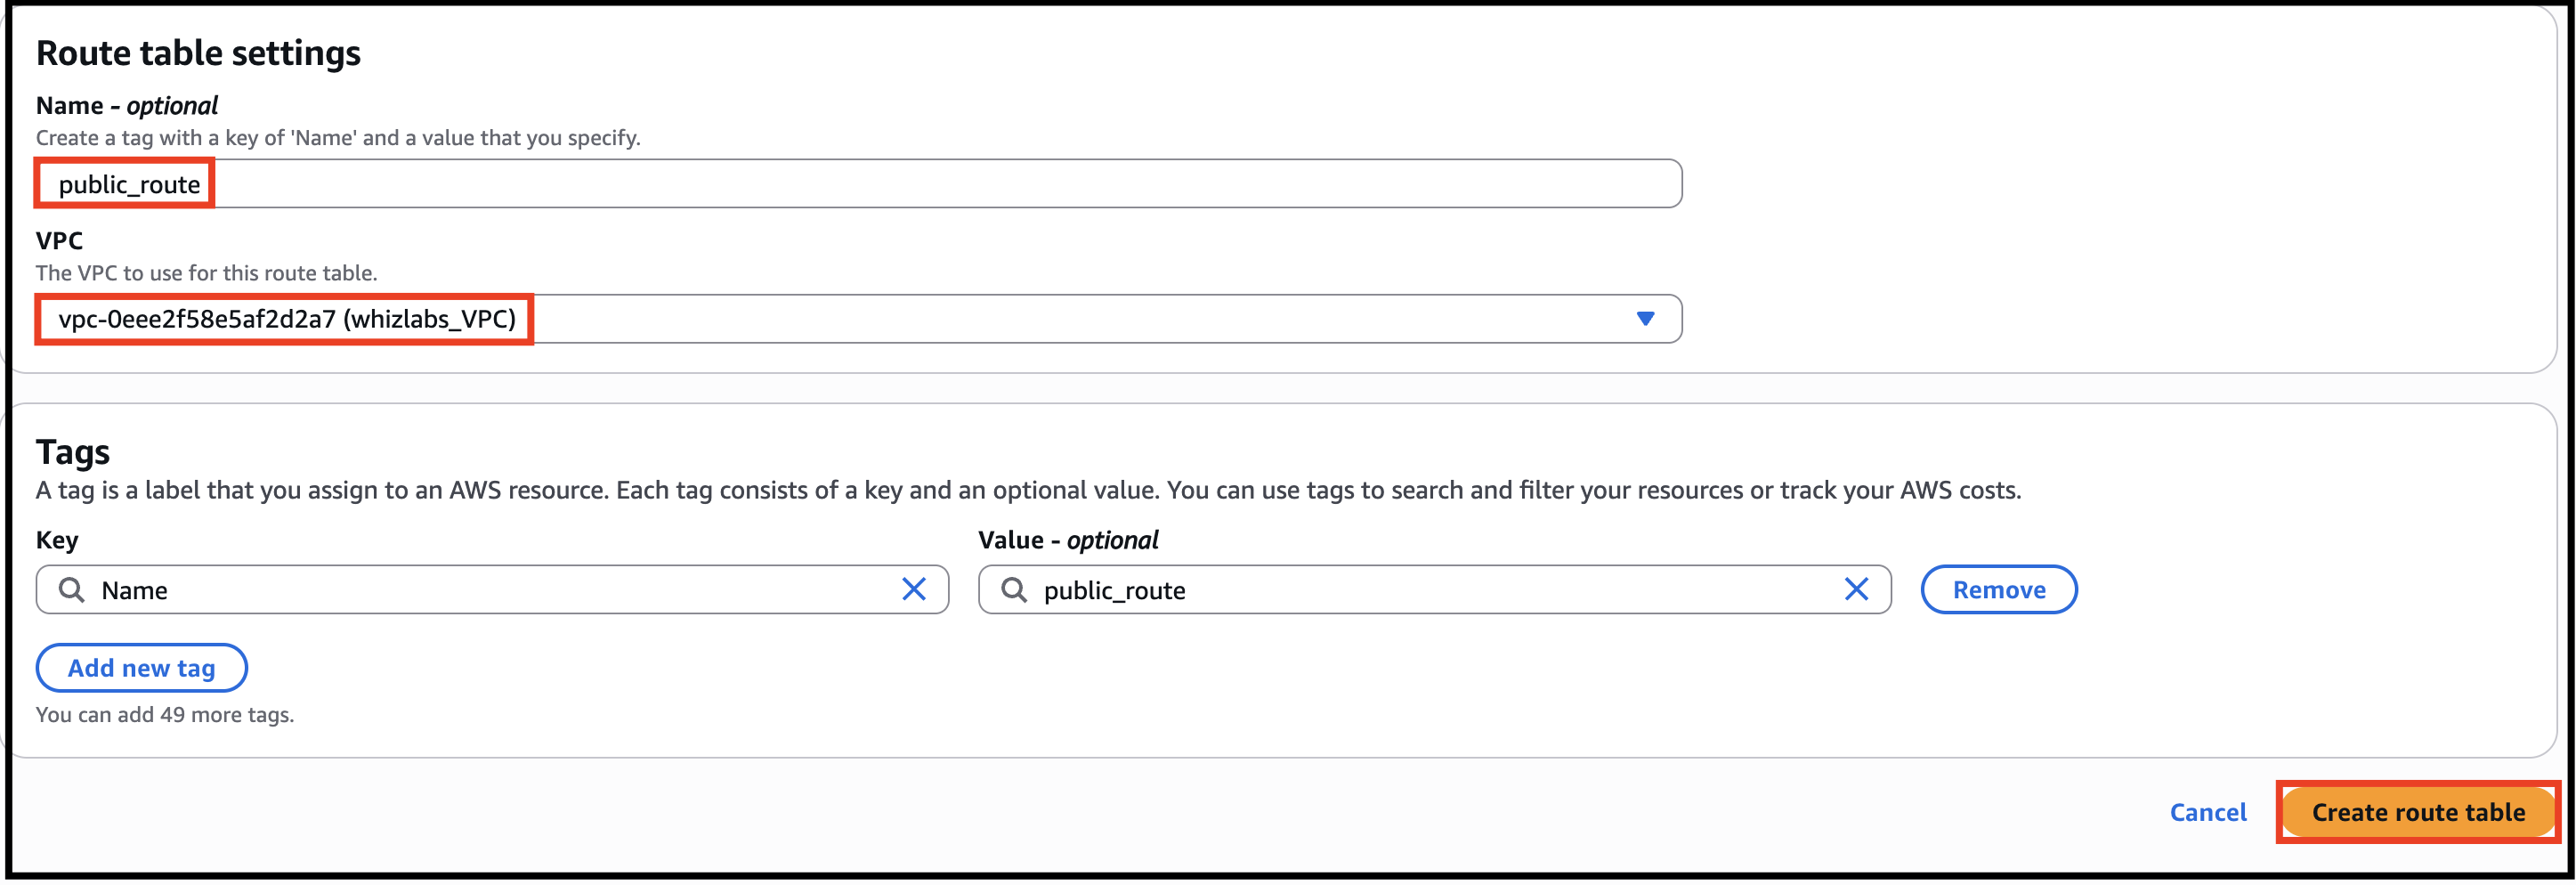
- Go to Route Tables from the left menu and click on Create route table button.
- Name tag: Enter public_route
- VPC: Select lab_VPC (Select the VPC you created from the dropdown)
- Click on Create route table button.
- Similarly, go to Route Tables from the left menu and click on Create route table.
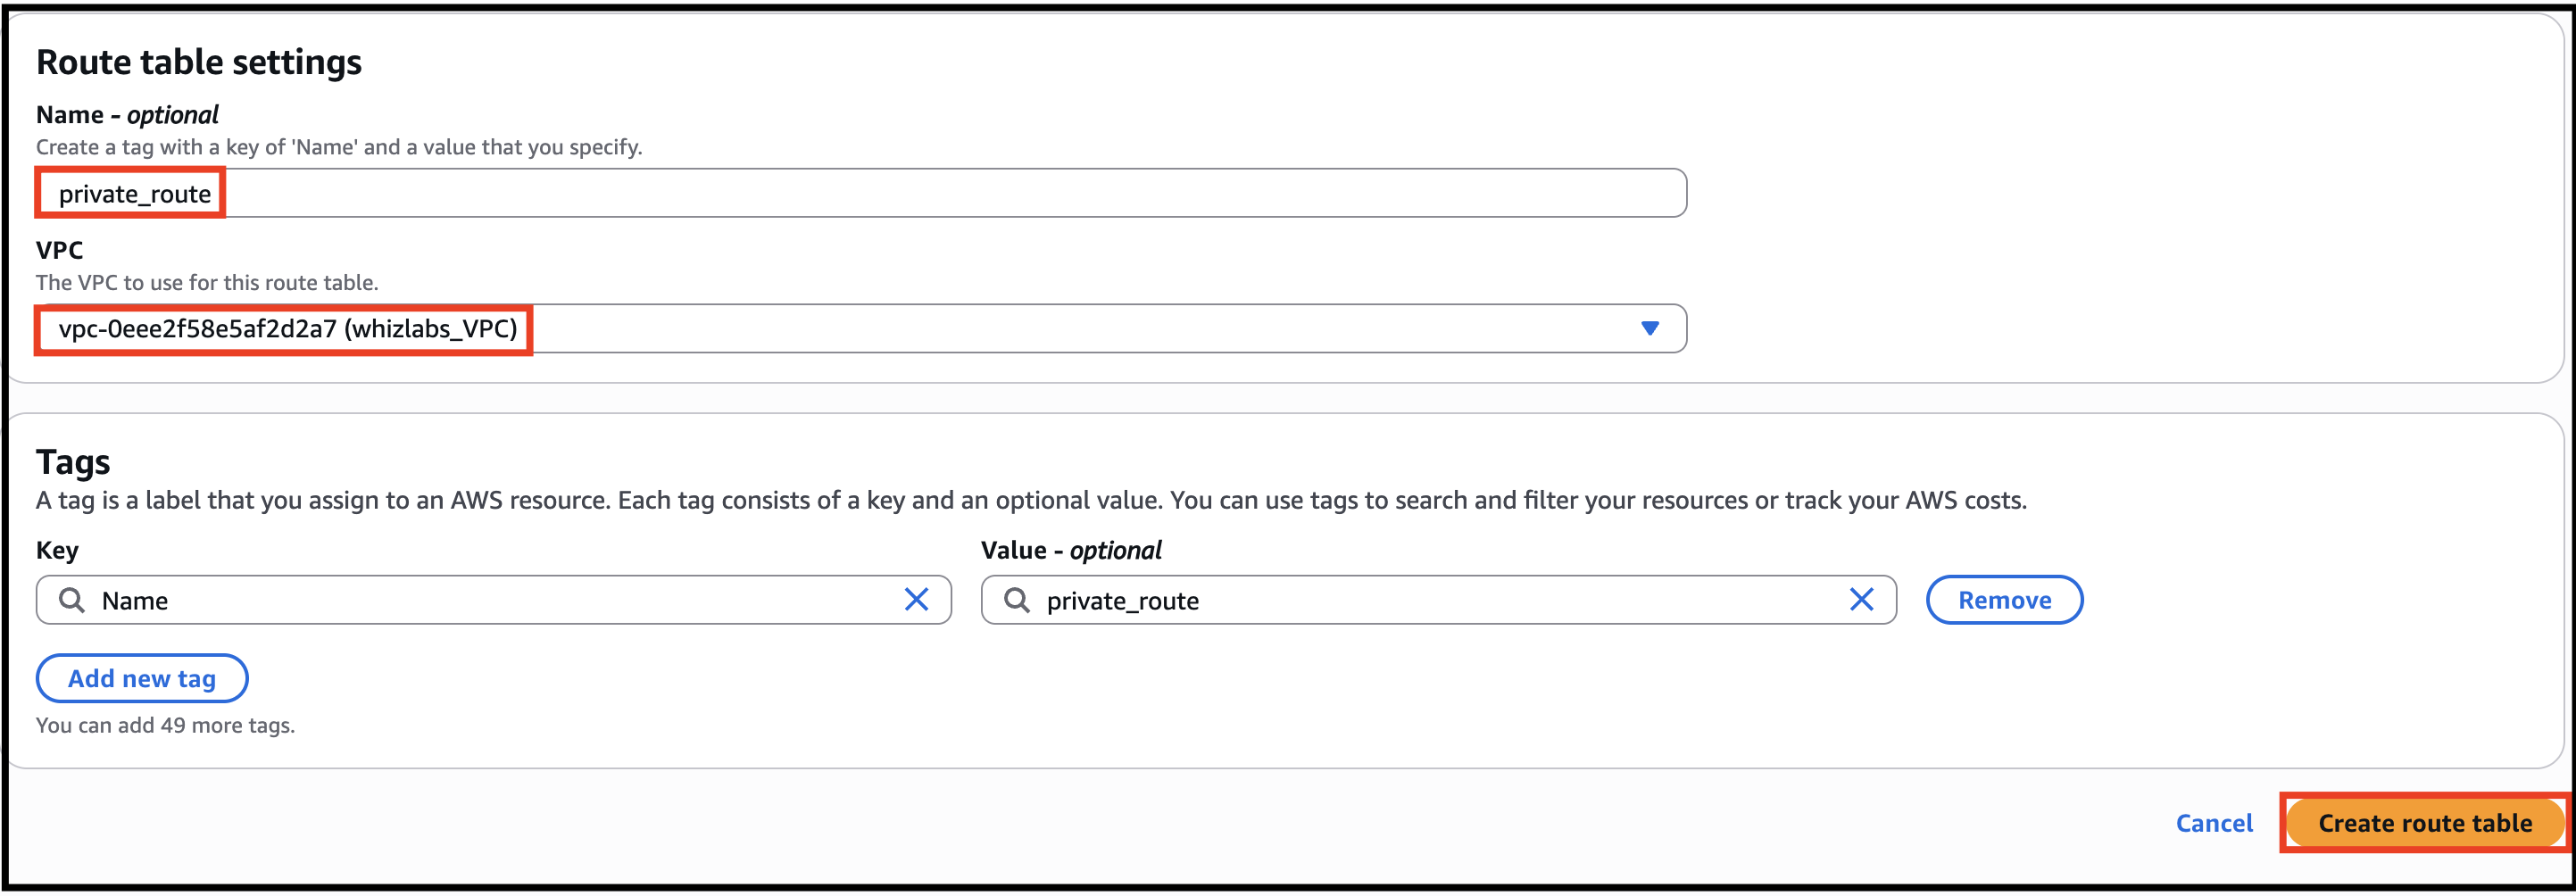
- Name tag: Enter private_route
- VPC: Select lab_VPC (Select the VPC you created from the dropdown)
- Click on Create route table button.

- Task 5: Creating Route tables, configuring routes and associating them with Subnets
- Now, you need to add routes to the Route Tables.
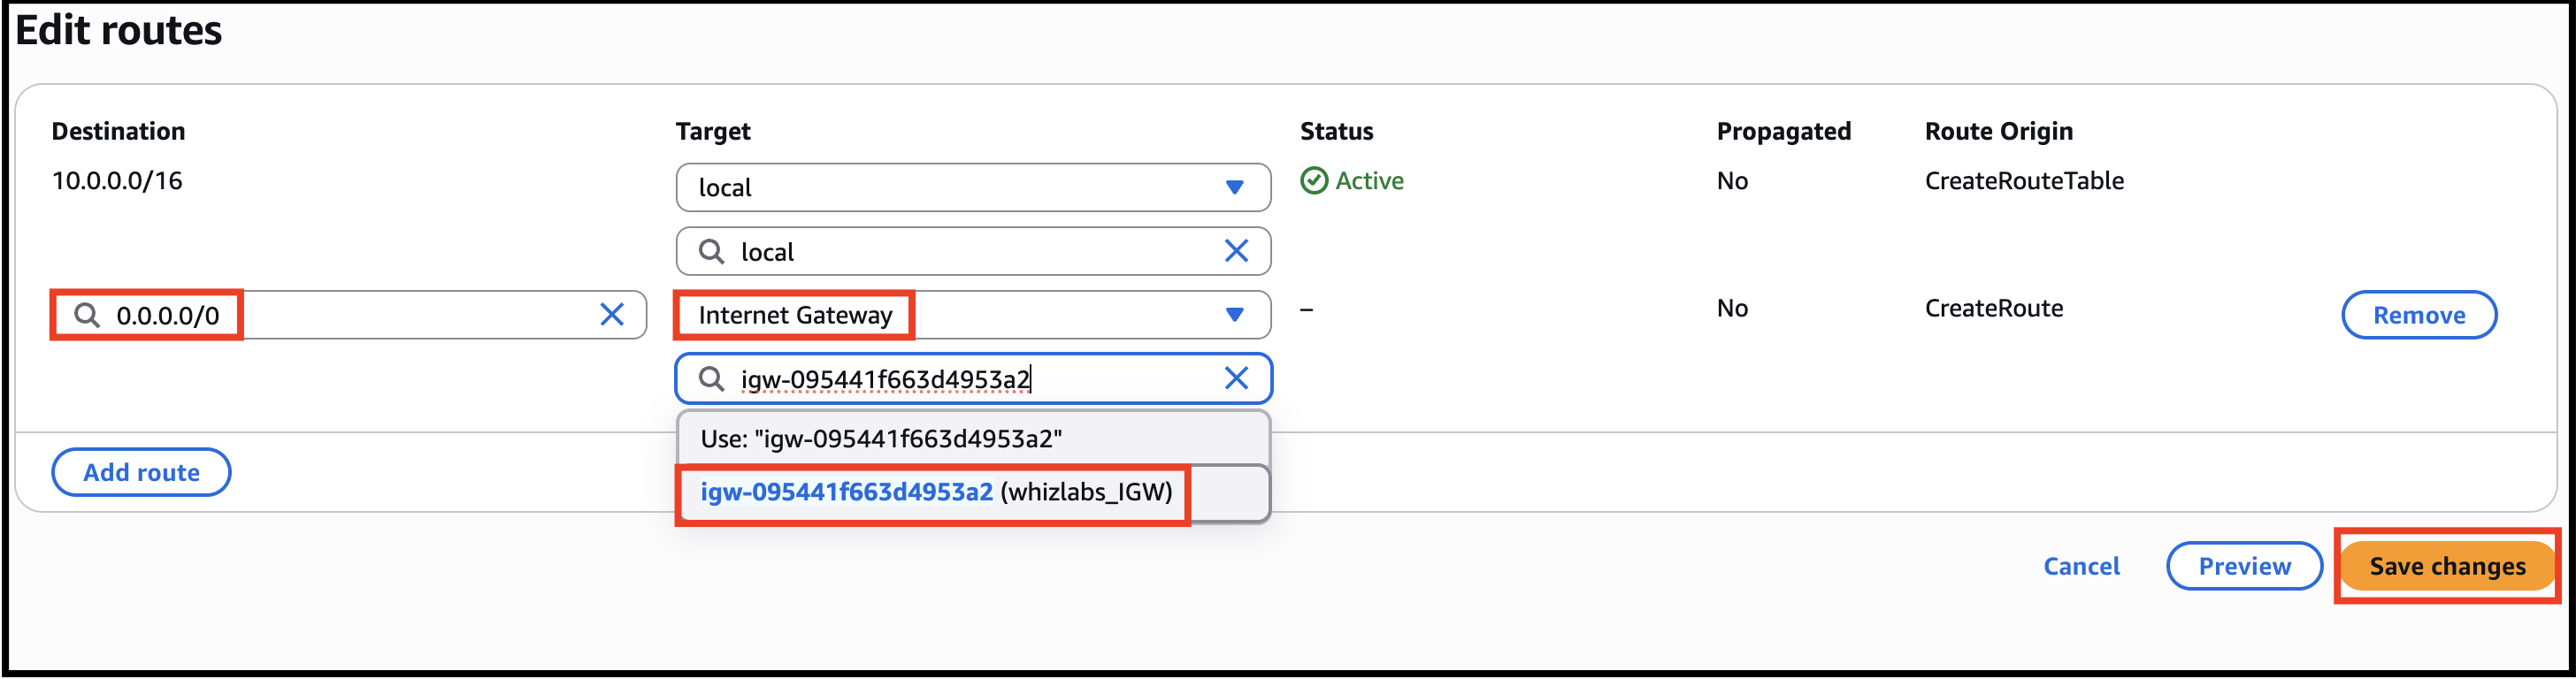
- Select public_route.
- Go to the Routes tab. Click on Edit routes. On the next page, click on Add route.
- Specify the following values: Destination: Enter 0.0.0.0/0 Target: Select Internet Gateway from the dropdown menu to select lab_IGW. Click on Save changes button.

- Specify the following values:
- Destination: Enter 0.0.0.0/0
- Target: Select Internet Gateway from the dropdown menu to select lab_IGW.
- Click on Save changes button.
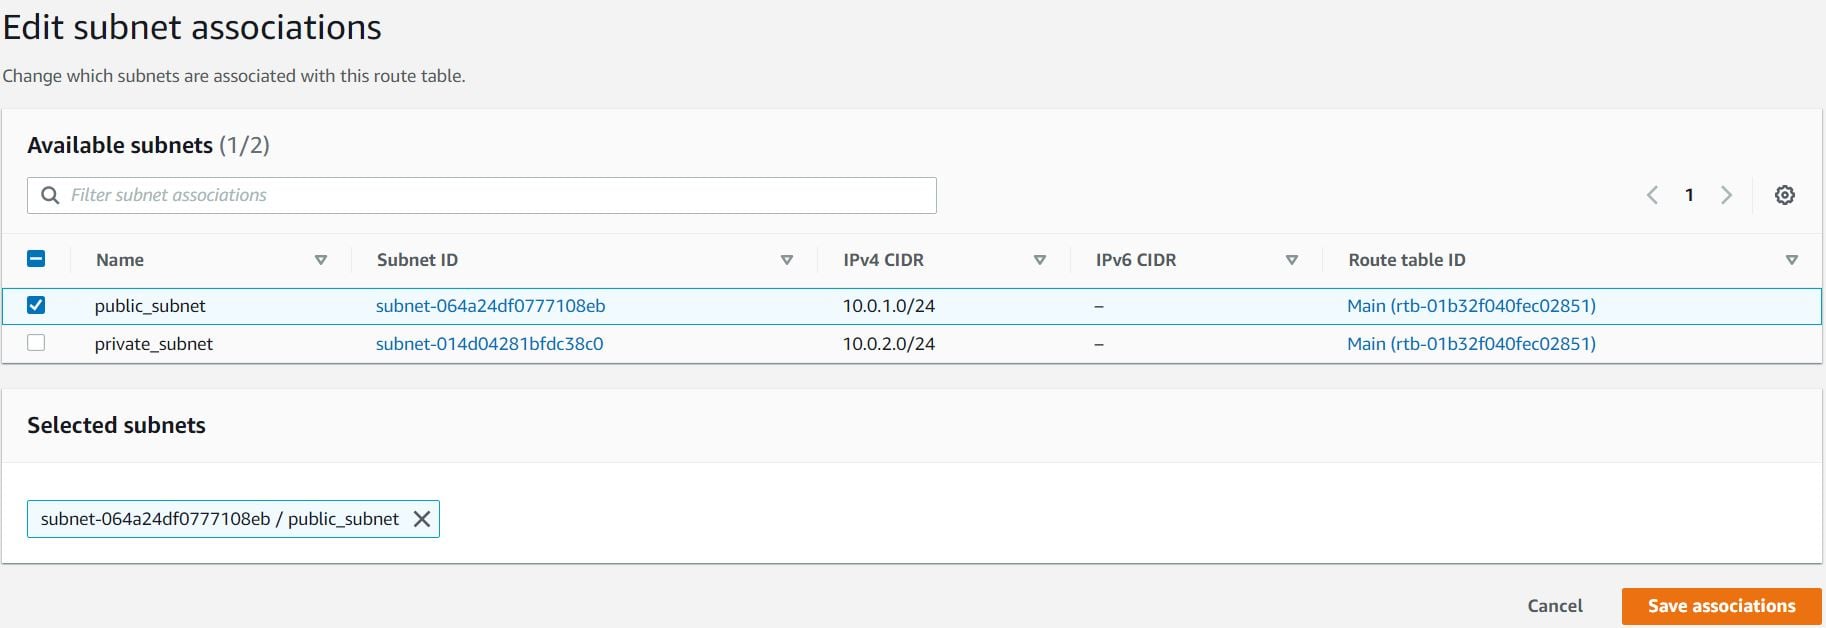
- Next, you need to associate the public_subnet with this public_route. Select the public_route and go to the Actions and in that go to Edit Subnet Associations tab. Click on Edit Subnet Associations. Select public_subnet from the list. Click on Save Associations button.
- Next, you need to associate the public_subnet with this public_route. Select the public_route and go to the Actions and in that go to Edit Subnet Associations tab.
- Click on Edit Subnet Associations.
- Select public_subnet from the list.
- Click on Save Associations button.
- Task 5: Creating Route tables, configuring routes and associating them with Subnets
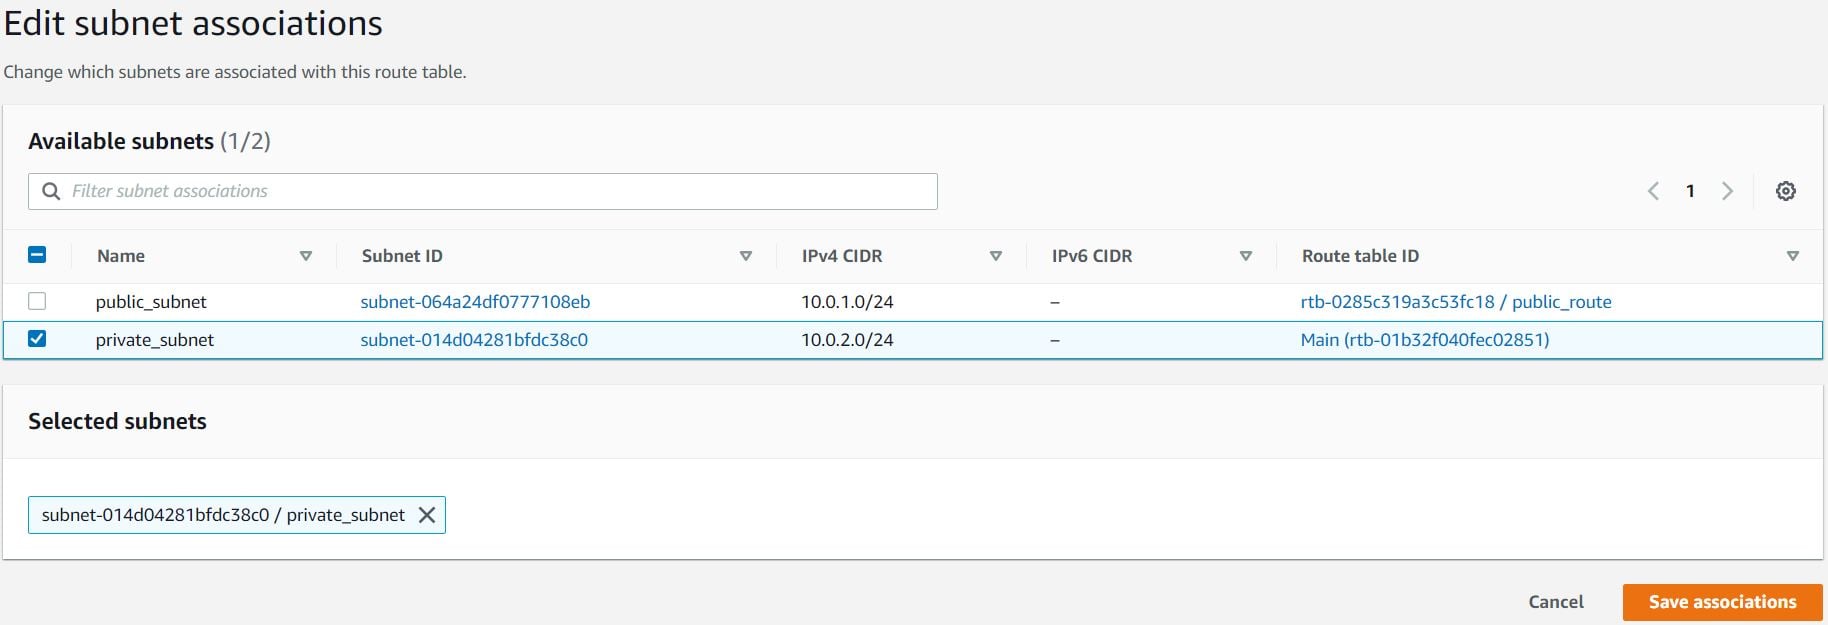
- Similarly, you need to associate the private_subnet with this private_route. Select the private_route and go to the Actions and in that go to Edit Subnet Associations tab. Click on Edit Subnet Associations. Select private_subnet from the list. Click on Save Associations button.
- Similarly, you need to associate the private_subnet with this private_route. Select the private_route and go to the Actions and in that go to Edit Subnet Associations tab.
- Click on Edit Subnet Associations.
- Select private_subnet from the list.
- Click on Save Associations button.
- Task 5: Creating Route tables, configuring routes and associating them with Subnets
- Destination – The IP address range for the traffic
- Target – Where the traffic should be directed (Internet Gateway, NAT Gateway, etc.)
- local route ? enables communication within the VPC
- 0.0.0/0 ? directs internet-bound traffic to the Internet Gateway
- In this task, we are going to create a security group for the EC2 Instance.
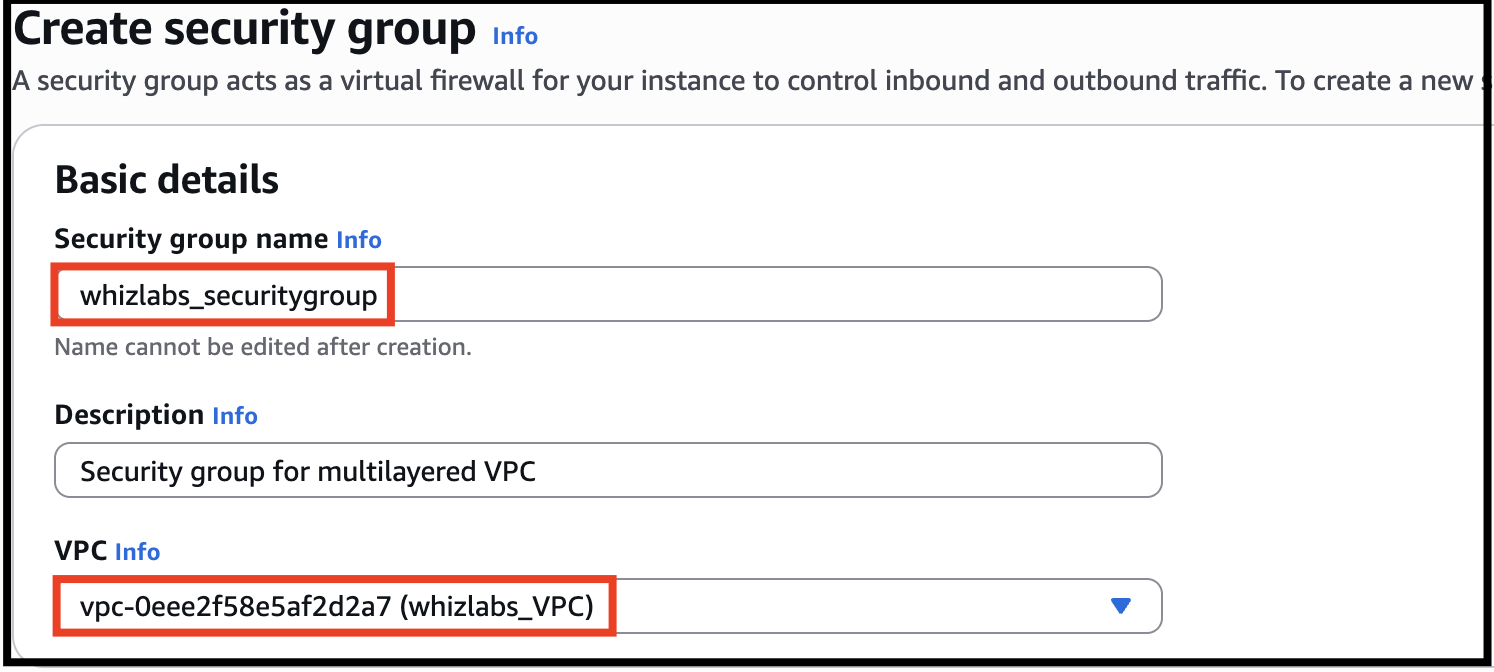
- Go to Security Group from the left menu and click on Create security group button and then provide the following details:
- Security group name: Enter lab_securitygroup
- Description: Enter Security group for multilayered VPC
- VPC: Select lab_VPC (select from the dropdown)

- Task 6: Creating Security Group
- Under Inbound Rules, click on Add Rule button.
- To add SSH, Choose Type: Select SSH Source: Anywhere-IPv4
- To add SSH,
- Choose Type: Select SSH
- Source: Anywhere-IPv4
- To add All ICMP - IPv4, Click on Add Rule Choose Type: Select All ICMP - IPv4 Source: Anywhere IPv4

- To add All ICMP - IPv4,
- Click on Add Rule
- Choose Type: Select All ICMP - IPv4
- Source: Anywhere IPv4

- Task 6: Creating Security Group

- Click on Create security group button.

- Stateful – If inbound traffic is allowed, the response is automatically allowed.
- Instance-level security – Applied directly to EC2 instances.
- Rule-based filtering – Controls traffic based on ports, protocols, and IP ranges.
- Network Access Control Lists (ACLs) in AWS are used to control inbound and outbound traffic at the subnet level. They act as virtual firewalls that provide an additional layer of security for your Amazon Virtual Private Cloud (VPC). In this task, we are going to create and configure Network ACL by adding required inbound and outbound rules.
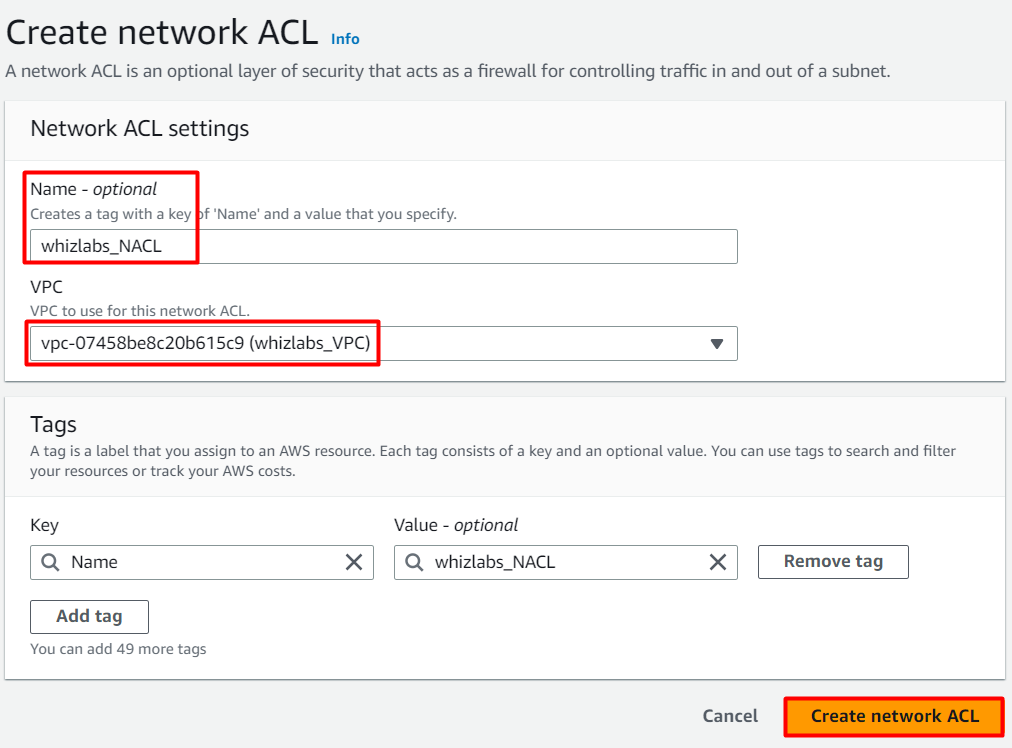
- Go to Network ACLs from the left menu and click on Create network ACL. Provide the following details:
- Name tag: Enter lab_NACL
- VPC: Select lab_VPC (Select the VPC which you created from the dropdown)
- Click on Create network ACL button.
- Task 7: Creating and configuring Network ACL
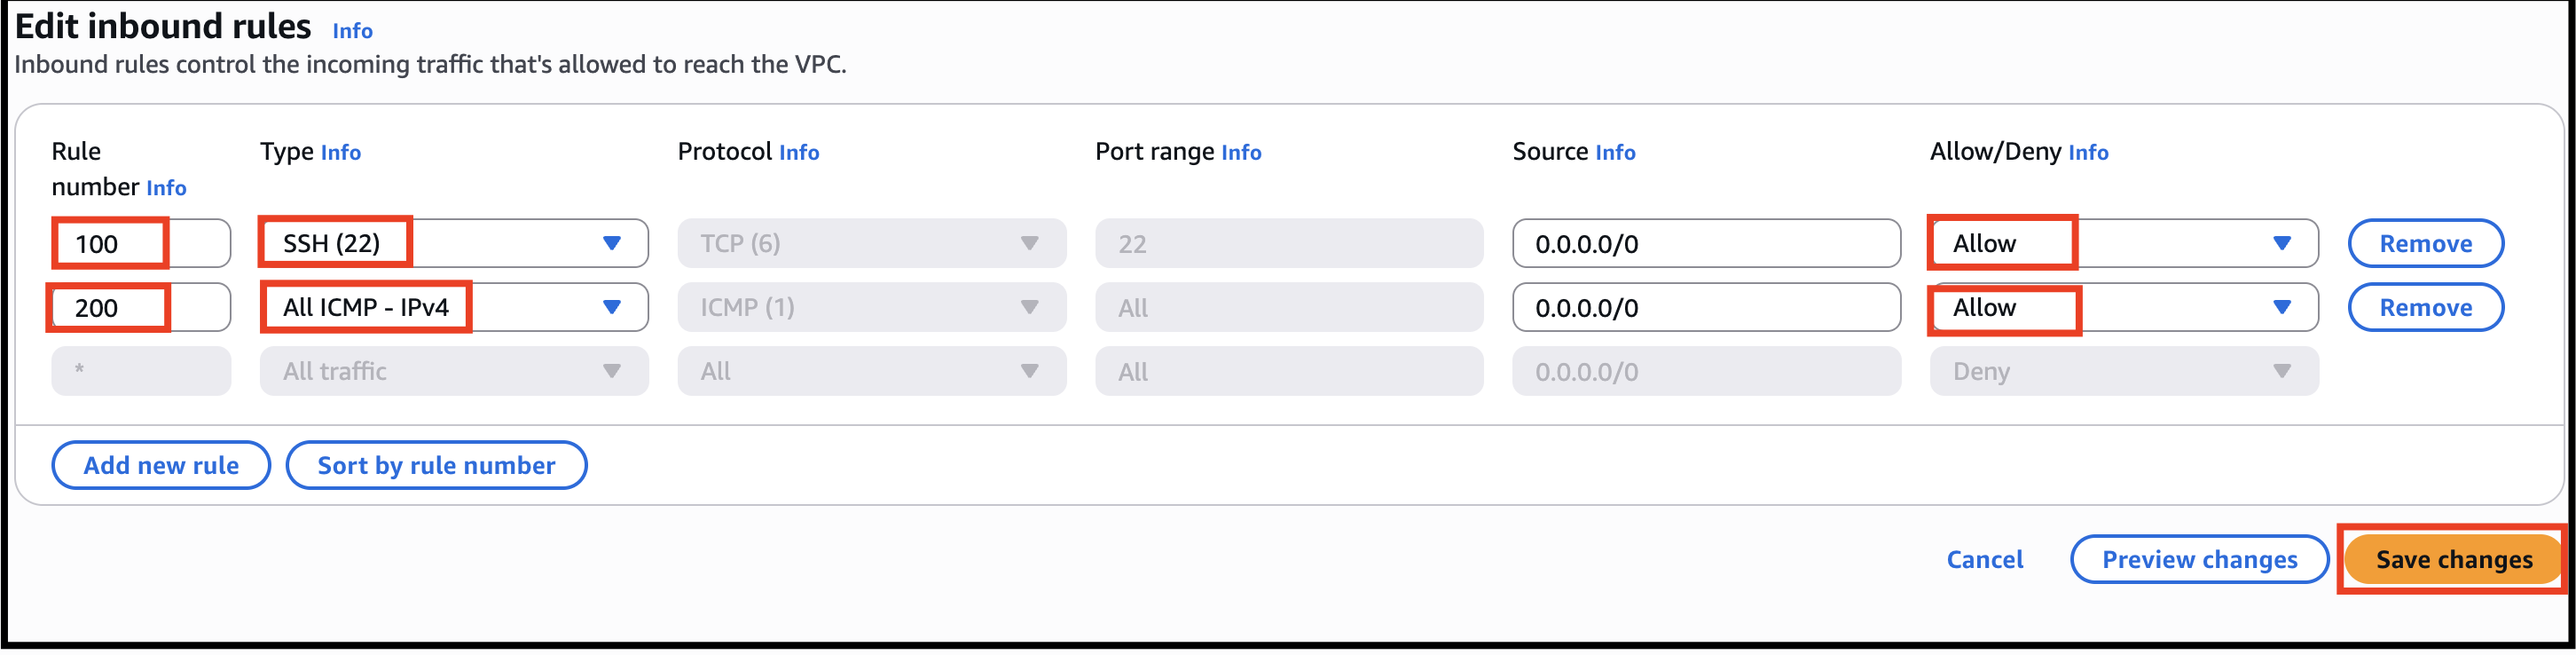
- Select lab_NACL and go to Inbound rules tab. Click on Edit inbound rules and then click on the Add new rule.
- Add the following rules:
- For SSH, click on Add new rule, Rule number : Enter 100 Type: Choose SSH (22) Source: Enter 0.0.0.0/0 Allow / Deny: Select Allow
- For SSH, click on Add new rule,
- Rule number : Enter 100
- Type: Choose SSH (22)
- Source: Enter 0.0.0.0/0
- Allow / Deny: Select Allow
- For ALL ICMP- IPv4, click on Add new rule, Rule number : Enter 200 Type: Choose ALL ICMP - IPv4 Source: Enter 0.0.0.0/0 Allow / Deny: Select Allow
- For ALL ICMP- IPv4, click on Add new rule,
- Rule number : Enter 200
- Type: Choose ALL ICMP - IPv4
- Source: Enter 0.0.0.0/0
- Allow / Deny: Select Allow
- Click on Save changes button.

- Task 7: Creating and configuring Network ACL
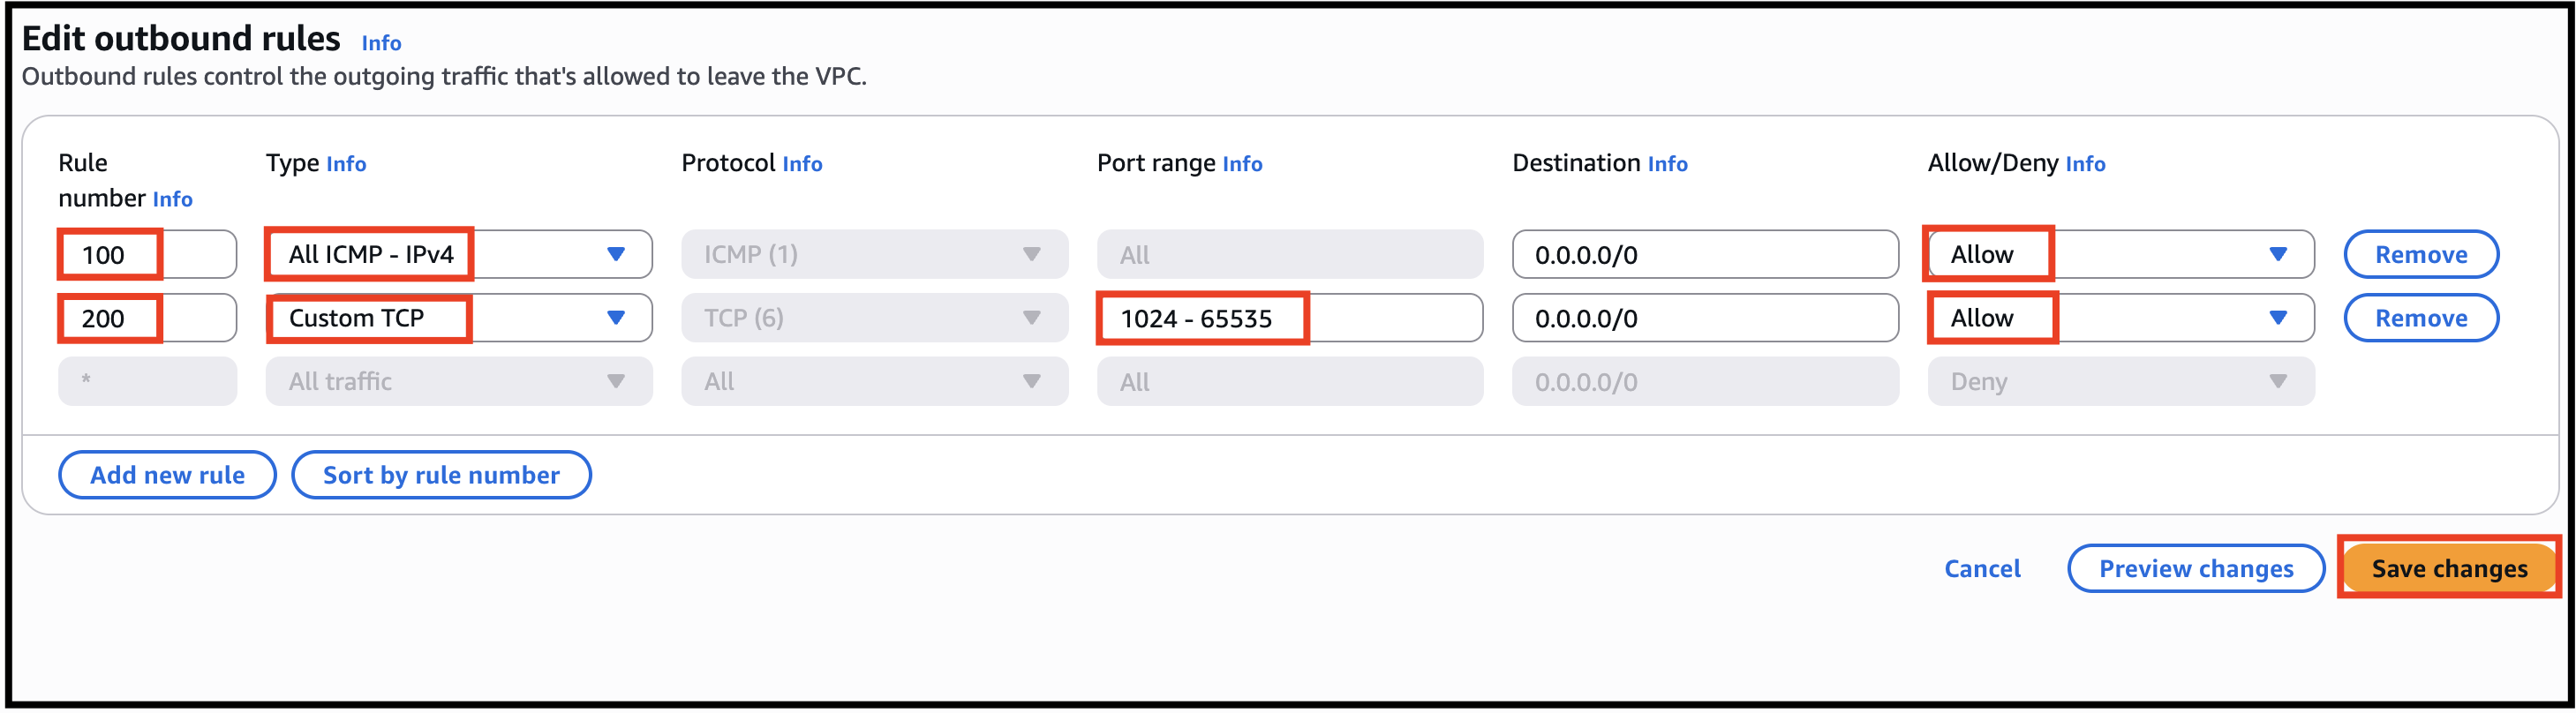
- NACLs are stateless. You need to add the rules in Outbound rules too.
- Select lab_NACL and go to Outbound rules tab. Click on Edit Outbound rules and then click on the Add Rule button.
- For ALL ICMP- IPv4, click on Add new rule, Rule# : Enter 100 Type: Choose ALL ICMP - IPv4 Destination: Enter 0.0.0.0/0 Allow / Deny: Select Allow
- For ALL ICMP- IPv4, click on Add new rule,
- Rule# : Enter 100
- Type: Choose ALL ICMP - IPv4
- Destination: Enter 0.0.0.0/0
- Allow / Deny: Select Allow
- For Custom TCP Rule, click on Add new rule, Rule# : Enter 200 Type: Choose Custom TCP Rule Port Range: Enter 1024 - 65535 Destination: Enter 0.0.0.0/0 Allow / Deny: Select Allow
- For Custom TCP Rule, click on Add new rule,
- Rule# : Enter 200
- Type: Choose Custom TCP Rule
- Port Range: Enter 1024 - 65535
- Destination: Enter 0.0.0.0/0
- Allow / Deny: Select Allow
- Click on Save changes button.
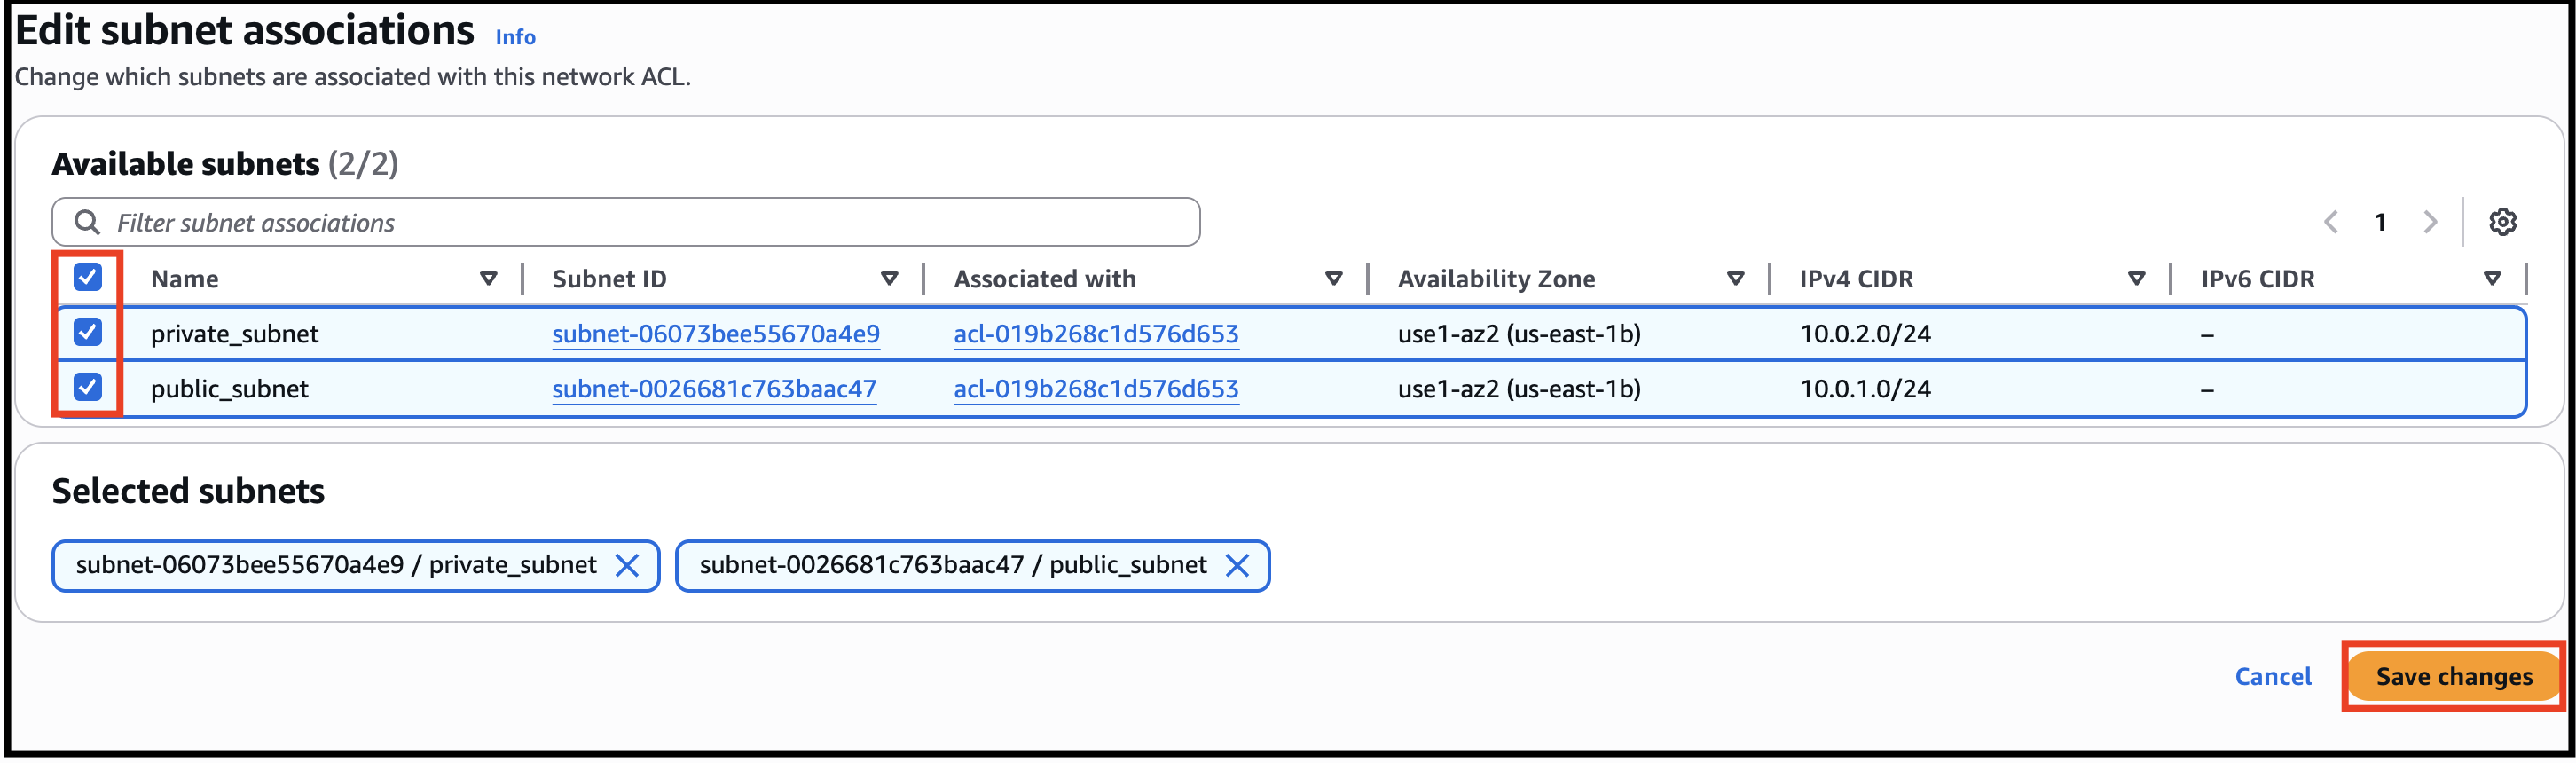
- You need to associate both public and private subnets with the NACL.
- Select lab_NACL and go to the Subnet associations tab. Click on Edit subnet associations.
- Choose all the available subnets and then click on Save changes button.

- Task 7: Creating and configuring Network ACL
- Stateless filtering – Return traffic must be explicitly allowed.
- Subnet-level control – Applied to entire subnets instead of individual instances.
- Rule numbering system – Lower rule numbers are evaluated first.
- Navigate to Services and choose EC2 under Compute
- Navigate to Instances on the left panel and click on Launch Instances button.
- Name : Enter public_instance
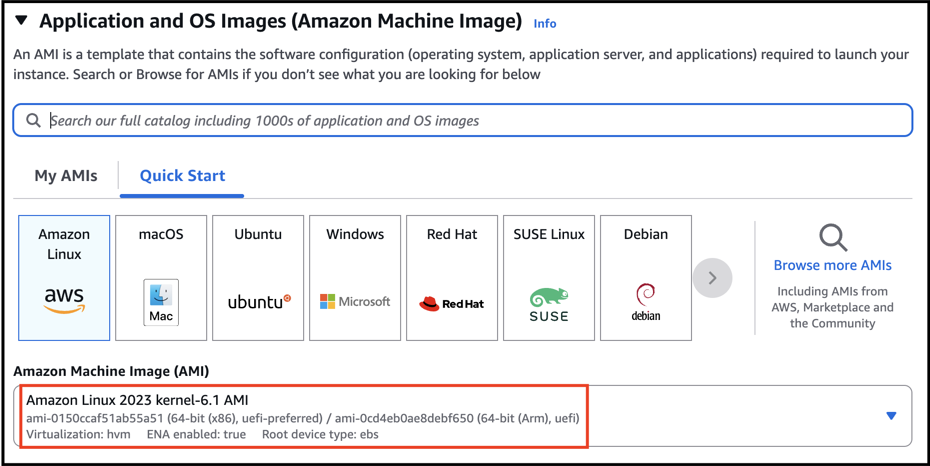
- For Amazon Machine Image (AMI): Search for Amazon Linux 2023 AMI in the search box and click on the select button.
- Task 8: Launching 2 EC2 Instances
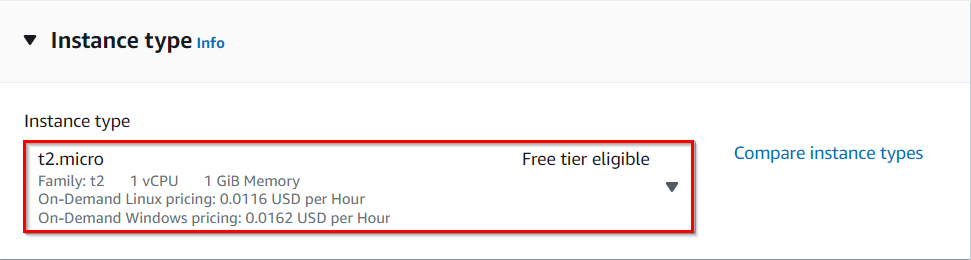
- For Instance Type: Select t2.micro
- Task 8: Launching 2 EC2 Instances
- For Key pair: Select Create a new key pair Button Key pair name: WhizKey Key pair type: RSA Private key file format: .pem
- For Key pair: Select Create a new key pair Button
- Key pair name: WhizKey
- Key pair type: RSA
- Private key file format: .pem
- Select Create key pair Button.
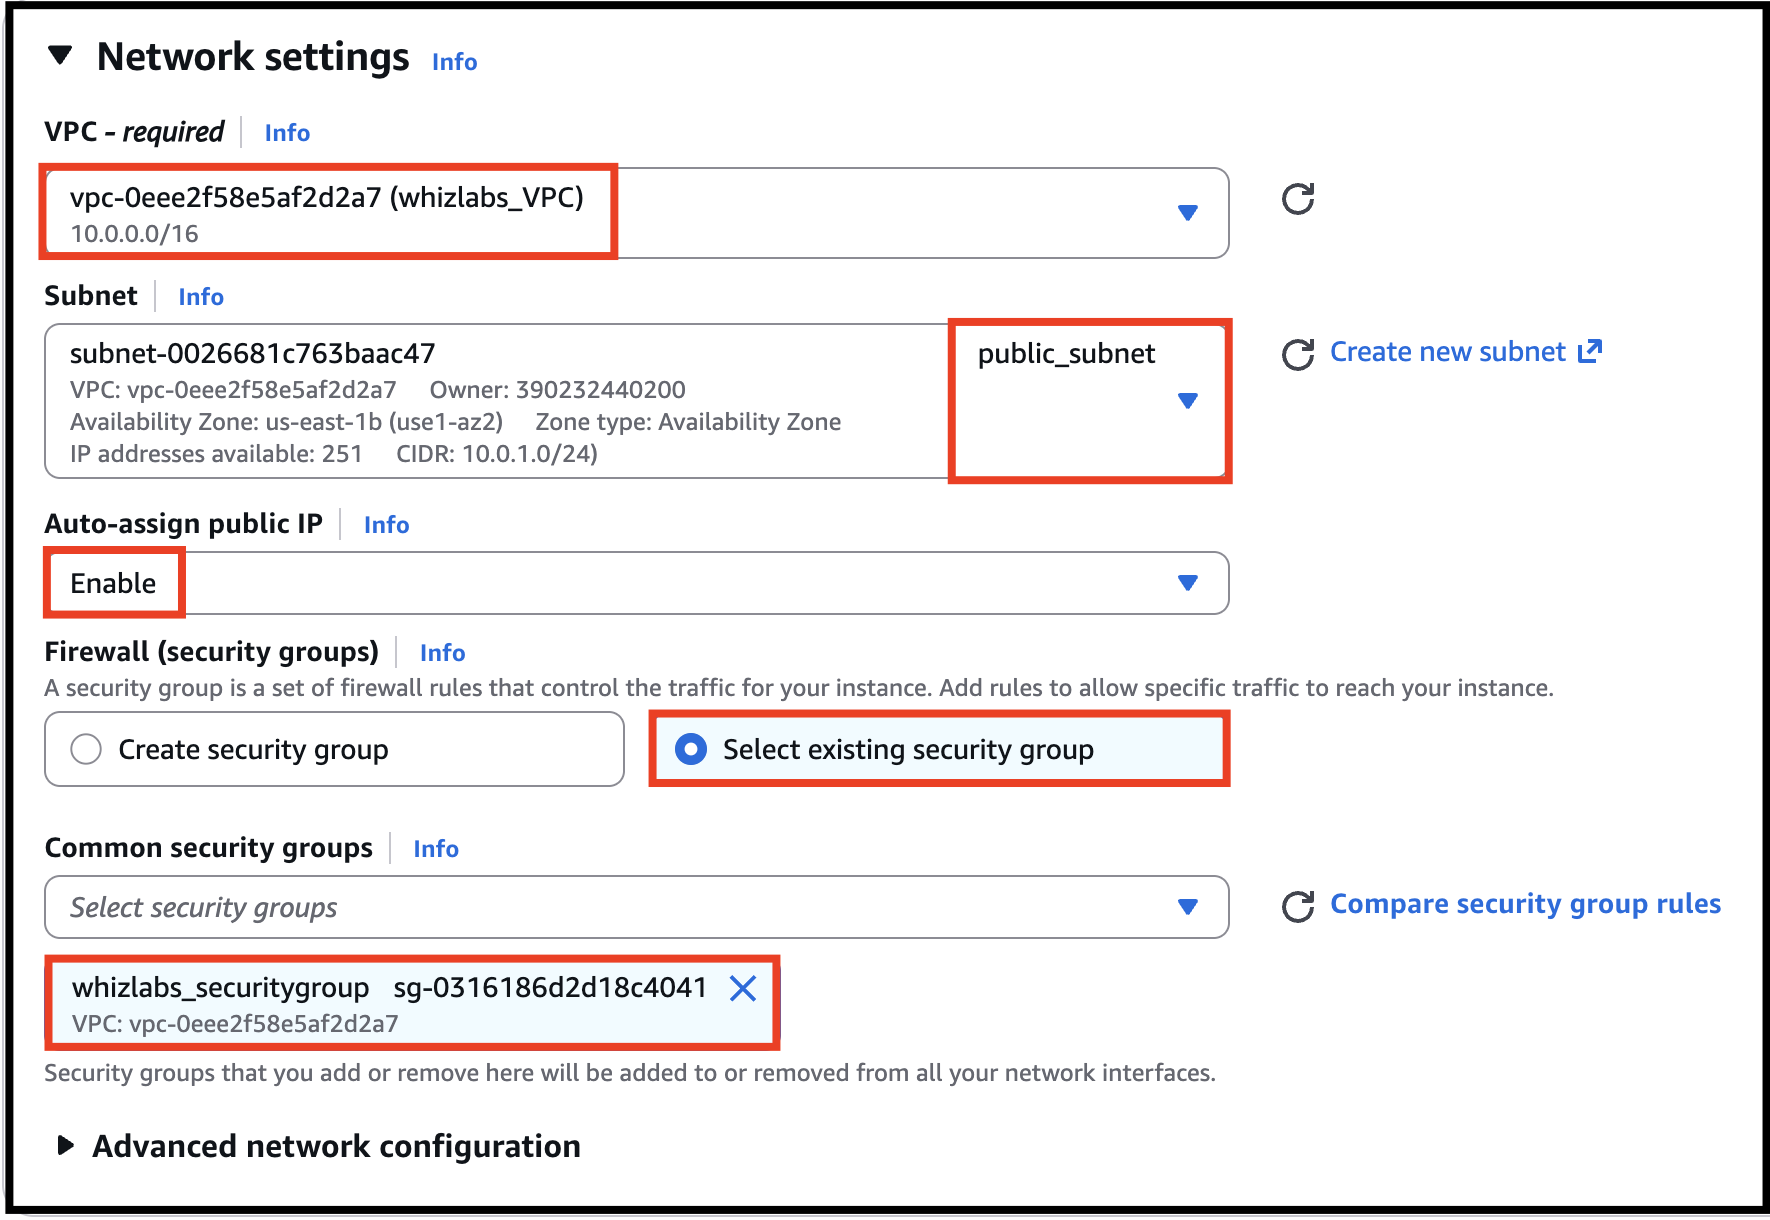
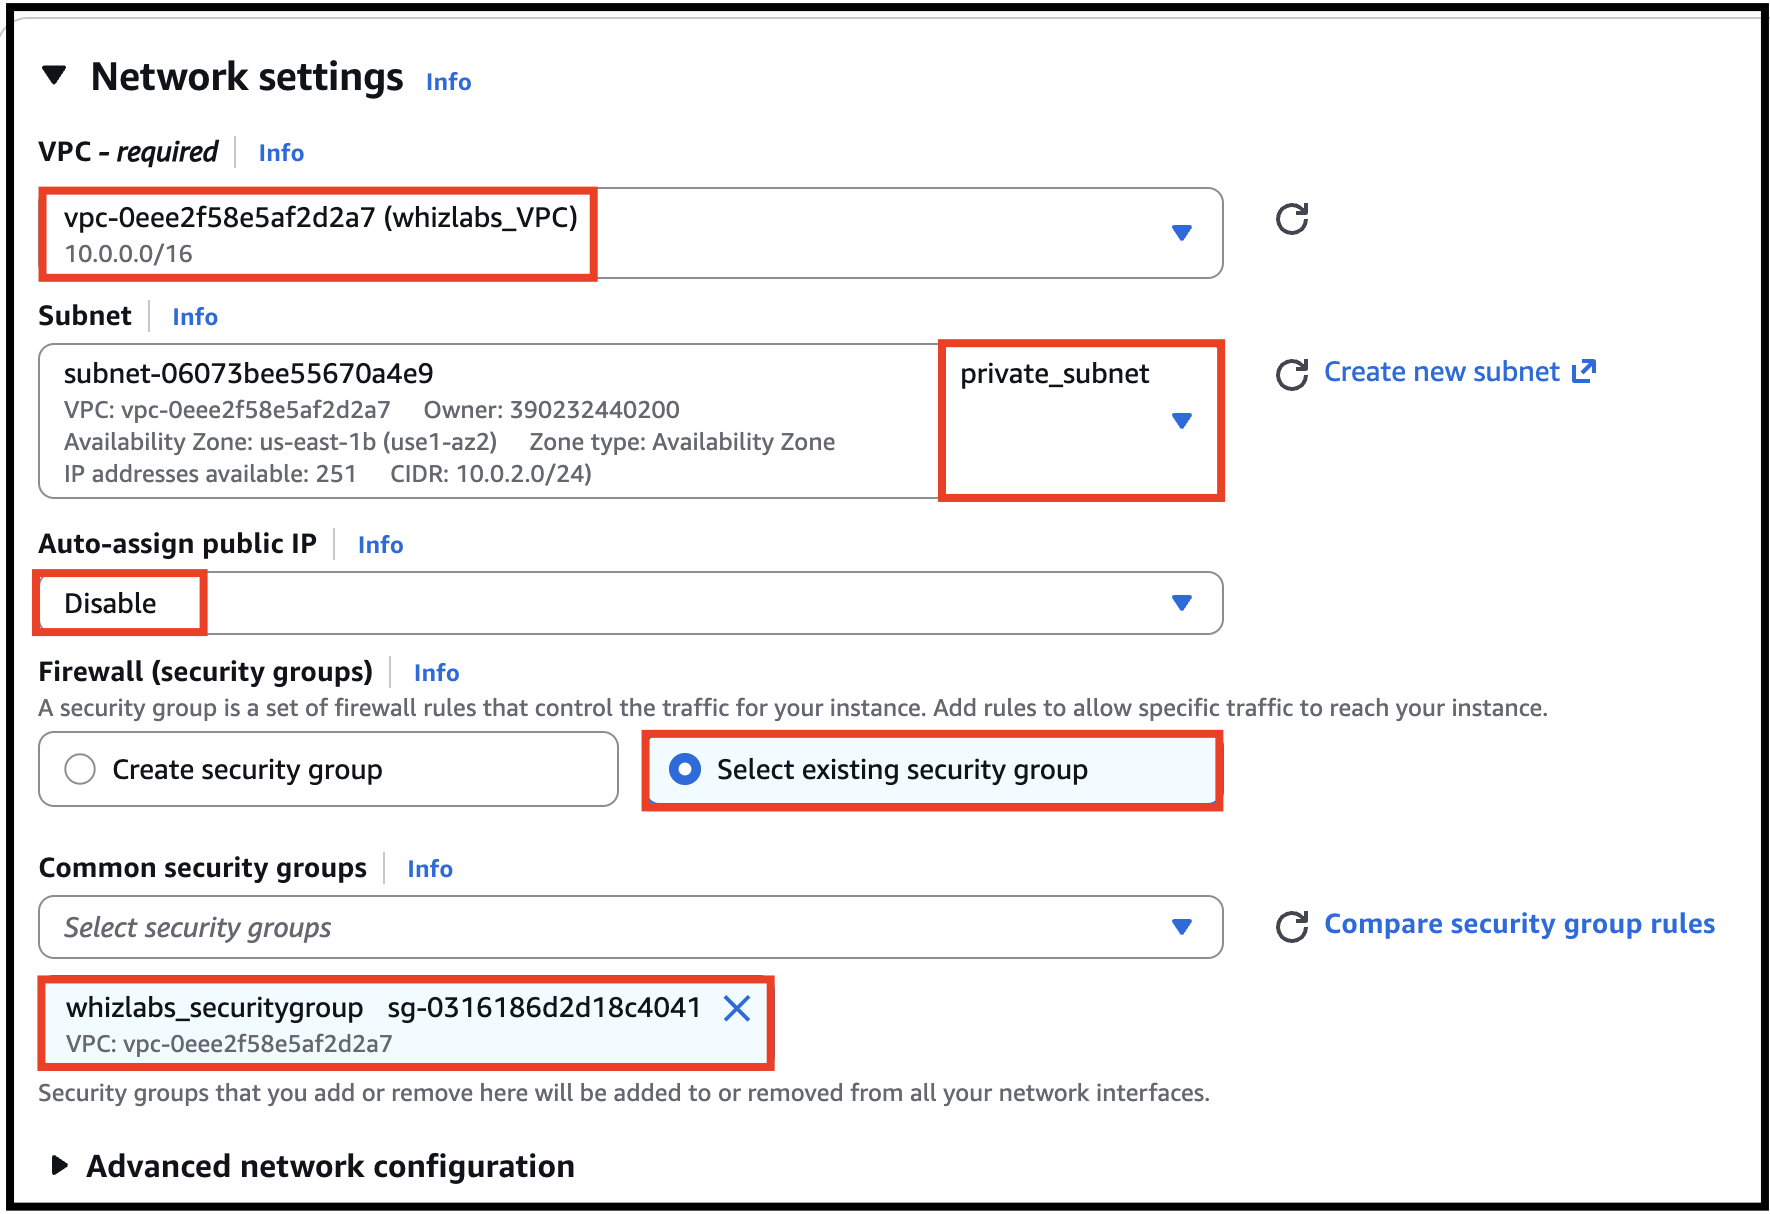
- In Network Settings Click on Edit button: VPC: Select lab_VPC Subnet: Select public_subnet Auto-assign public IP: Enable Choose Select an existing security group and remove default one then select lab_securitygroup

- In Network Settings Click on Edit button:
- VPC: Select lab_VPC
- Subnet: Select public_subnet
- Auto-assign public IP: Enable
- Choose Select an existing security group and remove default one then select lab_securitygroup

- Task 8: Launching 2 EC2 Instances
- Keep Rest thing Default and Click on Launch Instance Button.
- Select View all Instances to View Instance you Created
- Similar to the above, launch another EC2 instance:
- Name the instance as private_instanceInstance type: t2.micro
- Name the instance as private_instance
- Instance type: t2.micro
- Key pair : Select the existing one (WhizKey)
- VPC: Select lab_VPC
- Subnet: Select private_subnet
- Auto-assign public IP: Disable
- Choose Select an existing security group and remove default one then select lab_securitygroup

- Task 8: Launching 2 EC2 Instances
- Keep Rest thing Default and Click on Launch Instance Button.
- Select View all Instances to View Instance you Created.
- Public Layer – Web servers accessible from the internet
- Application Layer – Backend services in private subnets
- Database Layer – Databases isolated from direct internet access
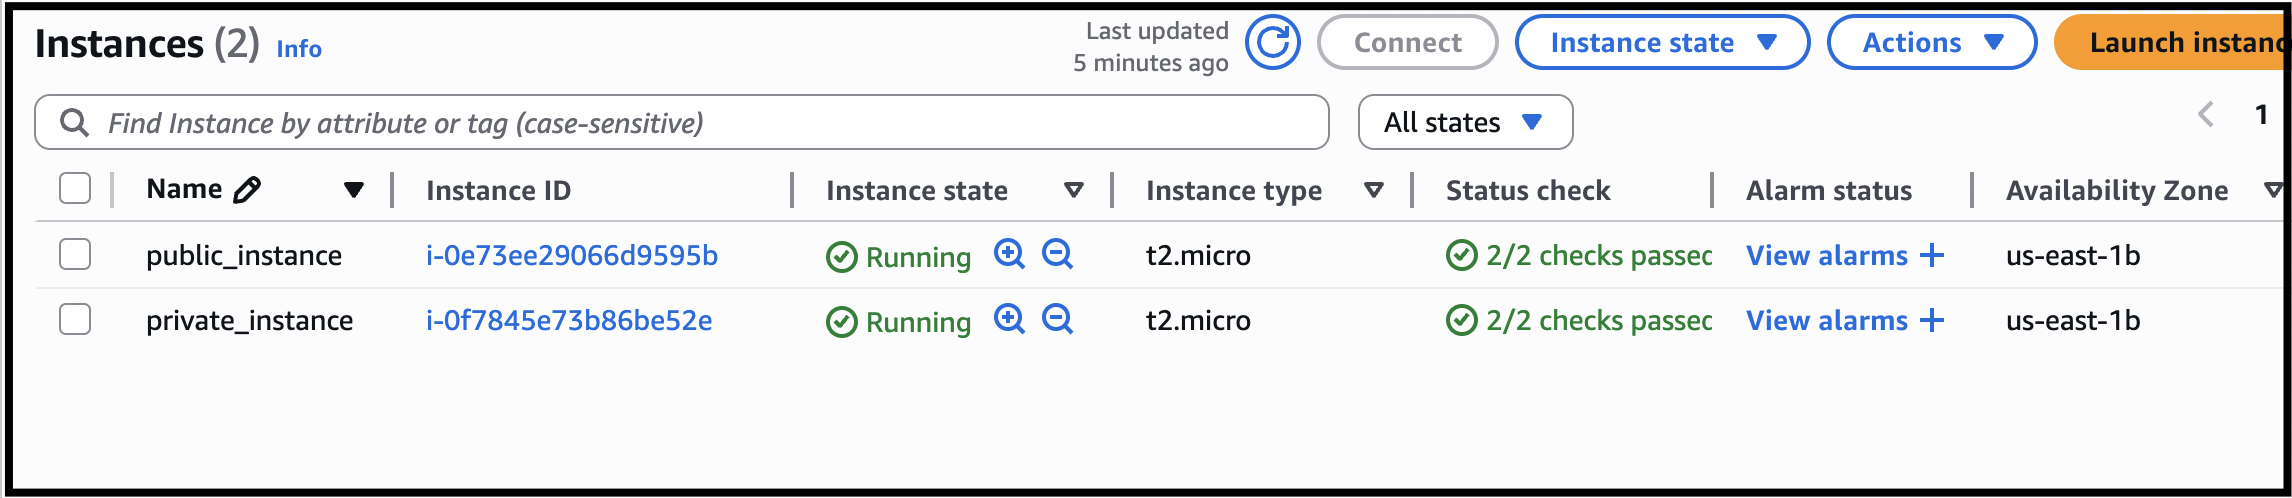
- Now you'll be able to see both the Instances.
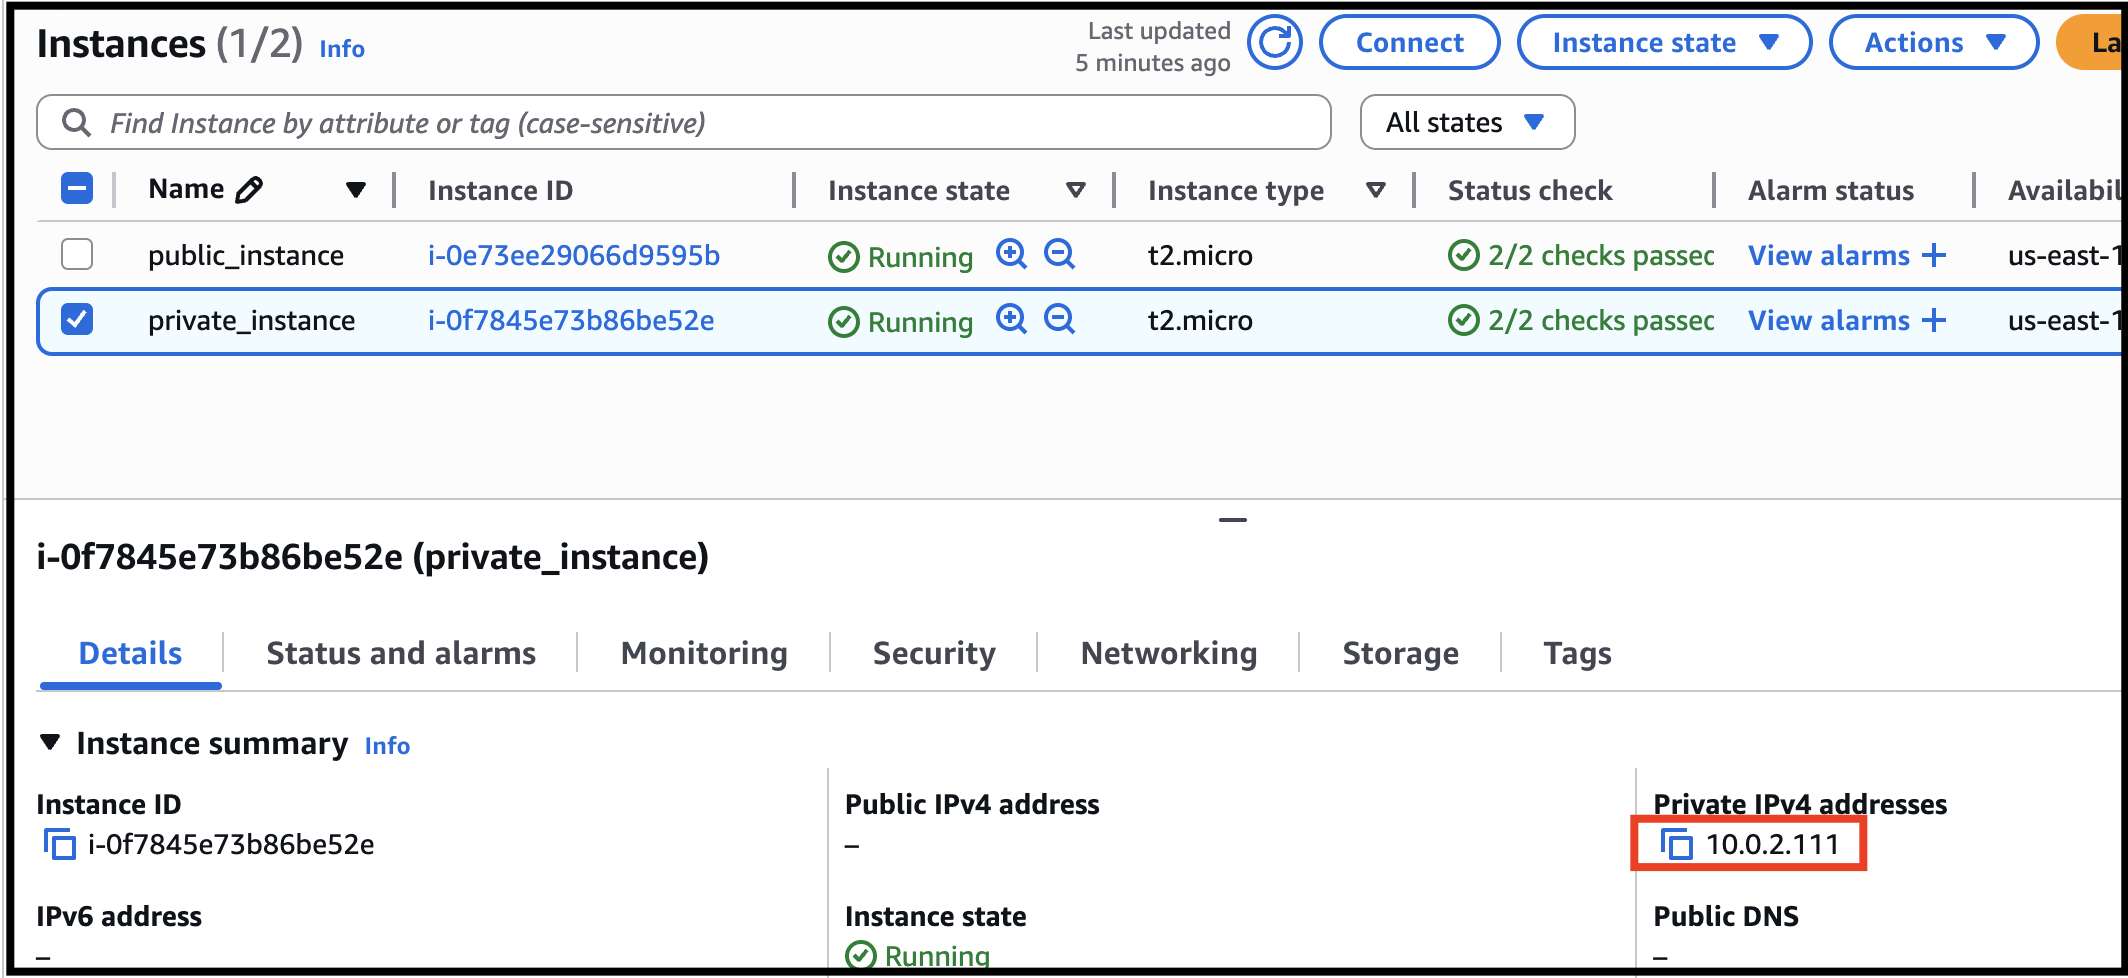
- Copy the Private IPv4 Address of the private_instance.

- Task 9: Testing the EC2 instances
- SSH into public_instance EC2 Instance.
- Please follow the steps in SSH into EC2 Instance.
- Ping the private IP of your private_instance by using the below command: ping <your Private EC2 IPv4 address>
- Ping the private IP of your private_instance by using the below command:
- ping <your Private EC2 IPv4 address>
- Once you execute this command, you will receive a response from the IP.
- Task 9: Testing the EC2 instances
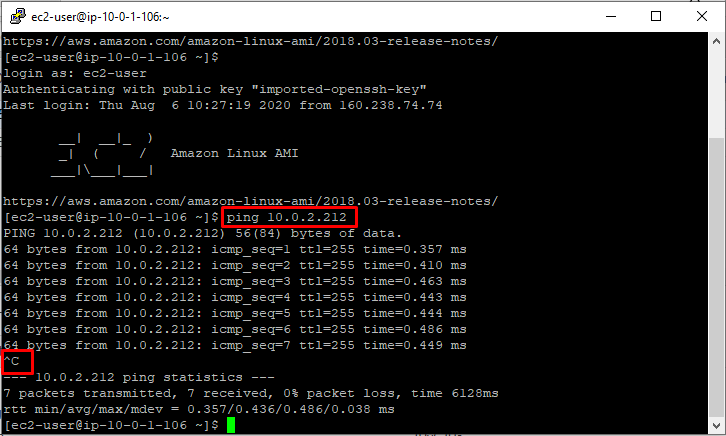
- Press [Ctrl] + C to cancel the process.
- Security groups are applied at the instance level and provide stateful control over traffic, while NACLs are applied at the subnet level and provide stateless control over traffic.
- Once the lab steps are completed, please click on the Validation button on the left side panel.
- This will validate the resources in the AWS account and displays whether you have completed this lab successfully or not.
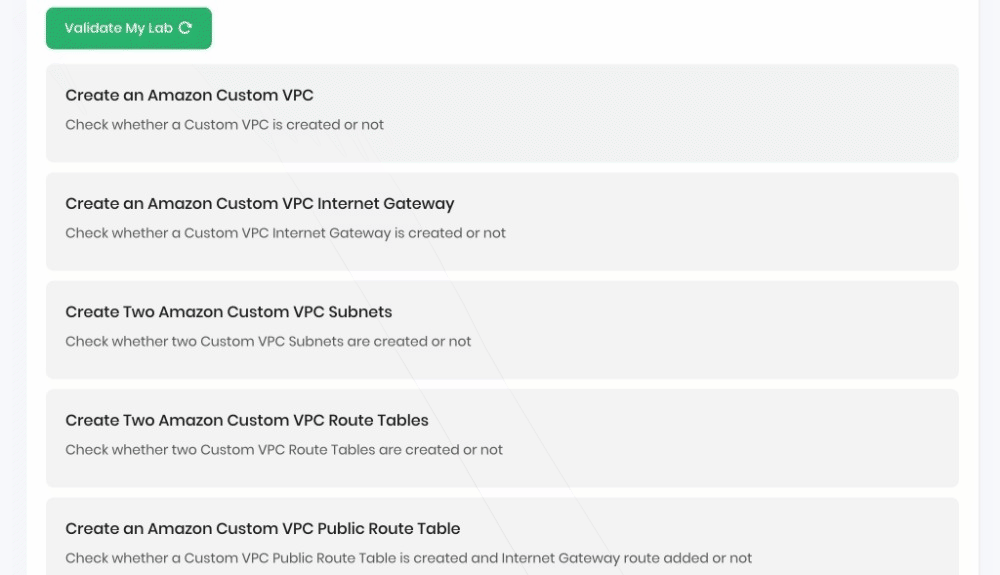
- Sample output :
- Task 10 : Validation of the Lab
- You have successfully created a new VPC.
- You have successfully created and attached an Internet Gateway.
- You have successfully created two subnets for public and private AWS instances.
- You have successfully created and configured the Route Table.
- You have successfully created a Security Group.
- You have successfully created and configured Network ACL.
- You have successfully launched 2 EC2 instances (one in a public subnet and one in a private subnet).
- You have successfully tested the EC2 instance.
- Sign out from the AWS Account.
- You have successfully completed the lab.
- Once you have completed the steps click on End Lab from the lab console.