- Click on the Open Console button, and you will get redirected to AWS Console in a new browser tab.
- On the AWS sign-in page, Leave the Account ID as default. Never edit/remove the 12-digit Account ID present in the AWS Console. Otherwise, you cannot proceed with the lab. Now copy your User Name and Password in the Lab Console to the IAM Username and Password in the AWS Console and click on the Sign-in button.
- On the AWS sign-in page,
- Leave the Account ID as default. Never edit/remove the 12-digit Account ID present in the AWS Console. Otherwise, you cannot proceed with the lab.
- Now copy your User Name and Password in the Lab Console to the IAM Username and Password in the AWS Console and click on the Sign-in button.
- Once Signed In to the AWS Management Console, make the default AWS Region as US East (N. Virginia) us-east-1.
- In this task, we are going to create and launch an EC2 Instance with the required configurations.
- Make sure you are in the N.Virginia Region.
- Navigate to EC2 by clicking on the Services menu at the top, then click on EC2 under Compute section.
- Navigate to Instances on the left panel and click on the Launch Instances button.
- Enter Name as MyVPNServer
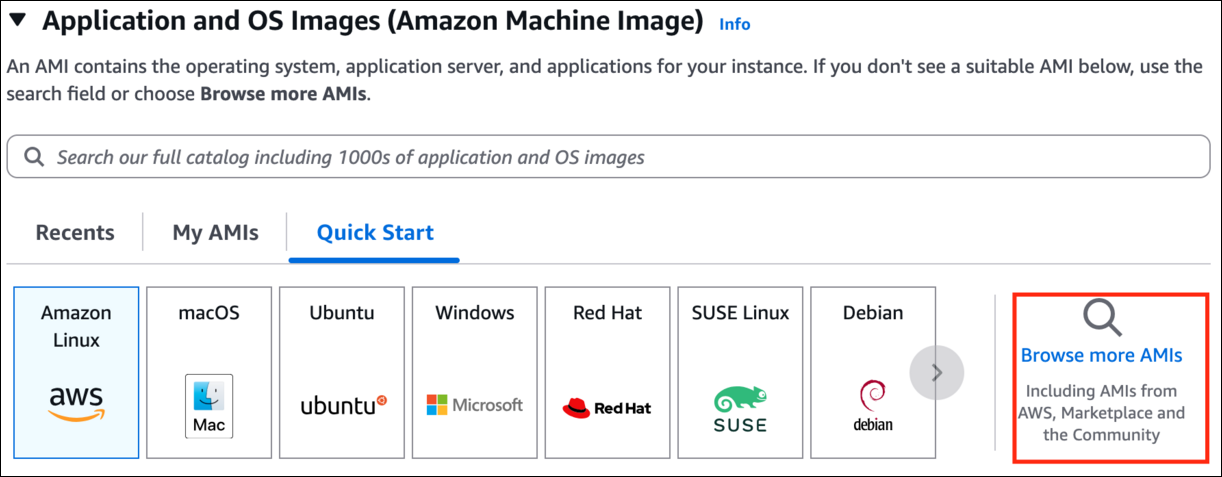
- Choose an Amazon Machine Image (AMI): Click on Browse more AMIs.

- Choose an Amazon Machine Image (AMI):
- Click on Browse more AMIs.
- Task 2: Launching an EC2 Instance

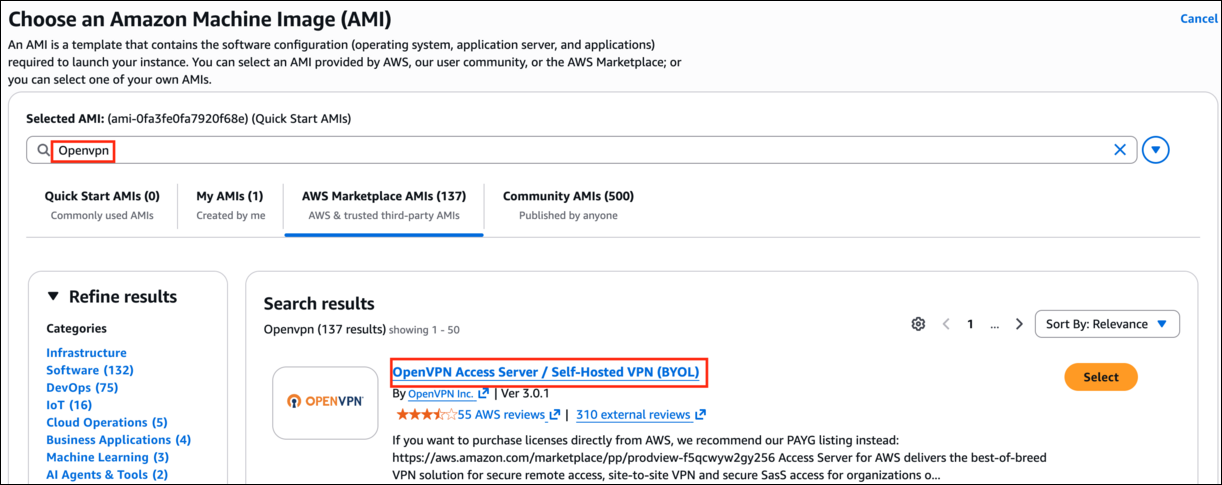
- Search for Openvpn in the search box.
- Click on the Select button of the OpenVPN Access Server

- Task 2: Launching an EC2 Instance
- Click on subscribe now.
- Click on the Continue button in the popup window.
- Choose an Instance Type: Enter t2.micro
- Task 2: Launching an EC2 Instance

- Note: Make sure only t2.micro is selected, Else it won't be allowed to launch the EC2 Instance.
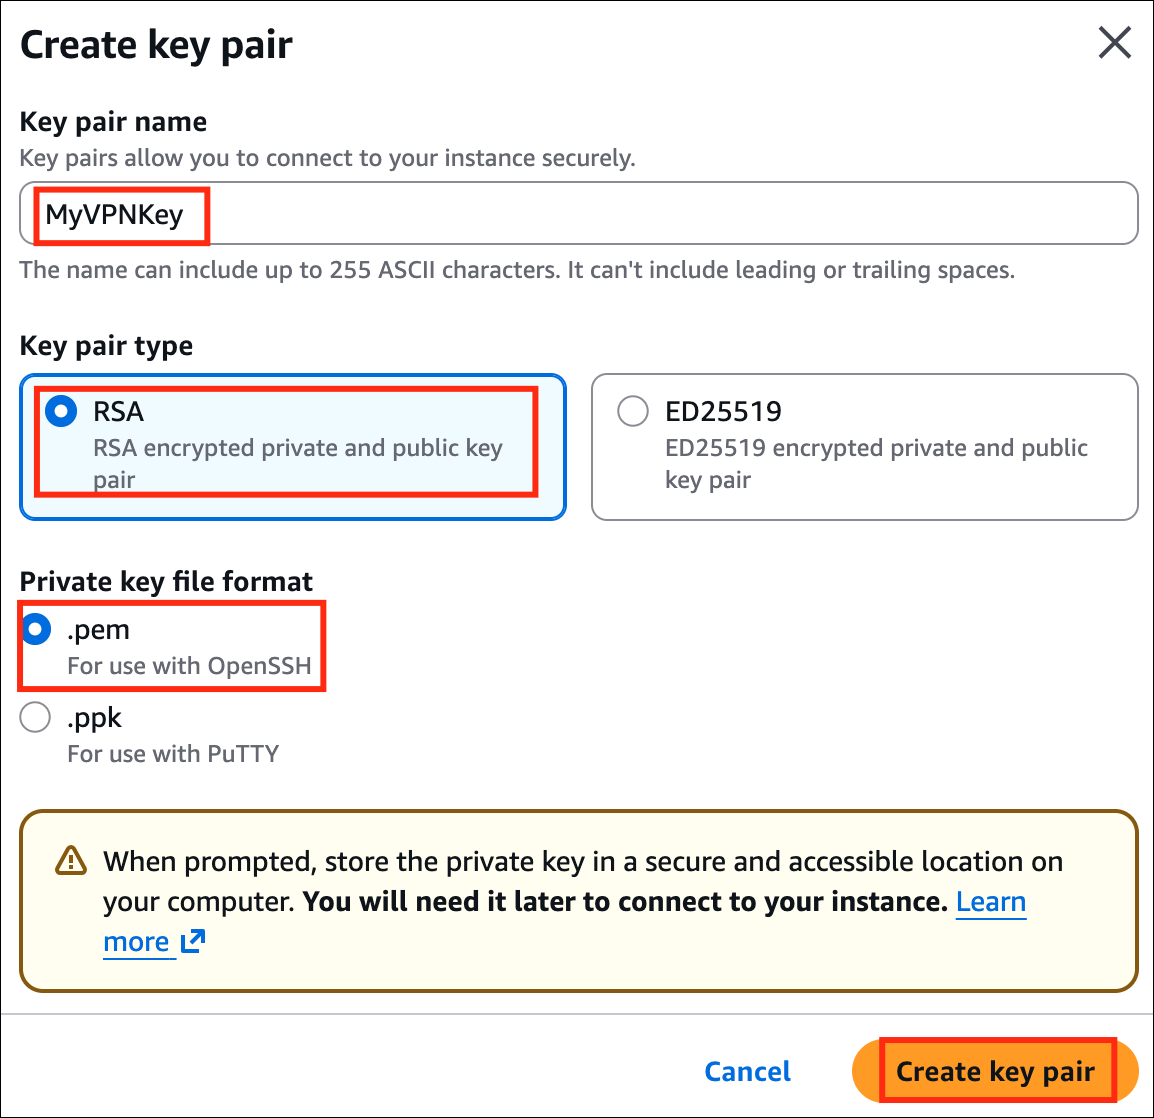
- Key Pair: Choose Create a new key Pair hyperlink.
- Key pair name: Enter MyVPNKey
- Key Pair Type: Select RSA
- Private key file format: Select .pem
- Click on the Create key pair button to download the key to your local machine.
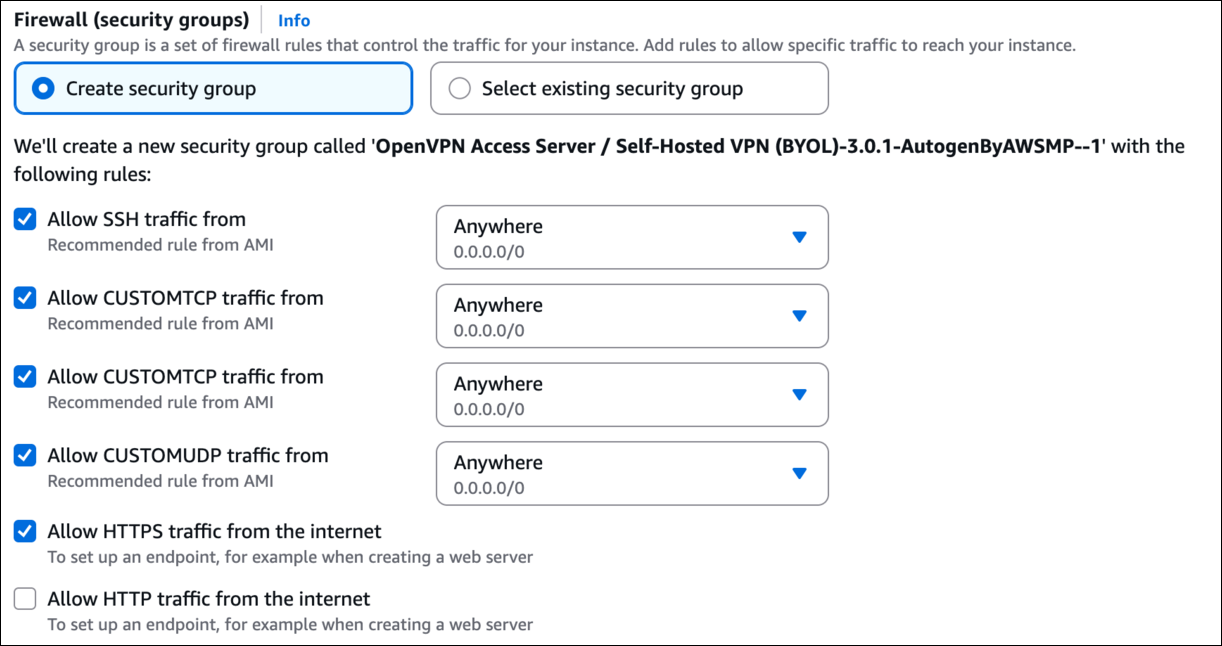
- Under Network Settings:
- The following ports will be automatically enabled :
- Now click on the Launch Instances button.
- Launching a VPN Server may take a few minutes, you may see a message saying that the Subscription may take an hour to complete.
- Scroll down and click on View Instances or click to navigate to the instance page
- Launch Status: Your instance is now launching, wait for the complete initialization of the instance till the status changes to Running.
- Task 2: Launching an EC2 Instance

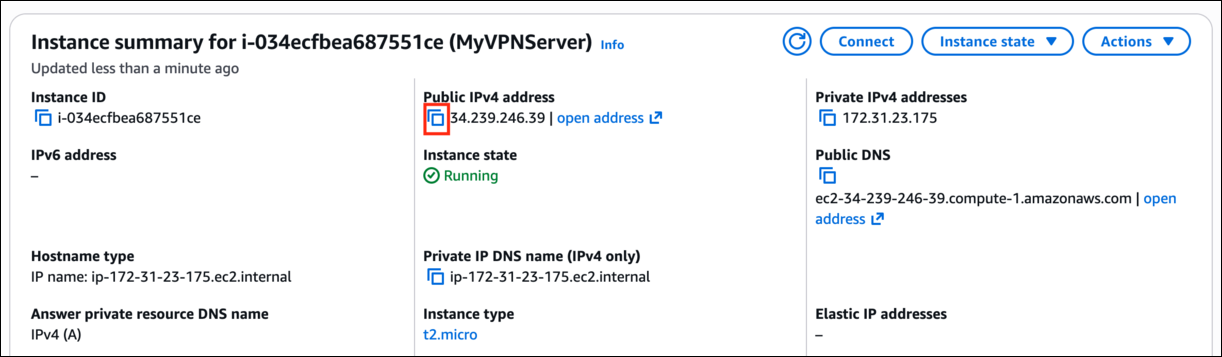
- Now click on the instance ID and copy the IPv4 Public IP of this instance and place it in your text editor.
- Task 2: Launching an EC2 Instance
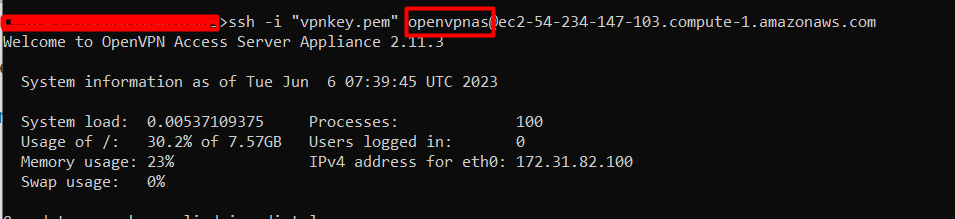
- Please note, that the username is root. Change the hostname or username to openvpnas.
- Please follow the steps to SSH into EC2 Instance.
- Task 3: SSH into EC2 Instance
- Please enter 'yes' to indicate your argument [no]: Enter yes
- Will this be the primary Access Server node? Press ENTER for default [yes]: Click the [enter] button.
- Will this be the primary Access Server node?
- Press ENTER for default [yes]: Click the [enter] button.
- Please specify the network interface and IP address to be Press Enter for default [1]: Click the [enter] button.
- Please specify the network interface and IP address to be
- Press Enter for default [1]: Click the [enter] button.
- What public/private type/algorithms do you want to use for the OpenVPN CA? Press ENTER for default [rsa]: Click the [enter] button.
- What public/private type/algorithms do you want to use for the OpenVPN CA?
- Press ENTER for default [rsa]: Click the [enter] button.
- What key size do you want to use for the certificates? Press ENTER for default [2048]: Click the [enter] button.
- What key size do you want to use for the certificates?
- Press ENTER for default [2048]: Click the [enter] button.
- What public/private type/algorithms do you want to use for the self-signed web certificate? Press ENTER for default [rsa]: Click the [enter] button.
- What public/private type/algorithms do you want to use for the self-signed web certificate?
- Press ENTER for default [rsa]: Click the [enter] button.
- What key size do you want to use for the certificates? Press ENTER for default [2048]: Click the [enter] button.
- What key size do you want to use for the certificates?
- Press ENTER for default [2048]: Click the [enter] button.
- Please specify the port number for the Admin Web UI. Press ENTER for default [943]: Click the [enter] button.
- Please specify the port number for the Admin Web UI.
- Press ENTER for default [943]: Click the [enter] button.
- Please specify the TCP port number for the OpenVPN Daemon Press ENTER for default [443]: Click the [enter] button.
- Please specify the TCP port number for the OpenVPN Daemon
- Press ENTER for default [443]: Click the [enter] button.
- Should client traffic be routed by default through the VPN? Press ENTER for default [no]: Click the [enter] button.
- Should client traffic be routed by default through the VPN?
- Press ENTER for default [no]: Click the [enter] button.
- Should client DNS traffic be routed by default through the VPN? Press ENTER for default [no]: Click the [enter] button.
- Should client DNS traffic be routed by default through the VPN?
- Press ENTER for default [no]: Click the [enter] button.
- Should private subnets be accessible to clients by default? Press ENTER for default [yes]: Click the [enter] button.
- Should private subnets be accessible to clients by default?
- Press ENTER for default [yes]: Click the [enter] button.
- Do you wish to log in to the Admin UI as "openvpn"? Press ENTER for default [yes]: Click the [enter] button. Type a password for the 'openvpn' account: Enter Whizvpn123@ and press [enter] and then enter the same password to confirm the password.
- Do you wish to log in to the Admin UI as "openvpn"?
- Press ENTER for default [yes]: Click the [enter] button.
- Type a password for the 'openvpn' account: Enter Whizvpn123@ and press [enter] and then enter the same password to confirm the password.
- Please specify your Activation key (or leave blank to specify later): Click the [enter] button.
- Task 4: Initialize the VPN Server
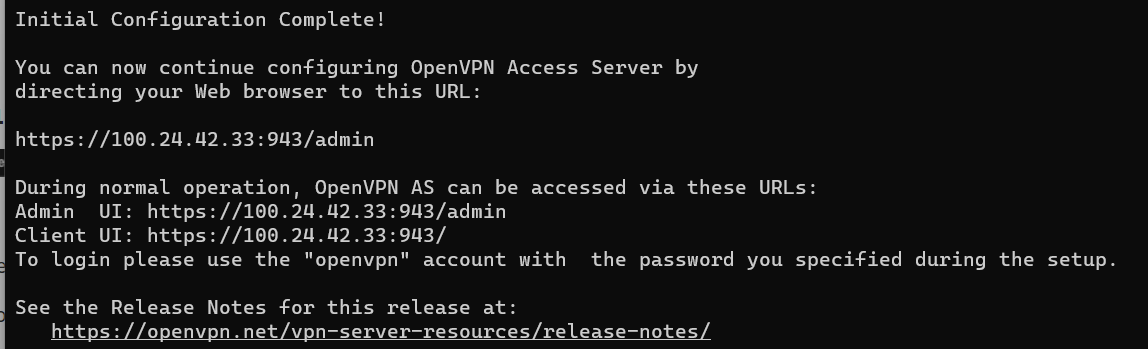
- Now login as administrator, open Google Chrome and paste the following URL Syntax : https://<IPv4 Public IP>:943/admin/ Example: https://3.239.61.27:943/admin/ Now you will get a Warning message Your connection isn't private, this is because we are not using any SSL certificate for this connection.
- Now login as administrator, open Google Chrome and paste the following URL
- Syntax : https://<IPv4 Public IP>:943/admin/
- Example: https://3.239.61.27:943/admin/
- Now you will get a Warning message Your connection isn't private, this is because we are not using any SSL certificate for this connection.
- Task 4: Initialize the VPN Server
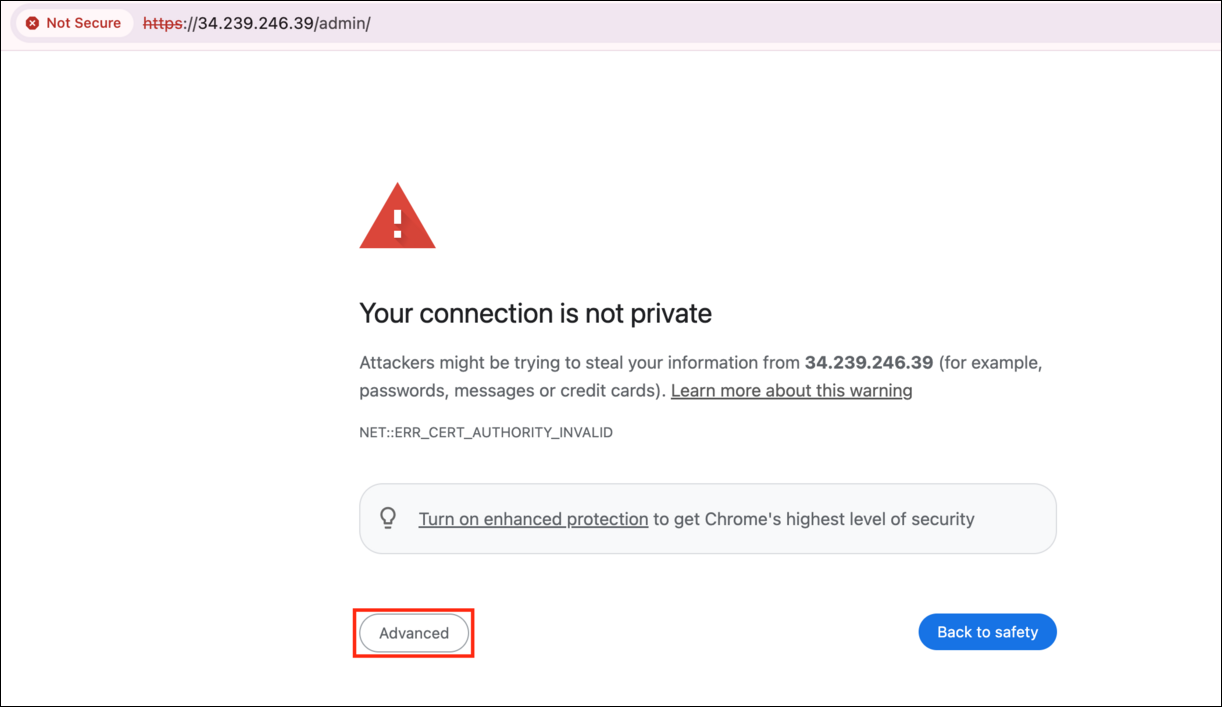
- Click on the Advanced Button and see if you have a proceed to website option then click on the link.
- If you see the below message instead, then type thisisunsafe on the keyboard and the page will automatically reload.
- Task 4: Initialize the VPN Server

- You will see a login page like this :

- Task 4: Initialize the VPN Server

- Login to the VPN Admin page : Username: Enter openvpn Password: Enter Whizvpn123@ Now click on the Sign in button.
- Login to the VPN Admin page :
- Username: Enter openvpn
- Password: Enter Whizvpn123@
- Now click on the Sign in button.
- Now On the License Agreement page click on the Agree button.
- Click on the VPN Server option in the left-side menu.
- To make sure all the internet traffic goes through the VPN, Under Network Settings Under Interface, make sure you have selected All Interfaces, if not select All Interfaces and click Save on the right corner.
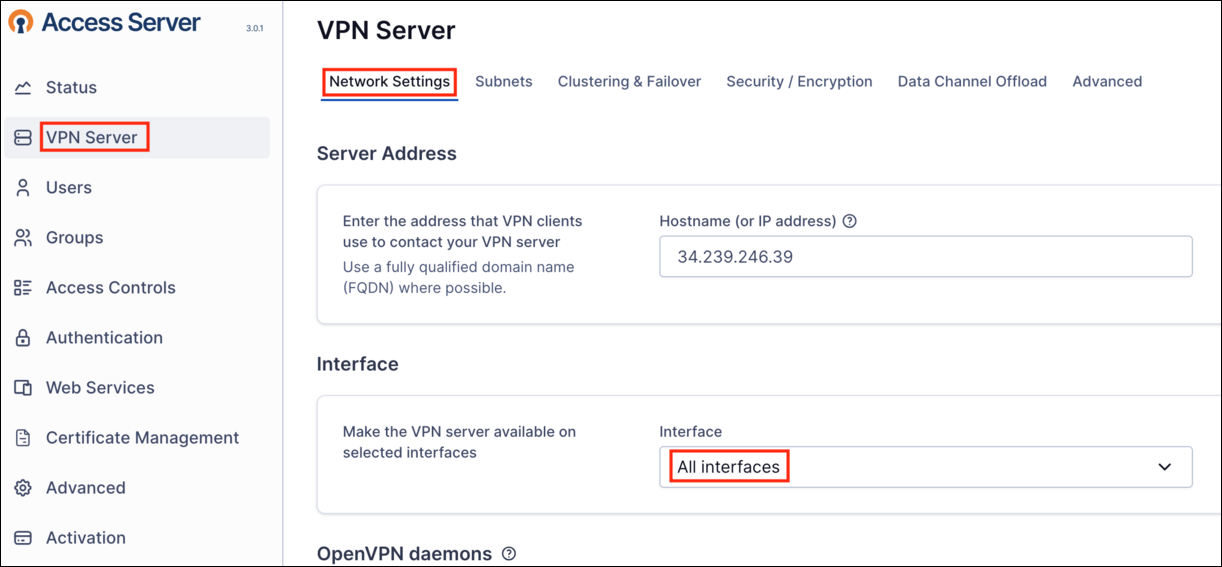
- To make sure all the internet traffic goes through the VPN, Under Network Settings
- Under Interface, make sure you have selected All Interfaces, if not select All Interfaces and click Save on the right corner.

- Task 4: Initialize the VPN Server

- Open a new tab in the Google Chrome browser.
- Paste the url https://<IPv4 Public IP>/ Example : https://100.26.97.202/
- Login to the VPN User Page : Username: Enter openvpn Password: Enter Whizvpn123@ Now click on the Sign in button.
- Login to the VPN User Page :
- Username: Enter openvpn
- Password: Enter Whizvpn123@
- Now click on the Sign in button.
- Now, based on which operating system you are using, download the VPN connector and install it on your local machine.
- Open the OpenVPNConnector application and if you see Onboarding Tour, just close it.
- Now again, agree to the terms and conditions.
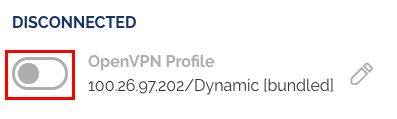
- You will be able to see a pre-configured VPN profile, turn on this connection.
- Task 5: Connect to the VPN
- Now again enter the username and password. Username: Enter openvpn Password: Enter Whizvpn123@ Click on the OK button.
- Now again enter the username and password.
- Username: Enter openvpn
- Password: Enter Whizvpn123@
- Click on the OK button.
- Now you are connected to the VPN
- Task 5: Connect to the VPN

- Now you can start browsing using a VPN connection.
- OpenVPN is widely used and trusted by organizations and individuals worldwide for its robust security features, including encryption, authentication, and data integrity. It provides a flexible and scalable solution for establishing secure connections, making it suitable for various use cases, such as remote access to corporate networks, securing public Wi-Fi connections, and creating secure communication channels between different cloud environments.
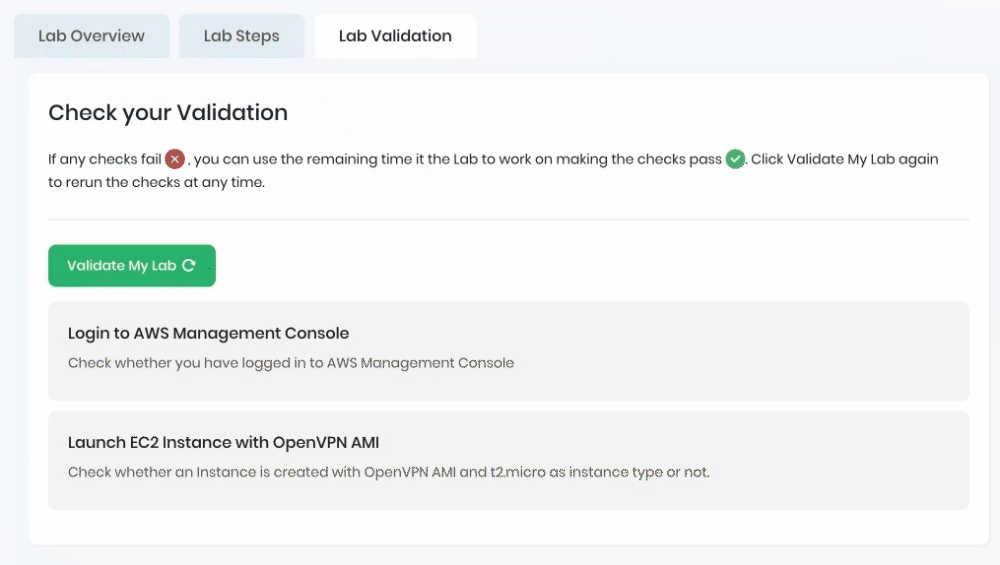
- Once the lab steps are completed, please click on the Validation button on the left side panel.
- This will validate the resources in the AWS account and display whether you have completed this lab successfully or not.
- Sample output :
- Task 6: Validation Test
- Make sure you are in the US East (N. Virginia) Region.
- Navigate to EC2 by clicking on the Services menu at the top, then click on EC2 under Compute section.
- Now Select the EC2 instance that you have created, click on Instance State, and click on the Terminate instance option.
- Click on the Terminate button and your EC2 will start terminating.
- You have successfully created and launched the Amazon EC2 Instance.
- You have successfully logged into an EC2 instance by SSH.
- You have successfully Initialized the VPN Server.
- You have successfully connected to the VPN.
- Sign out of AWS Account.
- You have successfully completed the lab.
- Once you have completed the steps, click on End Lab from your lab lab console and wait till the process is completed