Fundamental00:50:00
How to Encrypt an S3 bucket using AWS KMS and monitor the activities with CloudTrail
- Click on the Open Console button, and you will get redirected to AWS Console in a new browser tab.
- On the AWS sign-in page,
- Leave the Account ID as default. Never edit/remove the 12-digit Account ID present in the AWS Console. otherwise, you cannot proceed with the lab.
- Now copy your User Name and Password in the Lab Console to the IAM Username and Password in AWS Console and click on the Sign in button
- Once Signed In to the AWS Management Console, Make the default AWS Region as US East (N. Virginia) us-east-1.
- In this task, you will create a customer-managed KMS key and use it to encrypt S3 objects.
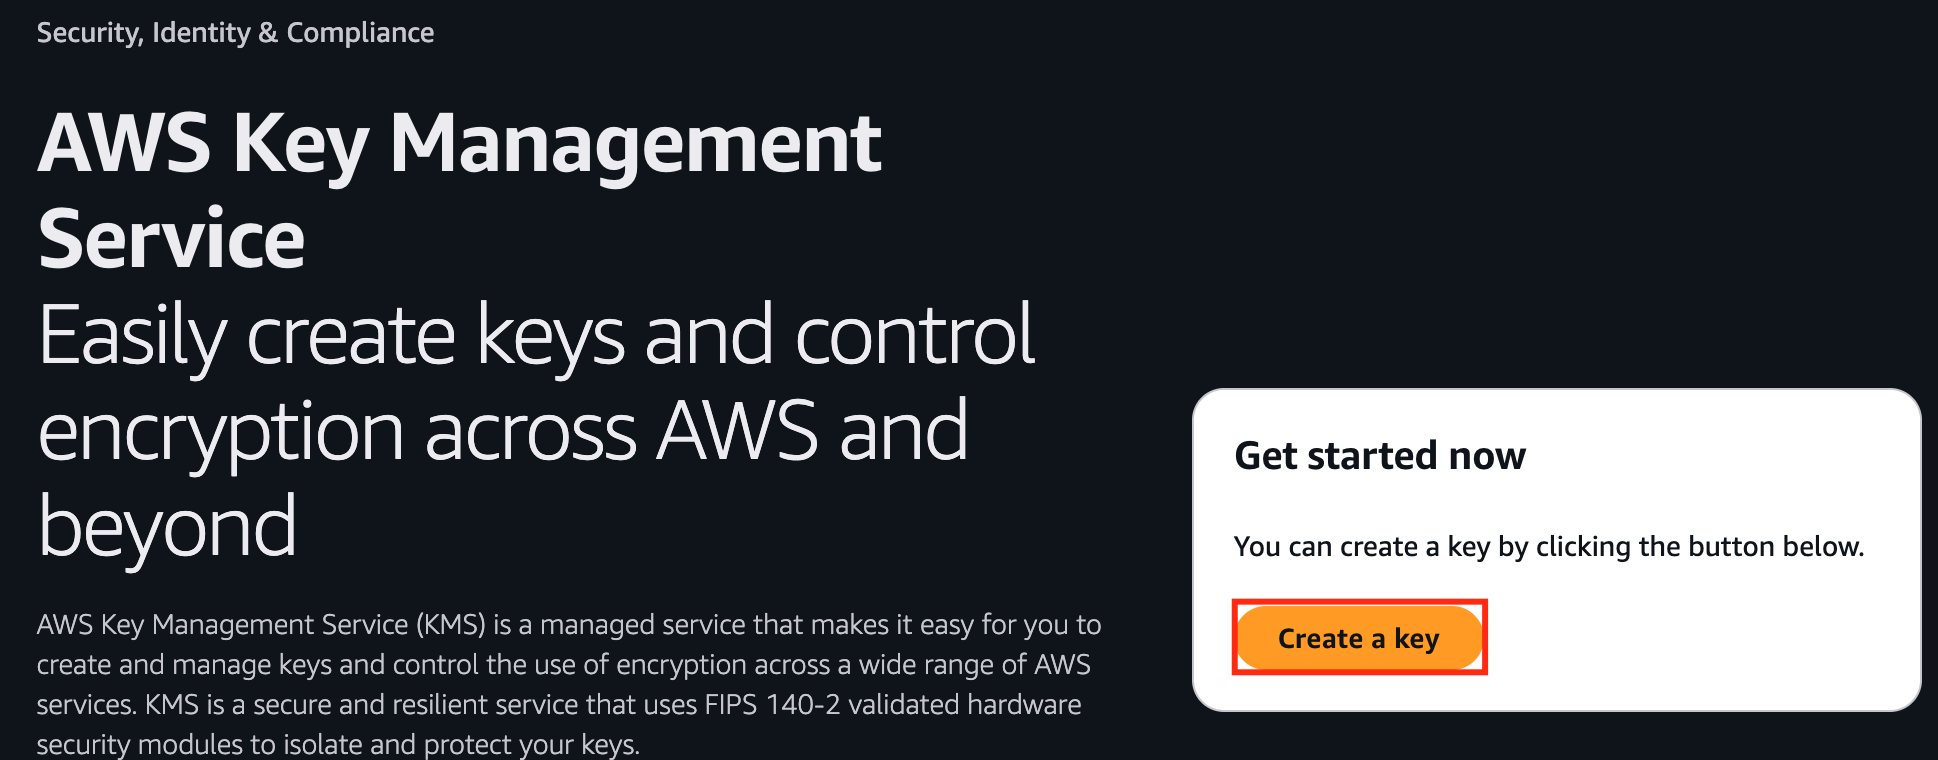
- Navigate to Key Management Service by clicking on Services in the AWS Management Console, and selecting Key Management Service under Security, Identity and Compliance section.
- Click on Create a Key

- Task 1: Sign in to AWS Management Console
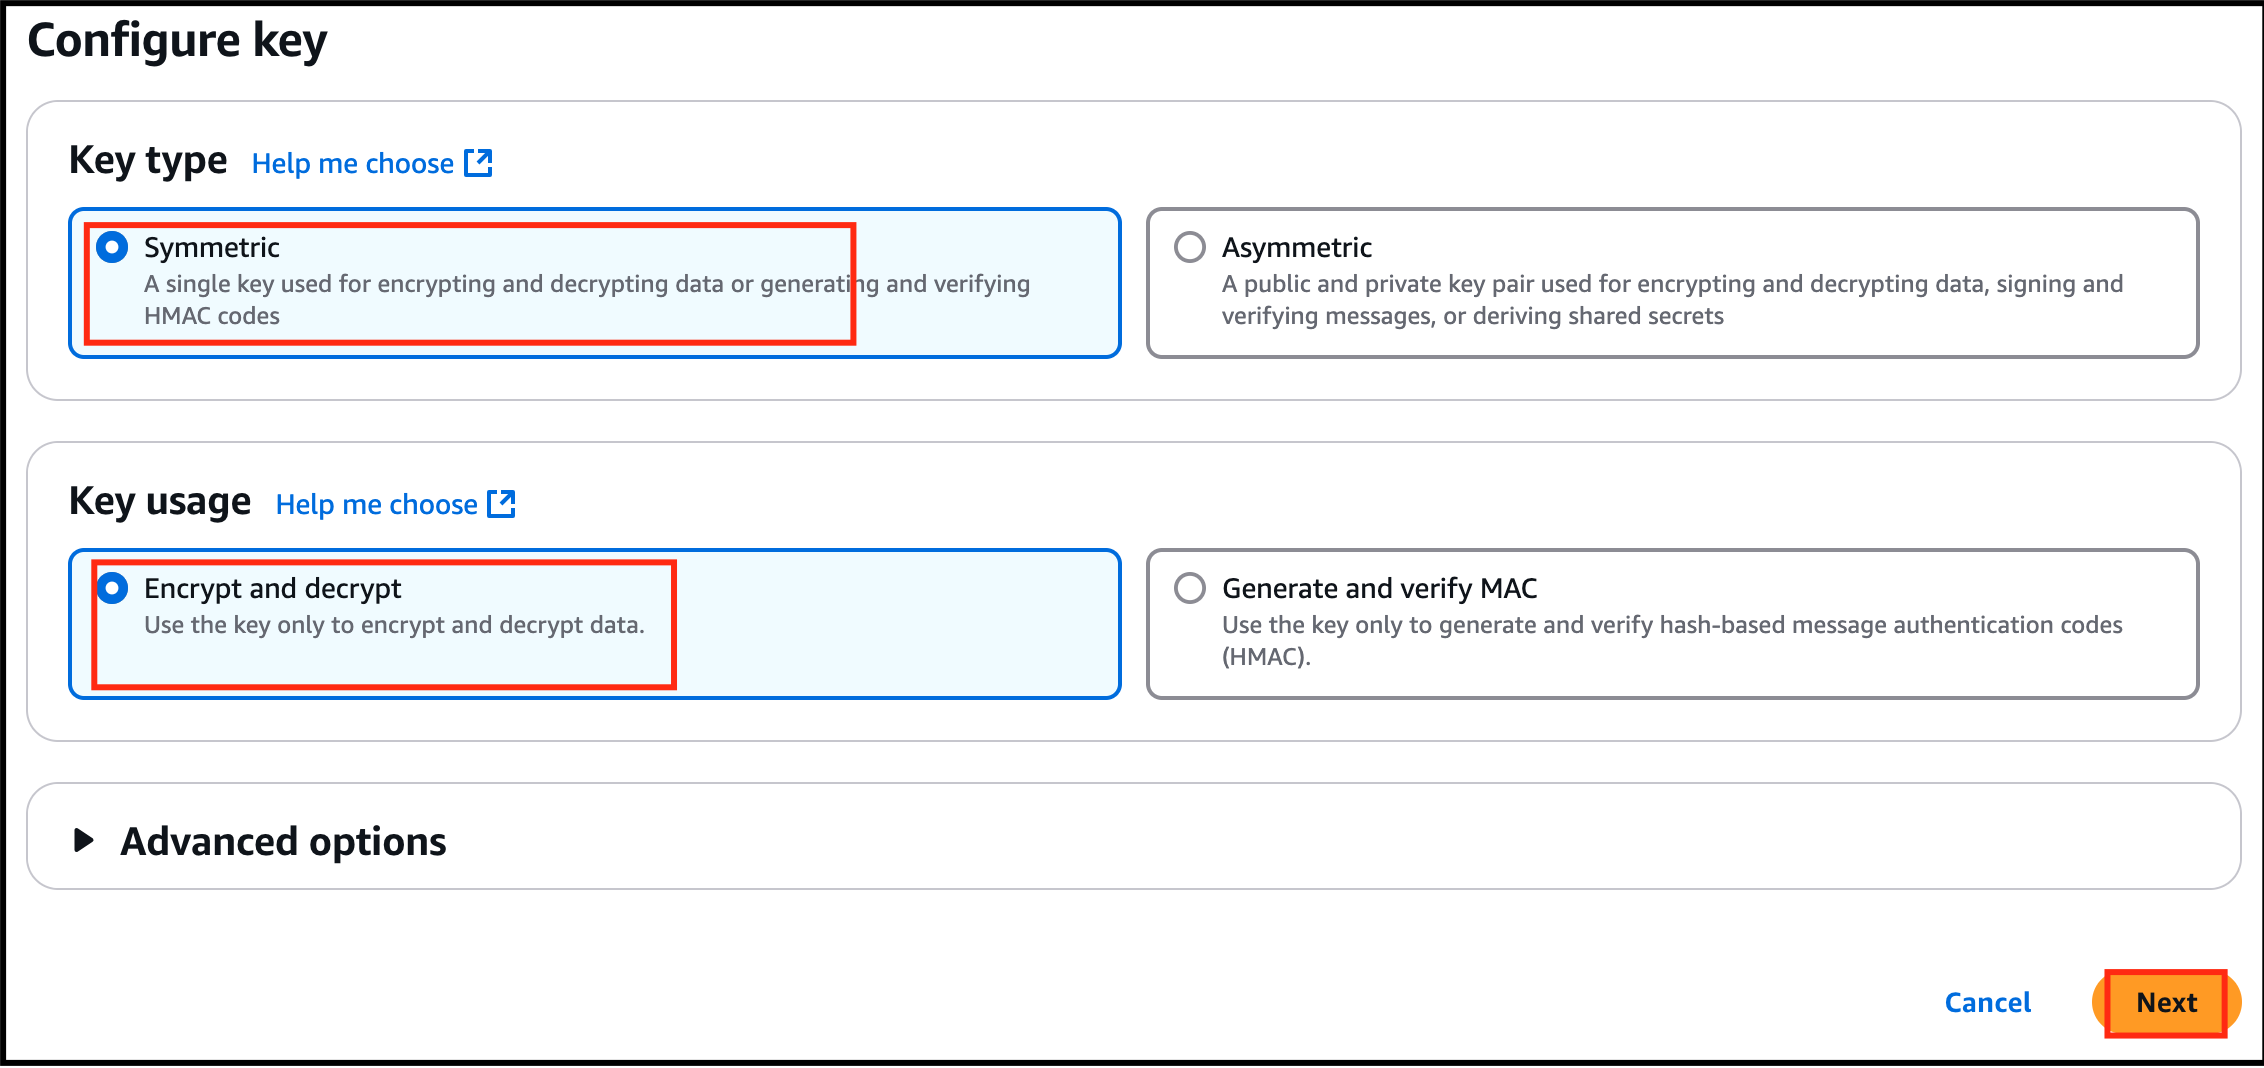
- Under configure key: Key type : Select Symmetric Key usage : Select Encrypt and Decrypt

- Under configure key:
- Key type : Select Symmetric
- Key usage : Select Encrypt and Decrypt

- Task 1: Sign in to AWS Management Console

- Click on Next
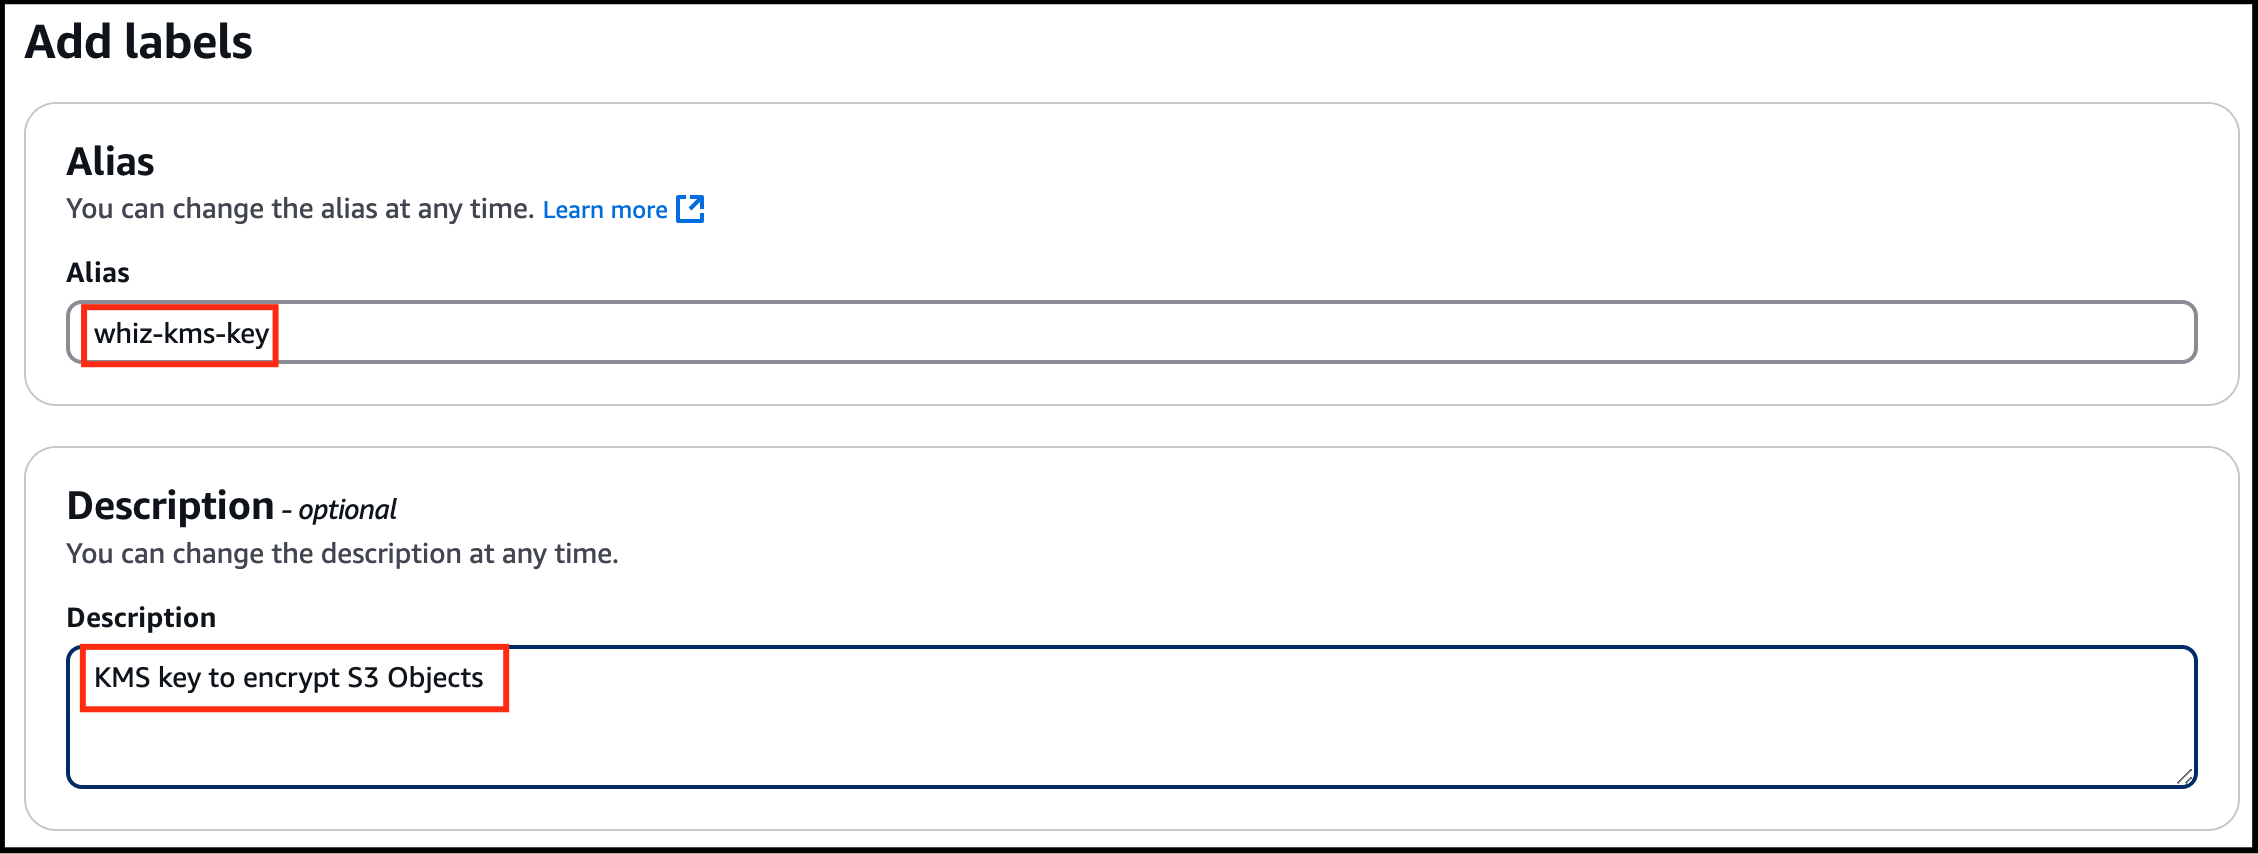
- Under Add labels: Alias : Enter whiz-kms-key Description : Enter KMS key to encrypt S3 Objects

- Under Add labels:
- Alias : Enter whiz-kms-key
- Description : Enter KMS key to encrypt S3 Objects

- Task 1: Sign in to AWS Management Console

- Click on Next
- Under Define key administrative permissions: Key administrators: Select the role that is associated with the account you are working with. For example: Whiz_user-<RANDOM_NUMBER>

- Under Define key administrative permissions:
- Key administrators: Select the role that is associated with the account you are working with. For example: Whiz_user-<RANDOM_NUMBER>
- Task 1: Sign in to AWS Management Console

- Click on Next
- Under Define Key usage permissions: Select the role that is associated with the account you are working with. For Whiz_user-<RANDOM_NUMBER>
- Under Define Key usage permissions:
- Select the role that is associated with the account you are working with. For Whiz_user-<RANDOM_NUMBER>

- Task 1: Sign in to AWS Management Console

- Click on Next. In Edit key policy, leave everything as default and click Next.
- Review everything and click on the Finish button.
- You have successfully created the KMS key.

- Task 1: Sign in to AWS Management Console

- Copy the Key ID and paste it in the notepad, we will use this later in the lab.
- In this task, you will create an S3 bucket to upload and encrypt an object an aslo to store events.
- Navigate to S3 by clicking on Services in the AWS Management Console, and selecting S3 under Storage section.
- Click on Create Bucket
- Under General configuration: Bucket type : General purpose Bucket name : Enter a unique name within the global namespace.
- Under General configuration:
- Bucket type : General purpose
- Bucket name : Enter a unique name within the global namespace.
- Object ownership: Select ACLs enabled option and choose Object writer as the Object owner
- Task 1: Sign in to AWS Management Console

- Leave the rest as default and click on Create Bucket.
- You have successfully created an S3 bucket.
- Task 1: Sign in to AWS Management Console

- In this task, you will create a CloudTrail and configure it to store KMS activities in S3 bucket.
- Navigate to CloudTrail by clicking on Services in the AWS Management Console, and selecting CloudTrail under Management & Governance section.
- Click on the menu section (three lines) on the left side panel and click on Trails.
- Click on Create Trail.
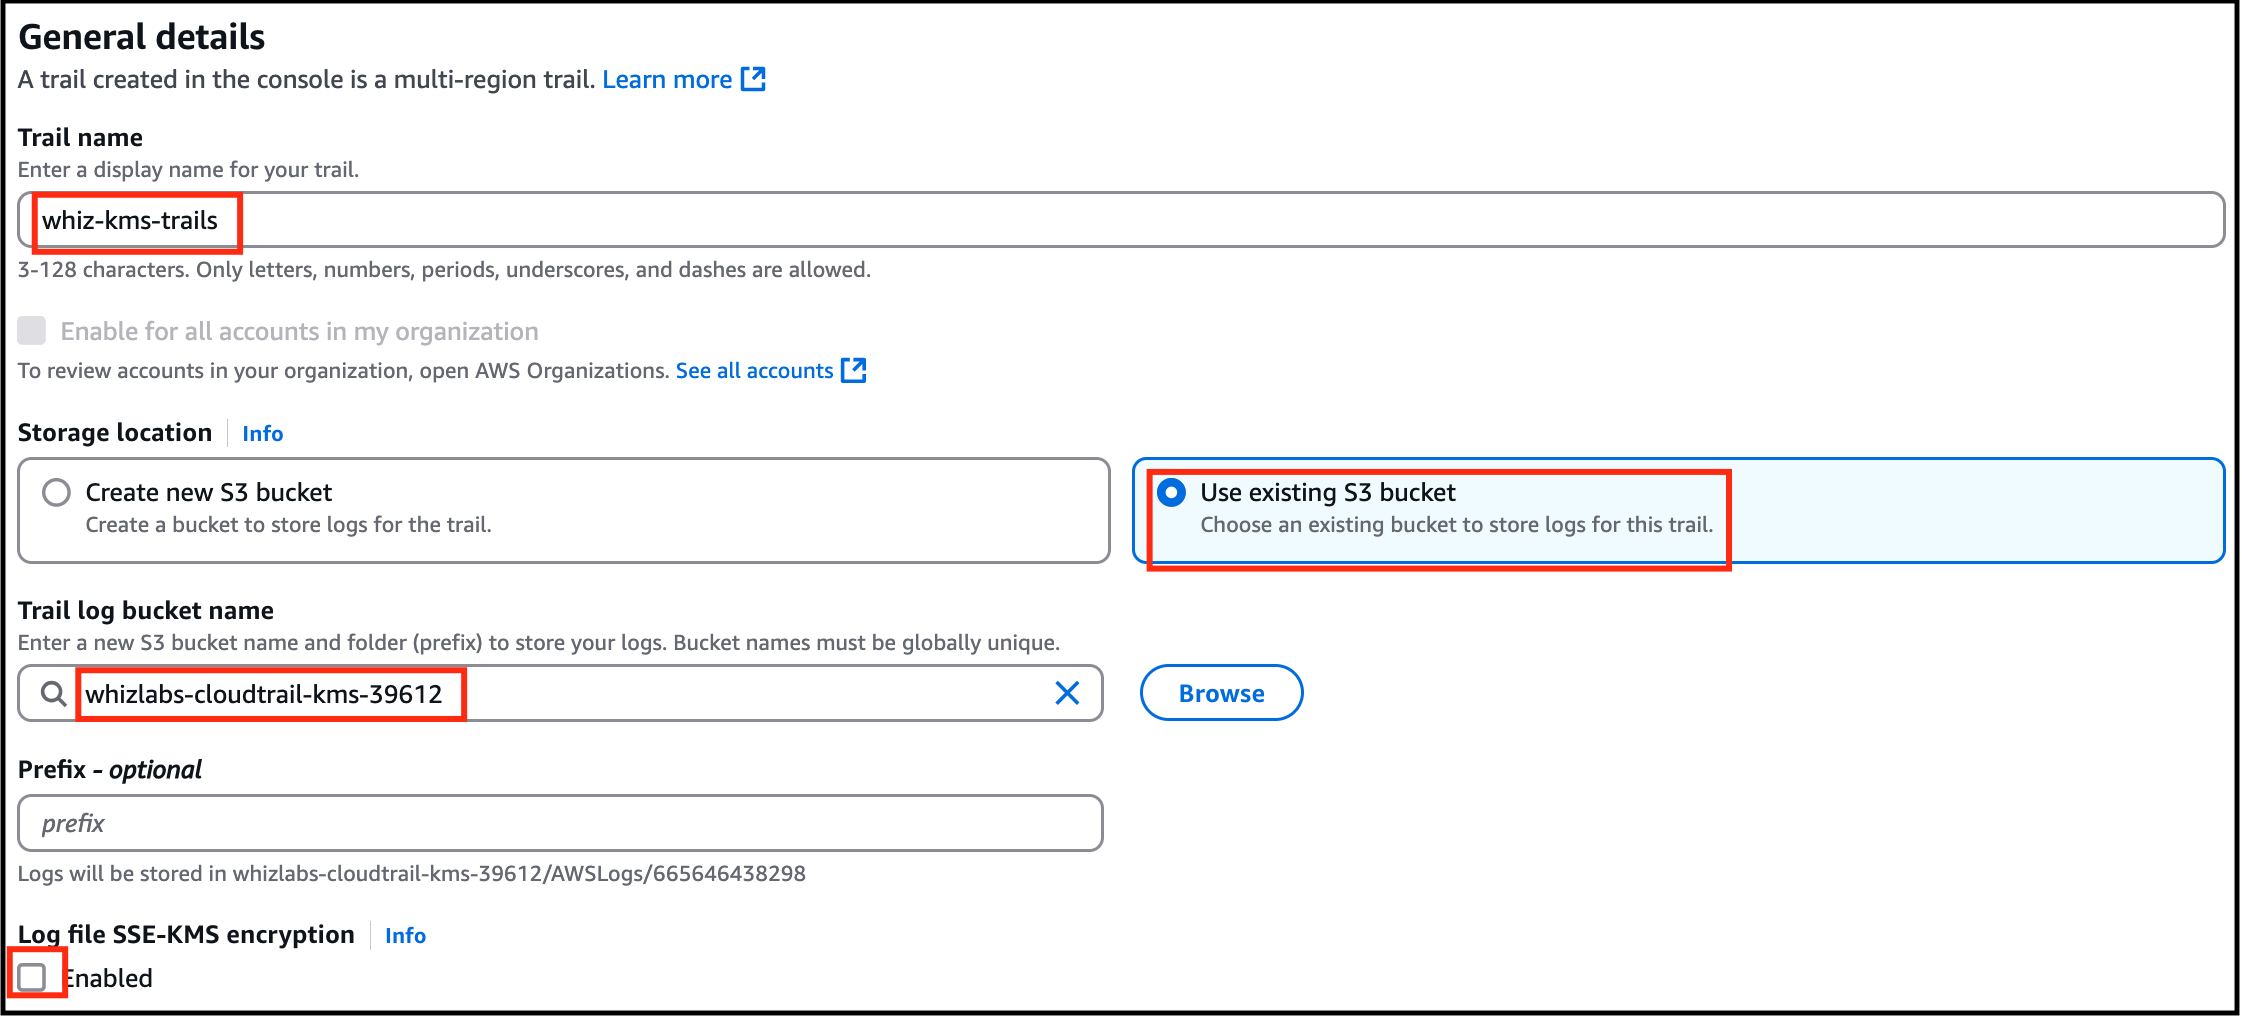
- Under General details: Trail name : Enter whiz-kms-trails Storage location : Choose Use existing S3 bucket Trail log bucket name : Click on Browse and choose the S3 bucket that you have created earlier(i.e lab-cloudtrail-kms)
- Under General details:
- Trail name : Enter whiz-kms-trails
- Storage location : Choose Use existing S3 bucket
- Trail log bucket name : Click on Browse and choose the S3 bucket that you have created earlier(i.e lab-cloudtrail-kms)
- Log file SSE-KMS encryption : Uncheck Enabled

- Task 1: Sign in to AWS Management Console

- Leave the rest as default and click on Next.
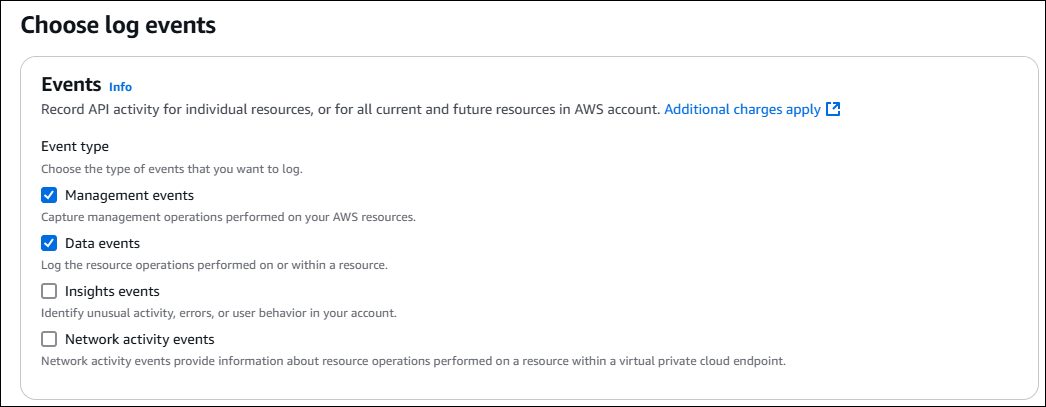
- Choose log events: Event type : Check both Management events and Data events.

- Choose log events:
- Event type : Check both Management events and Data events.

- Task 1: Sign in to AWS Management Console

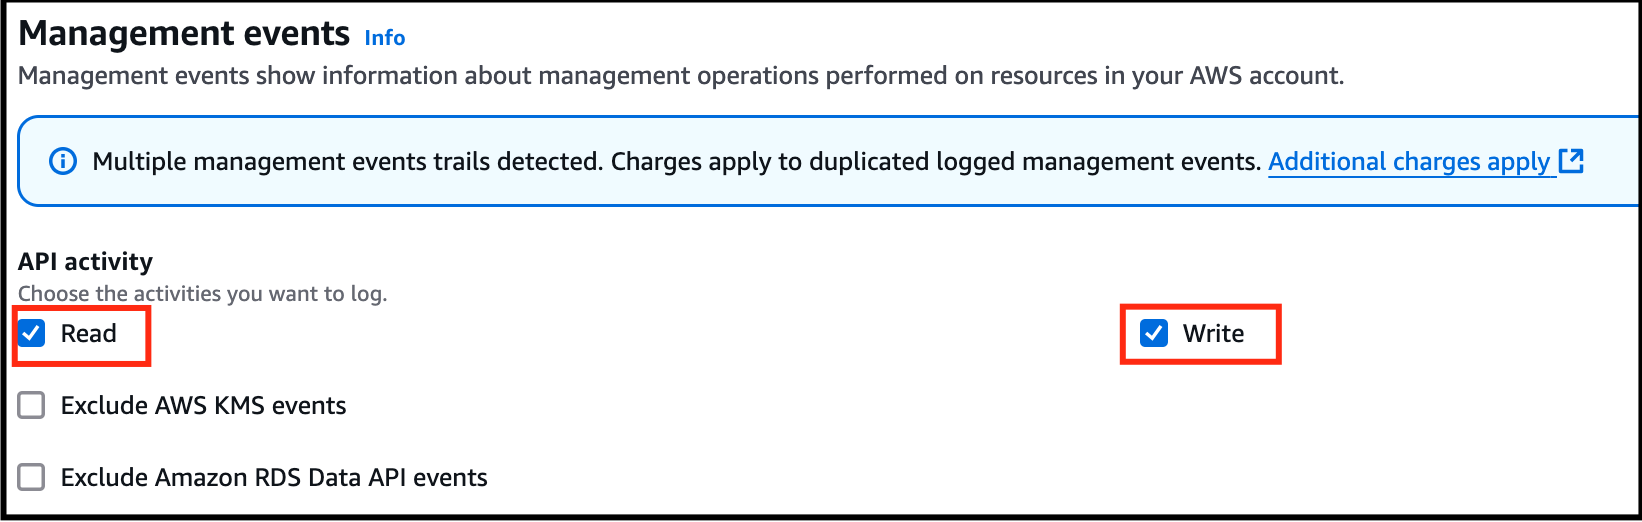
- Management events: API activity : Check both Read and Write

- Management events:
- API activity : Check both Read and Write

- Task 1: Sign in to AWS Management Console

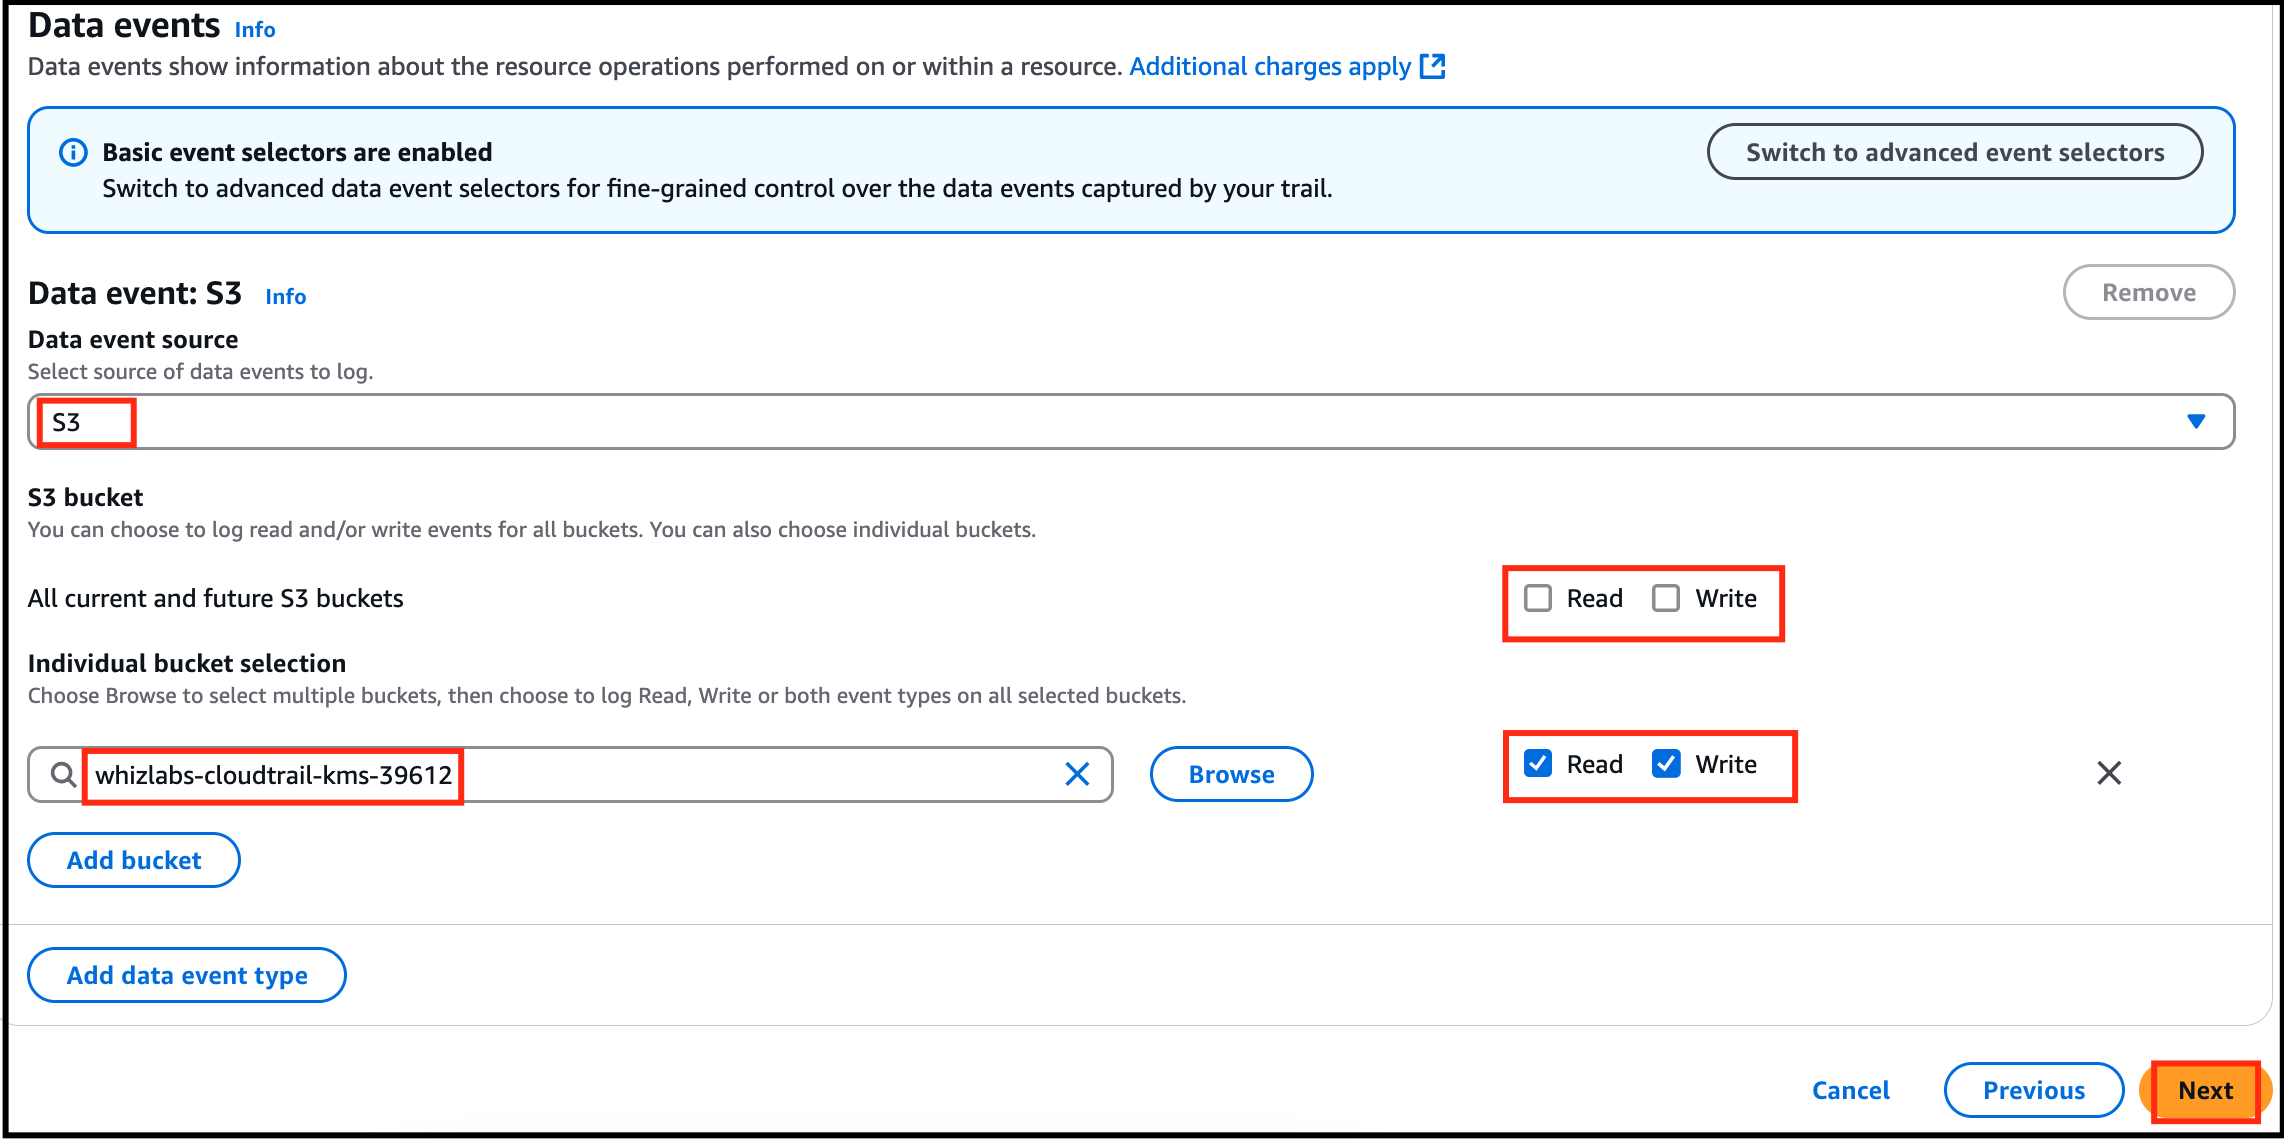
- Data events: Click on Switch to basic event selectors button. Click on Continue button on pop up. All current and future S3 buckets : Uncheck both Read and Write Individual bucket selection : Click on Browse and choose the S3 bucket that we have created earlier(i.e lab-cloudtrail-kms) Make sure you have checked both Read and Write next to the Browse.

- Data events:
- Click on Switch to basic event selectors button.
- Click on Continue button on pop up.
- All current and future S3 buckets : Uncheck both Read and Write
- Individual bucket selection : Click on Browse and choose the S3 bucket that we have created earlier(i.e lab-cloudtrail-kms)
- Make sure you have checked both Read and Write next to the Browse.

- Task 1: Sign in to AWS Management Console

- Click on Next.
- Review everything and click on Create Trail.
- You have successfully created a CloudTrail and can find yours under Trails.

- Task 1: Sign in to AWS Management Console
- In this task, you will upload an image from our local PC and encrypt it using the KMS key we have created in Task 3.
- Navigate to S3 by clicking on Services in the AWS Management Console, and selecting S3 under the Storage section.
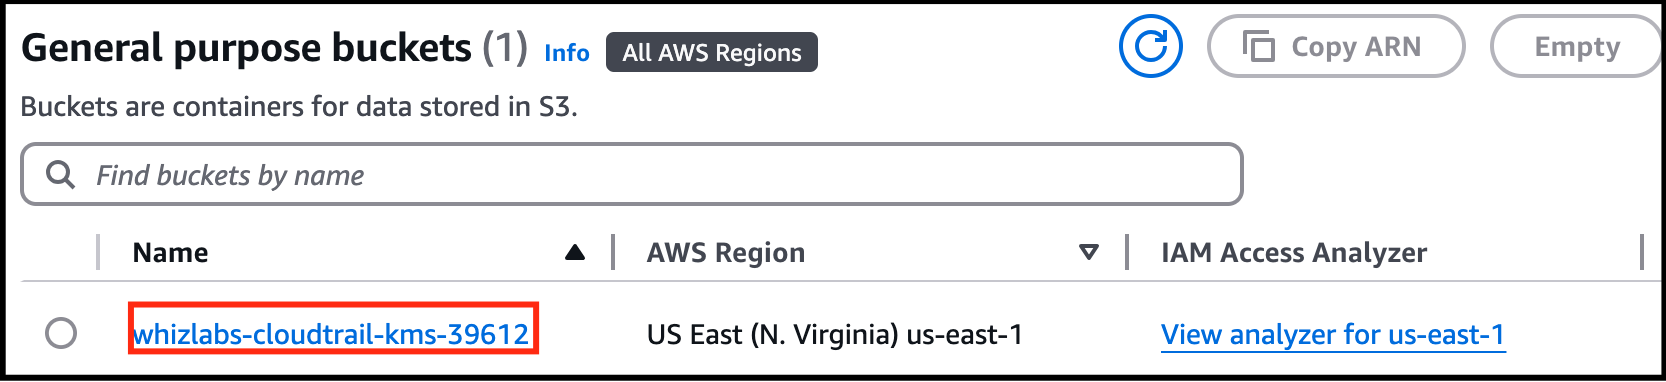
- Click on the S3 bucket (lab-cloudtrail-kms) we have created.

- Task 1: Sign in to AWS Management Console

- Click on the Upload button.

- Task 1: Sign in to AWS Management Console

- Click on Add files and choose a picture from your local PC and Click on the Upload button.
- Task 1: Sign in to AWS Management Console

- Click on the object which we have uploaded. Go to the Properties tab.
- Scroll down to Server-side encryption settings and click Edit: Encryption settings : Override bucket settings for default encryption Encryption key type : Select Server Side Encryption with AWS Key Management Service key(SSE-KMS) AWS KMS key : Select Choose from your AWS KMS keys and from the drop-down menu select the KMS key we have created i.e whiz-kms-key
- Scroll down to Server-side encryption settings and click Edit:
- Encryption settings : Override bucket settings for default encryption
- Encryption key type : Select Server Side Encryption with AWS Key Management Service key(SSE-KMS)
- AWS KMS key : Select Choose from your AWS KMS keys and from the drop-down menu select the KMS key we have created i.e whiz-kms-key

- Task 1: Sign in to AWS Management Console

- Leave everything as default and click on the Save Changes button.
- Click on close and you will see your uploaded picture under the objects section.
- Note the Last Modified time in the notepad.
- In this task, you will try to access the encrypted object through both S3 console and Object URL.
- Click on the picture you have uploaded and click on Open on the top right side of your screen.

- Task 1: Sign in to AWS Management Console

- The picture opens in a new tab/window.
- What happens behind the scenes Amazon S3 sends the encrypted data key to AWS KMS. AWS KMS decrypts the key by using the appropriate master key and sends the plaintext key back to Amazon S3. Amazon S3 decrypts the cypher text and removes the plaintext data key from memory as soon as possible.
- What happens behind the scenes
- Amazon S3 sends the encrypted data key to AWS KMS.
- AWS KMS decrypts the key by using the appropriate master key and sends the plaintext key back to Amazon S3.
- Amazon S3 decrypts the cypher text and removes the plaintext data key from memory as soon as possible.
- Close the tab/window that displayed your picture.
- Now copy the Object URL and paste it into a new tab of your browser and hit Enter.
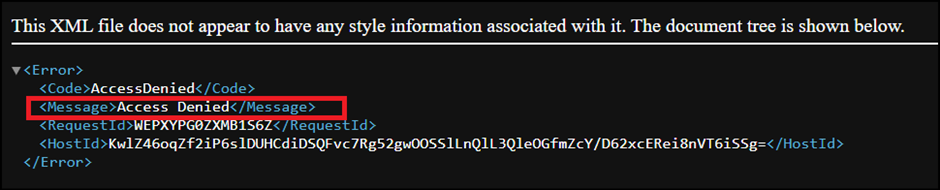
- You will see a page with the message “Access denied.” And that is because by default, the public access is blocked.

- Task 1: Sign in to AWS Management Console

- Go back to the bucket, click on the Permissions section.

- Task 1: Sign in to AWS Management Console
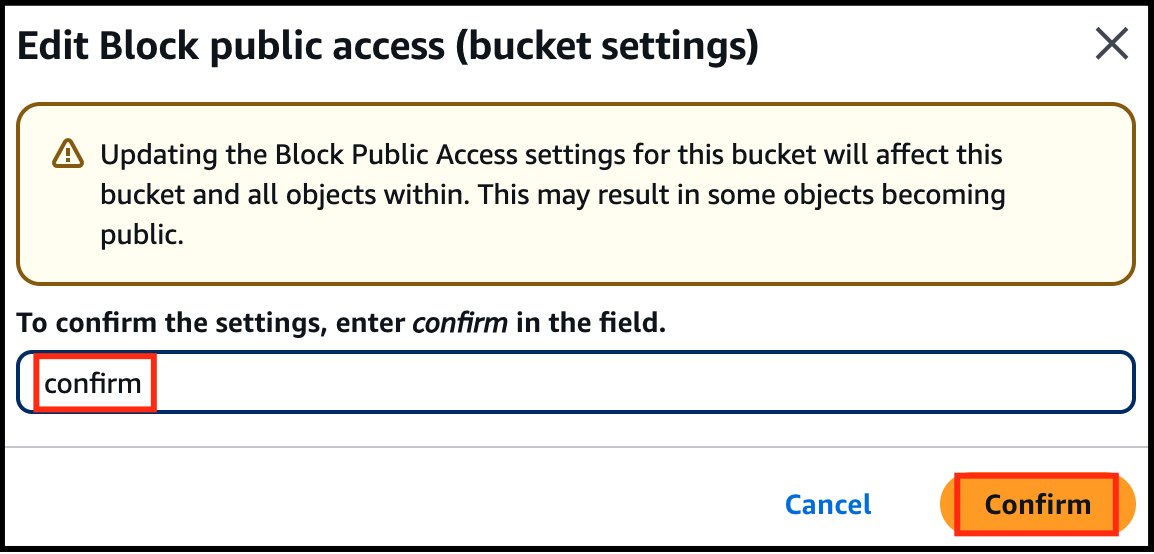
- Under Block public access, click on Edit and uncheck Block all public access and click on Save changes.

- Task 1: Sign in to AWS Management Console

- In the next screen, Type confirm and click on Confirm button.
- Task 1: Sign in to AWS Management Console

- You have successfully edited Block Public Access settings.
- Now go to the Objects tab and click on your object.
- On the top right corner, click the Object actions drop-down menu and click on Make public using ACL.
- Click on Make public button.
- Now refresh the tab where you have pasted the Object URL earlier.
- You should see a message something like this.

- Task 1: Sign in to AWS Management Console

- This is because the picture is encrypted and you are not able to view it using the public link. If you are uploading or accessing objects encrypted by SSE-KMS, you need to use AWS Signature Version 4 for added security.
- In this task, you will access and view our CloudTrail log files in the S3 bucket related to KMS encryption operations.
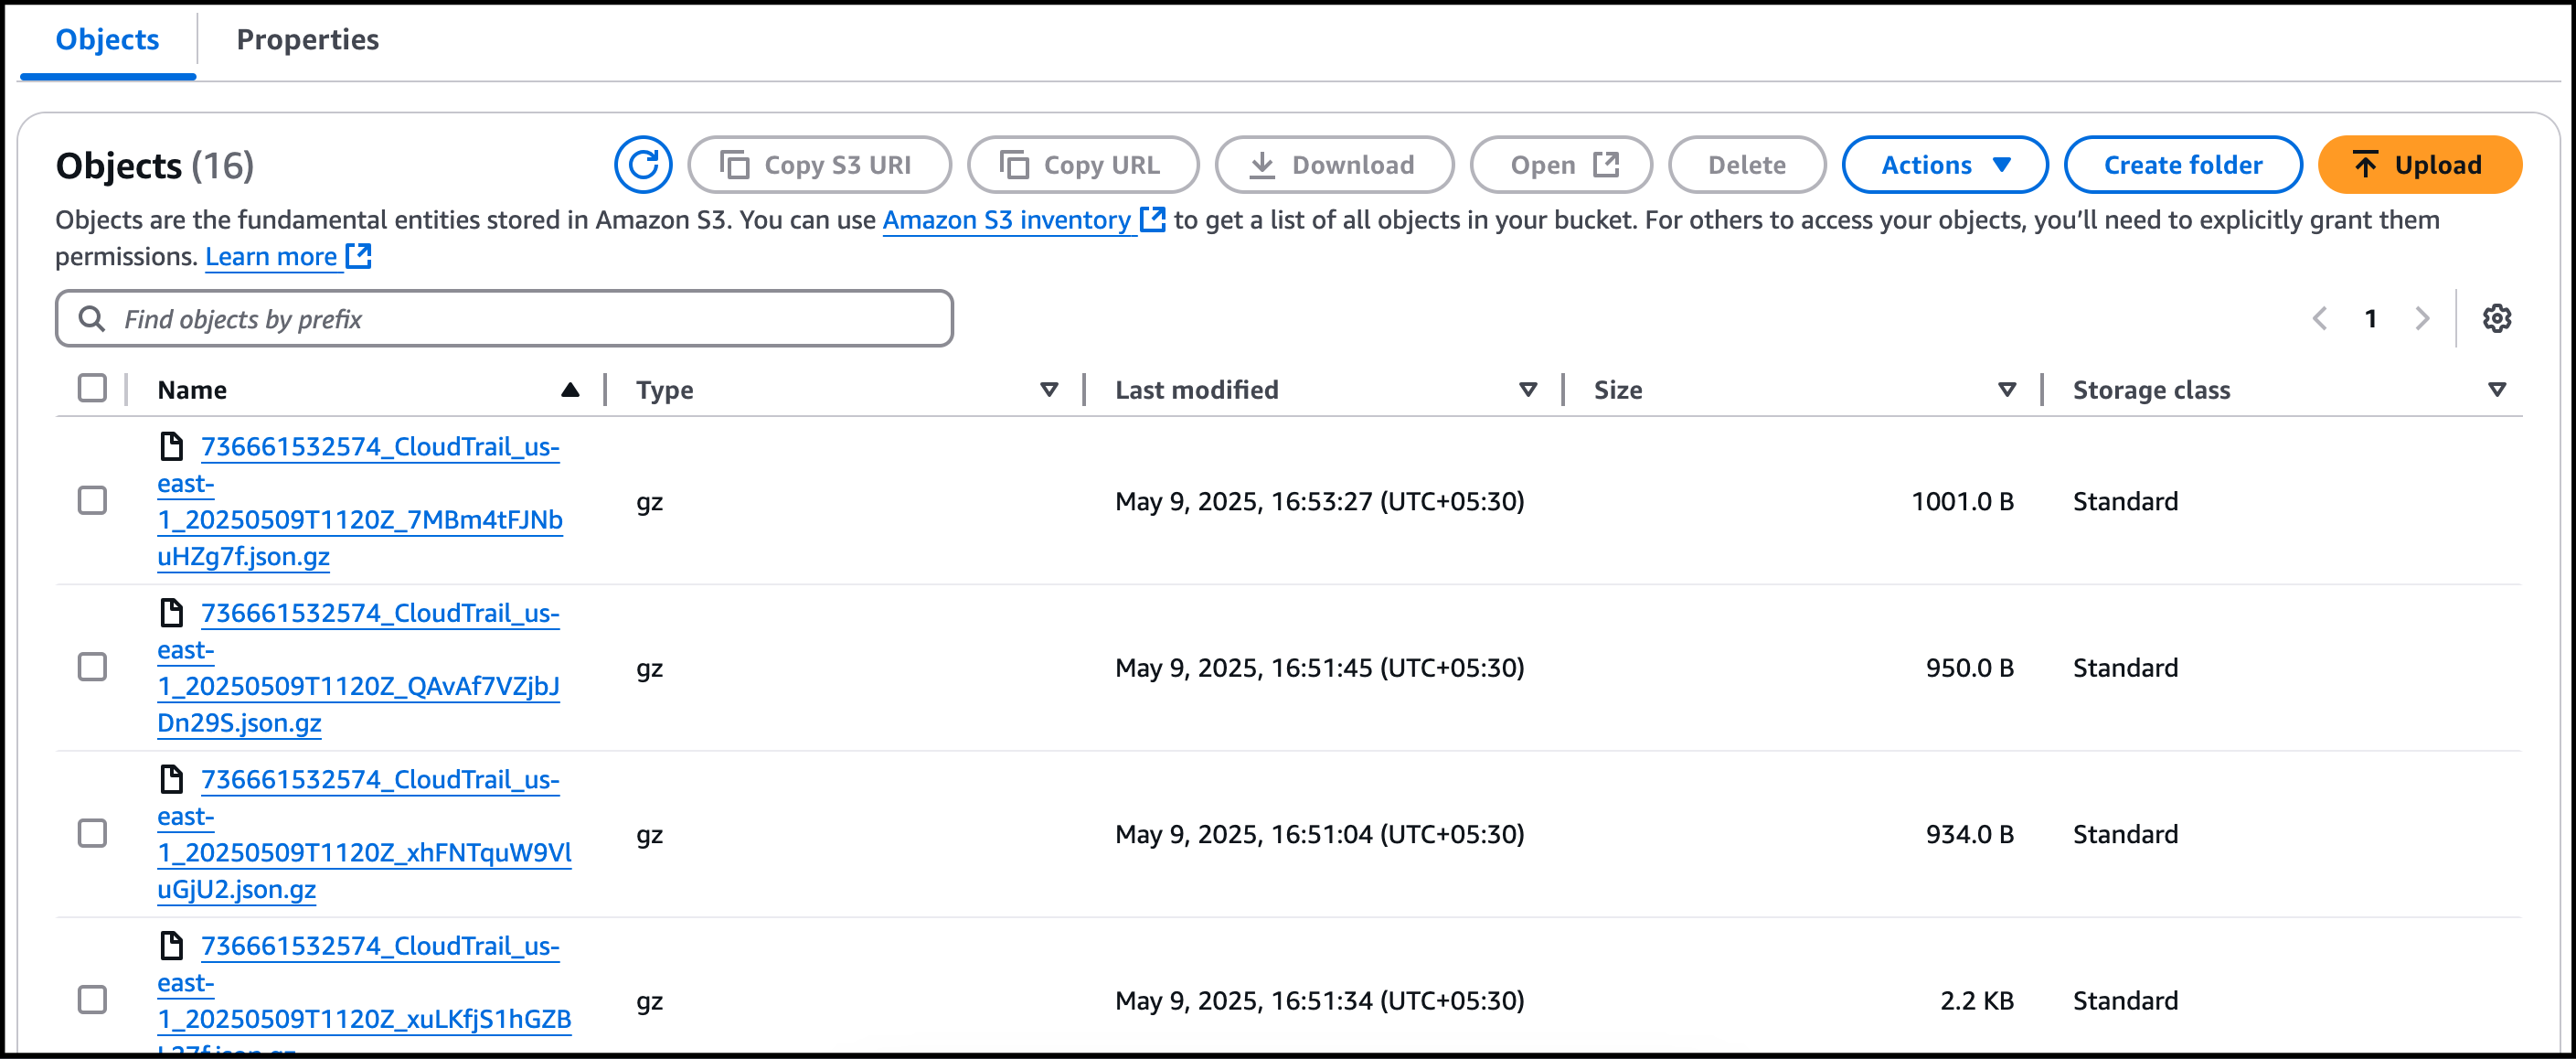
- Go back to the S3 bucket we have created and you will be able to find one more object with the name AWSLogs/.

- Task 1: Sign in to AWS Management Console

- Click on it and click on the next directory too representing your account number.
- Now click on the CloudTrail/ directory and click on us-east-1/.
- In case if you do not see any objects under CloudTrail/, please wait for 5 minutes and refresh the objects.
- Now click on the <year>, <month> and <date> one after the other.
- You will be able to see CloudTrail logs.

- Task 1: Sign in to AWS Management Console

- Click on the log file whose Last modified time is greater than the timestamp of the picture when it is uploaded.(Refer your notepad)
- If there is no log file whose Last modified time is greater than the timestamp of the picture when it is uploaded, wait for 5 more minutes.
- Click on the latest log file from the list.
- Click on Open.
- Press Ctrl+F and search for the Key Id you have saved in the notepad and the picture name you have created.
- If you are unable to find them, copy the object URL of the picture you have uploaded again and paste it in the browser and note down the time.
- Wait for some time and now search for the logs whose time is greater than that of what you just noted down.
- Now you will be able to find the Key ID in the log record.
- Encrypting an S3 bucket using AWS Key Management Service (KMS) and monitoring the activities with CloudTrail is a secure way to protect your data and track any changes or access to the bucket. Here are some points to consider for each heading:
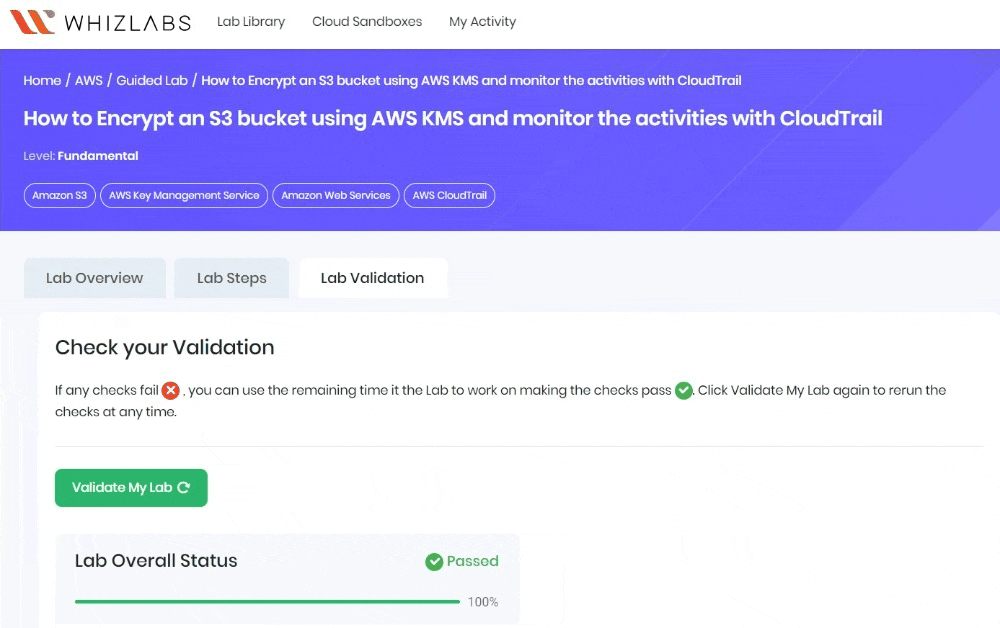
- Once the lab steps are completed, please click on the Validate button on the left side panel.
- This will validate the resources in the AWS account and displays whether you have completed this lab successfully or not.
- Sample output :
- You have successfully created a KMS key and an S3 bucket.
- You have successfully created a CloudTrail and configured it to store events in S3.
- You have successfully monitored KMS activity using CloudTrail Logs in S3 bucket.
- Sign out of the AWS Account.
- You have successfully completed the lab.
- Once you have completed the steps, click on End Lab from the lab console.
- In this task, you will create a customer-managed KMS key and use it to encrypt S3 objects.
- Navigate to Key Management Service by clicking on Services in the AWS Management Console, and selecting Key Management Service under Security, Identity and Compliance section.
- Click on Create a Key

- Task 2: Create a customer-managed KMS key

- Under configure key: Key type : Select Symmetric Key usage : Select Encrypt and Decrypt
- Under configure key:
- Key type : Select Symmetric
- Key usage : Select Encrypt and Decrypt

- Task 2: Create a customer-managed KMS key

- Click on Next
- Under Add labels: Alias : Enter whiz-kms-key Description : Enter KMS key to encrypt S3 Objects

- Under Add labels:
- Alias : Enter whiz-kms-key
- Description : Enter KMS key to encrypt S3 Objects
- Task 2: Create a customer-managed KMS key

- Click on Next
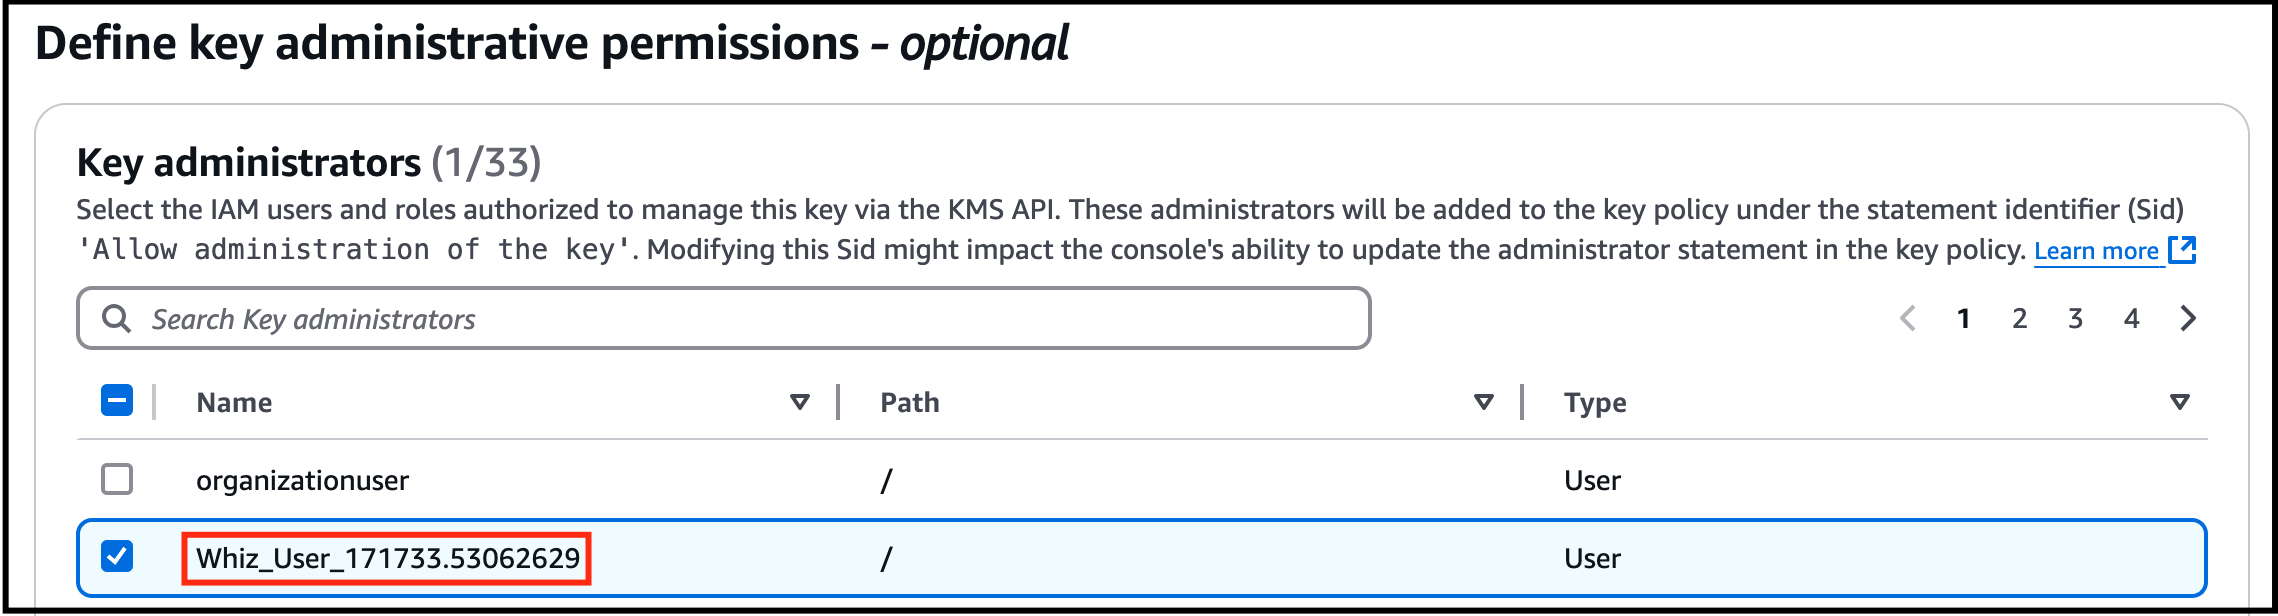
- Under Define key administrative permissions: Key administrators: Select the role that is associated with the account you are working with. For example: Whiz_user-<RANDOM_NUMBER>

- Under Define key administrative permissions:
- Key administrators: Select the role that is associated with the account you are working with. For example: Whiz_user-<RANDOM_NUMBER>

- Task 2: Create a customer-managed KMS key

- Click on Next
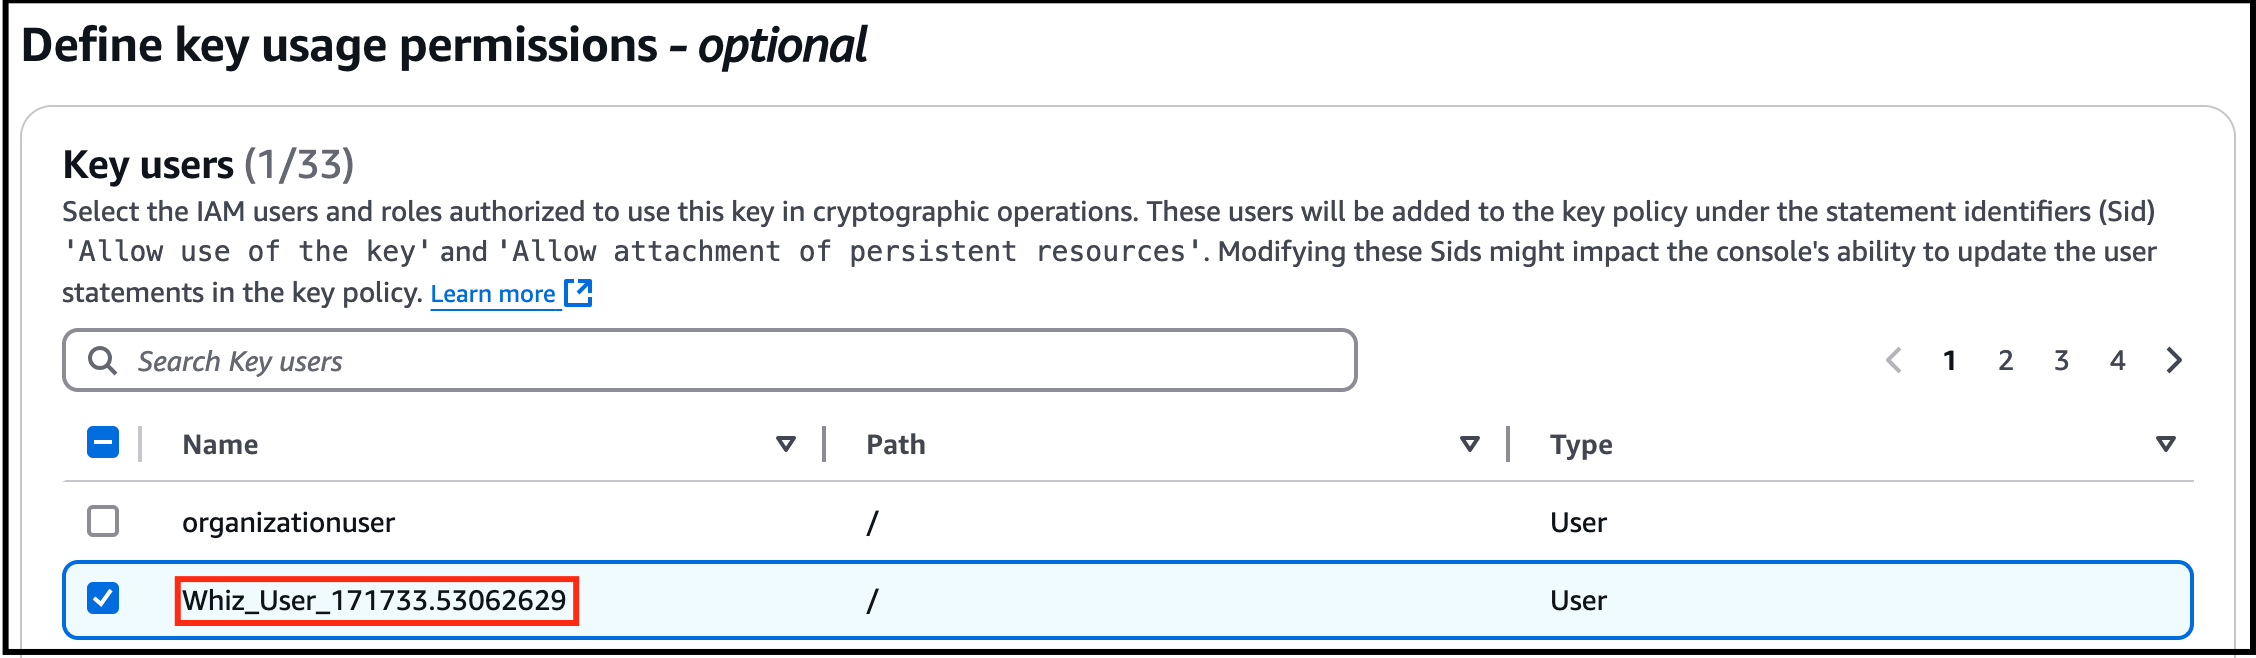
- Under Define Key usage permissions: Select the role that is associated with the account you are working with. For Whiz_user-<RANDOM_NUMBER>

- Under Define Key usage permissions:
- Select the role that is associated with the account you are working with. For Whiz_user-<RANDOM_NUMBER>

- Task 2: Create a customer-managed KMS key

- Click on Next. In Edit key policy, leave everything as default and click Next.
- Review everything and click on the Finish button.
- You have successfully created the KMS key.

- Task 2: Create a customer-managed KMS key

- Copy the Key ID and paste it in the notepad, we will use this later in the lab.
- In this task, you will create an S3 bucket to upload and encrypt an object an aslo to store events.
- Navigate to S3 by clicking on Services in the AWS Management Console, and selecting S3 under Storage section.
- Click on Create Bucket
- Under General configuration: Bucket type : General purpose Bucket name : Enter a unique name within the global namespace.
- Under General configuration:
- Bucket type : General purpose
- Bucket name : Enter a unique name within the global namespace.
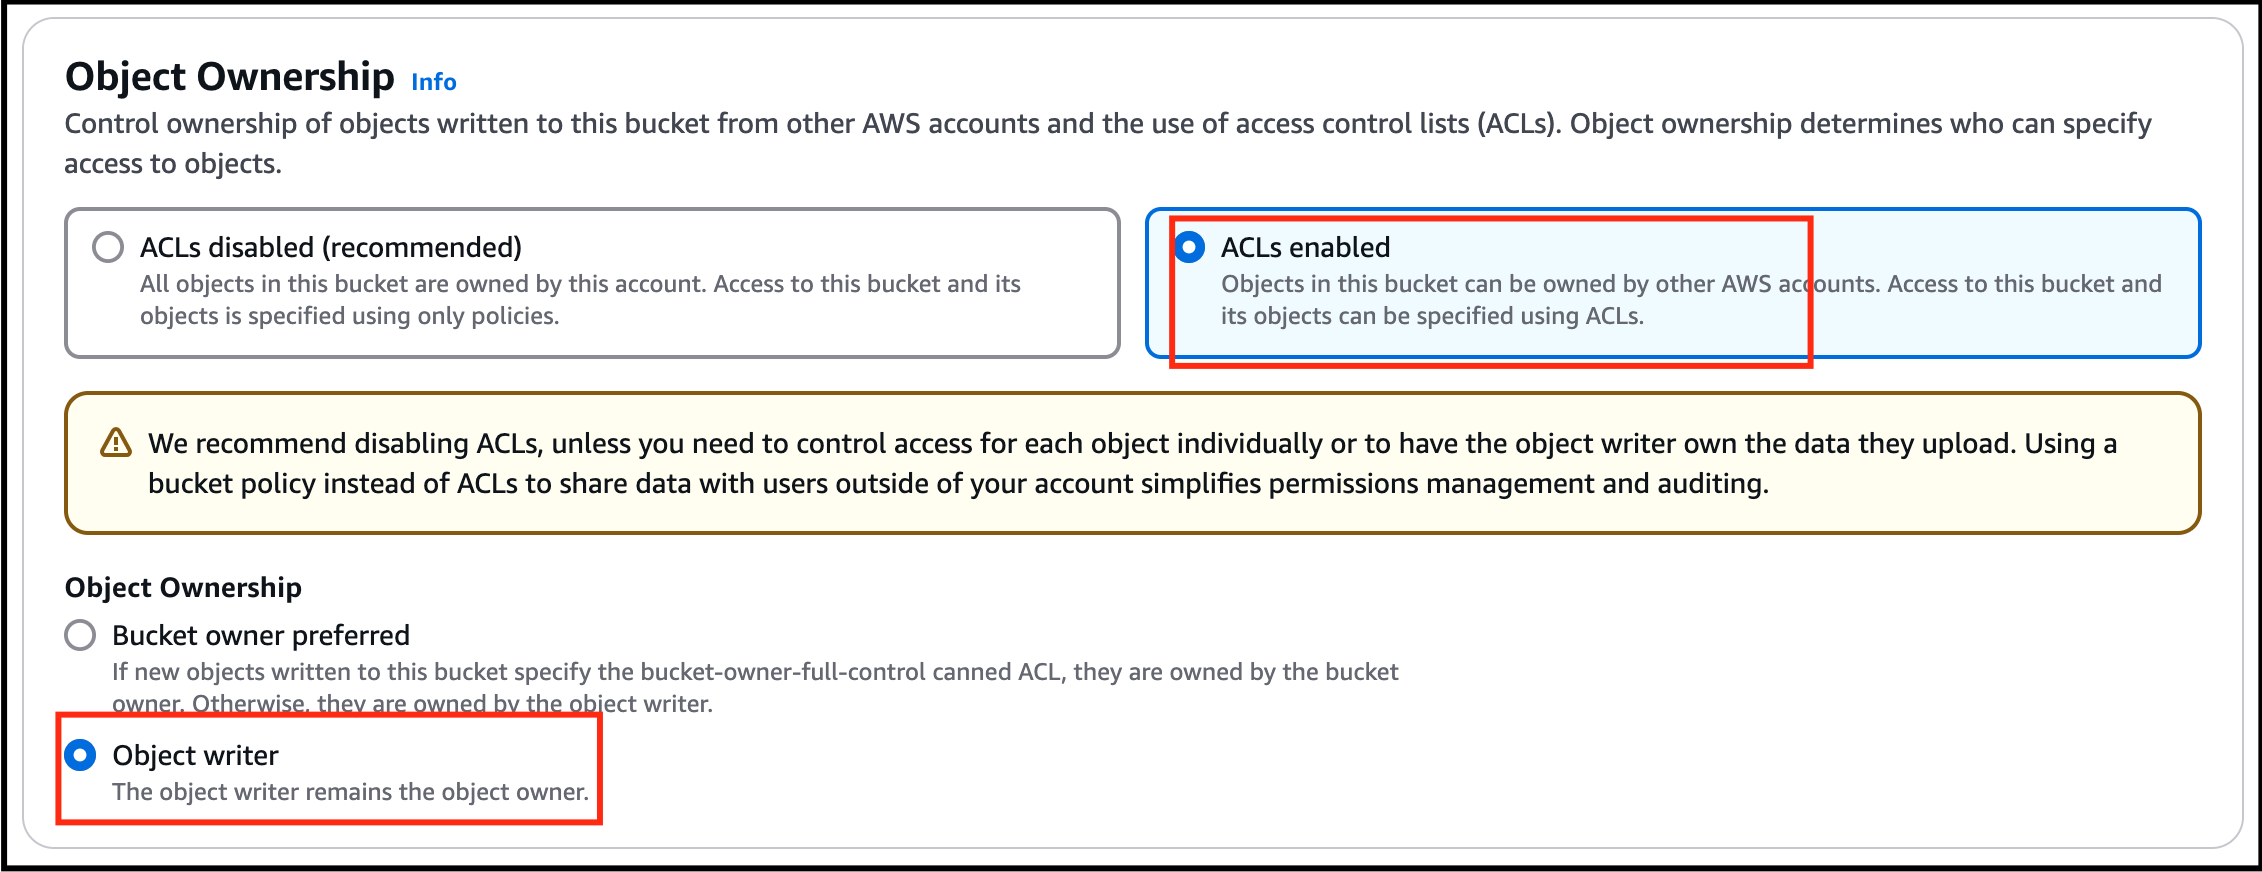
- Object ownership: Select ACLs enabled option and choose Object writer as the Object owner

- Task 3: Create an S3 bucket

- Leave the rest as default and click on Create Bucket.
- You have successfully created an S3 bucket.
- Task 3: Create an S3 bucket

- In this task, you will create a CloudTrail and configure it to store KMS activities in S3 bucket.
- Navigate to CloudTrail by clicking on Services in the AWS Management Console, and selecting CloudTrail under Management & Governance section.
- Click on the menu section (three lines) on the left side panel and click on Trails.
- Click on Create Trail.
- Under General details: Trail name : Enter whiz-kms-trails Storage location : Choose Use existing S3 bucket Trail log bucket name : Click on Browse and choose the S3 bucket that you have created earlier(i.e lab-cloudtrail-kms)
- Under General details:
- Trail name : Enter whiz-kms-trails
- Storage location : Choose Use existing S3 bucket
- Trail log bucket name : Click on Browse and choose the S3 bucket that you have created earlier(i.e lab-cloudtrail-kms)
- Log file SSE-KMS encryption : Uncheck Enabled

- Task 4: Create a CloudTrail and configure it to store events in S3
- Leave the rest as default and click on Next.
- Choose log events: Event type : Check both Management events and Data events.

- Choose log events:
- Event type : Check both Management events and Data events.

- Task 4: Create a CloudTrail and configure it to store events in S3
- Management events: API activity : Check both Read and Write

- Management events:
- API activity : Check both Read and Write
- Task 4: Create a CloudTrail and configure it to store events in S3

- Data events: Click on Switch to basic event selectors button. Click on Continue button on pop up. All current and future S3 buckets : Uncheck both Read and Write Individual bucket selection : Click on Browse and choose the S3 bucket that we have created earlier(i.e lab-cloudtrail-kms) Make sure you have checked both Read and Write next to the Browse.
- Data events:
- Click on Switch to basic event selectors button.
- Click on Continue button on pop up.
- All current and future S3 buckets : Uncheck both Read and Write
- Individual bucket selection : Click on Browse and choose the S3 bucket that we have created earlier(i.e lab-cloudtrail-kms)
- Make sure you have checked both Read and Write next to the Browse.

- Task 4: Create a CloudTrail and configure it to store events in S3

- Click on Next.
- Review everything and click on Create Trail.
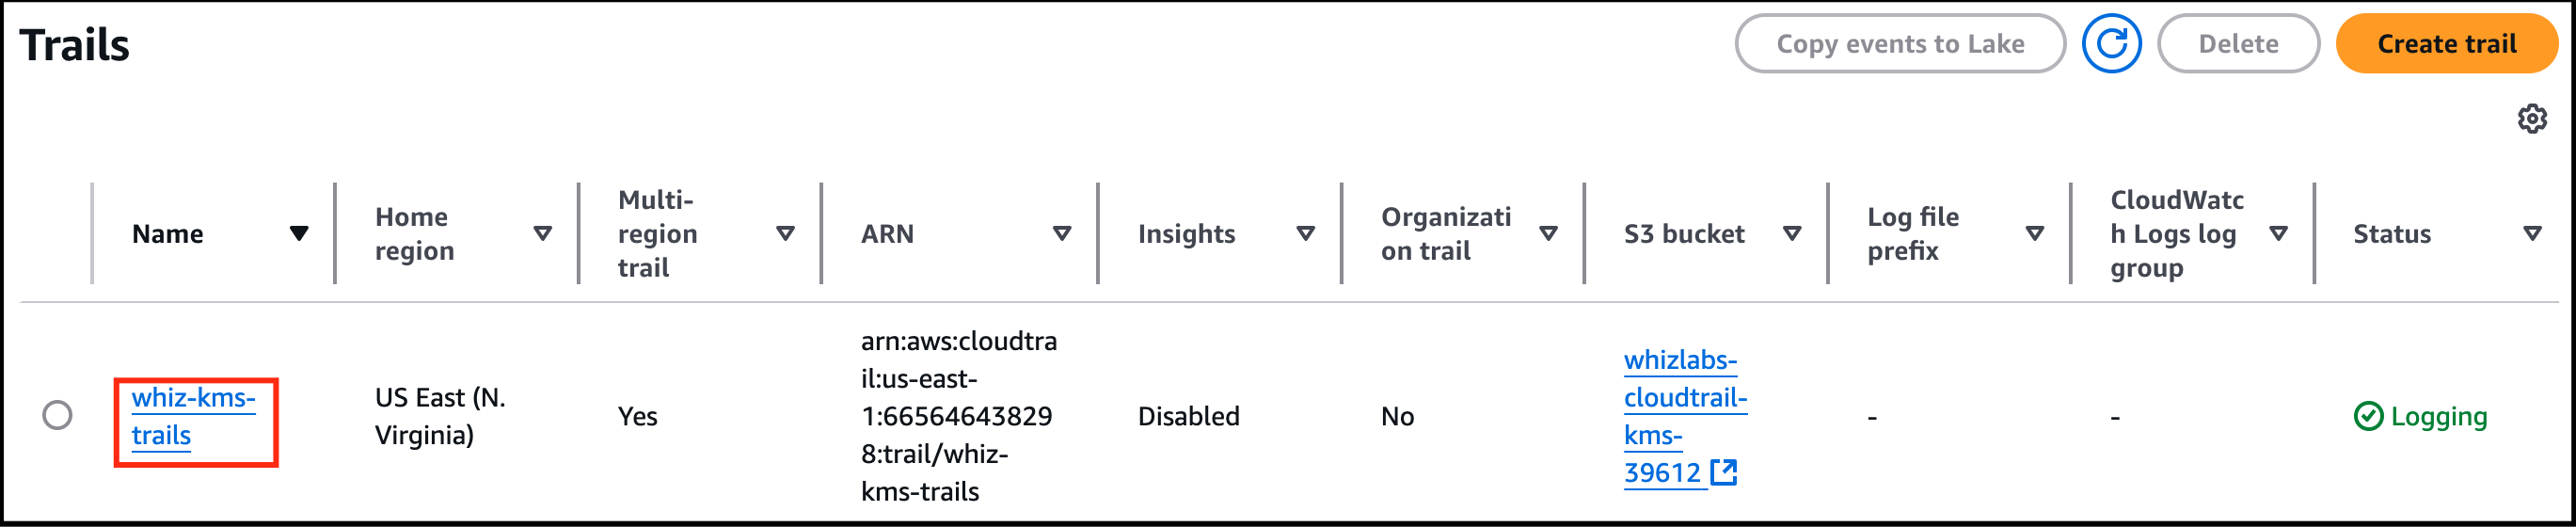
- You have successfully created a CloudTrail and can find yours under Trails.

- Task 4: Create a CloudTrail and configure it to store events in S3

- In this task, you will upload an image from our local PC and encrypt it using the KMS key we have created in Task 3.
- Navigate to S3 by clicking on Services in the AWS Management Console, and selecting S3 under the Storage section.
- Click on the S3 bucket (lab-cloudtrail-kms) we have created.
- Task 5: Uploading an object and encrypting it

- Click on the Upload button.

- Task 5: Uploading an object and encrypting it

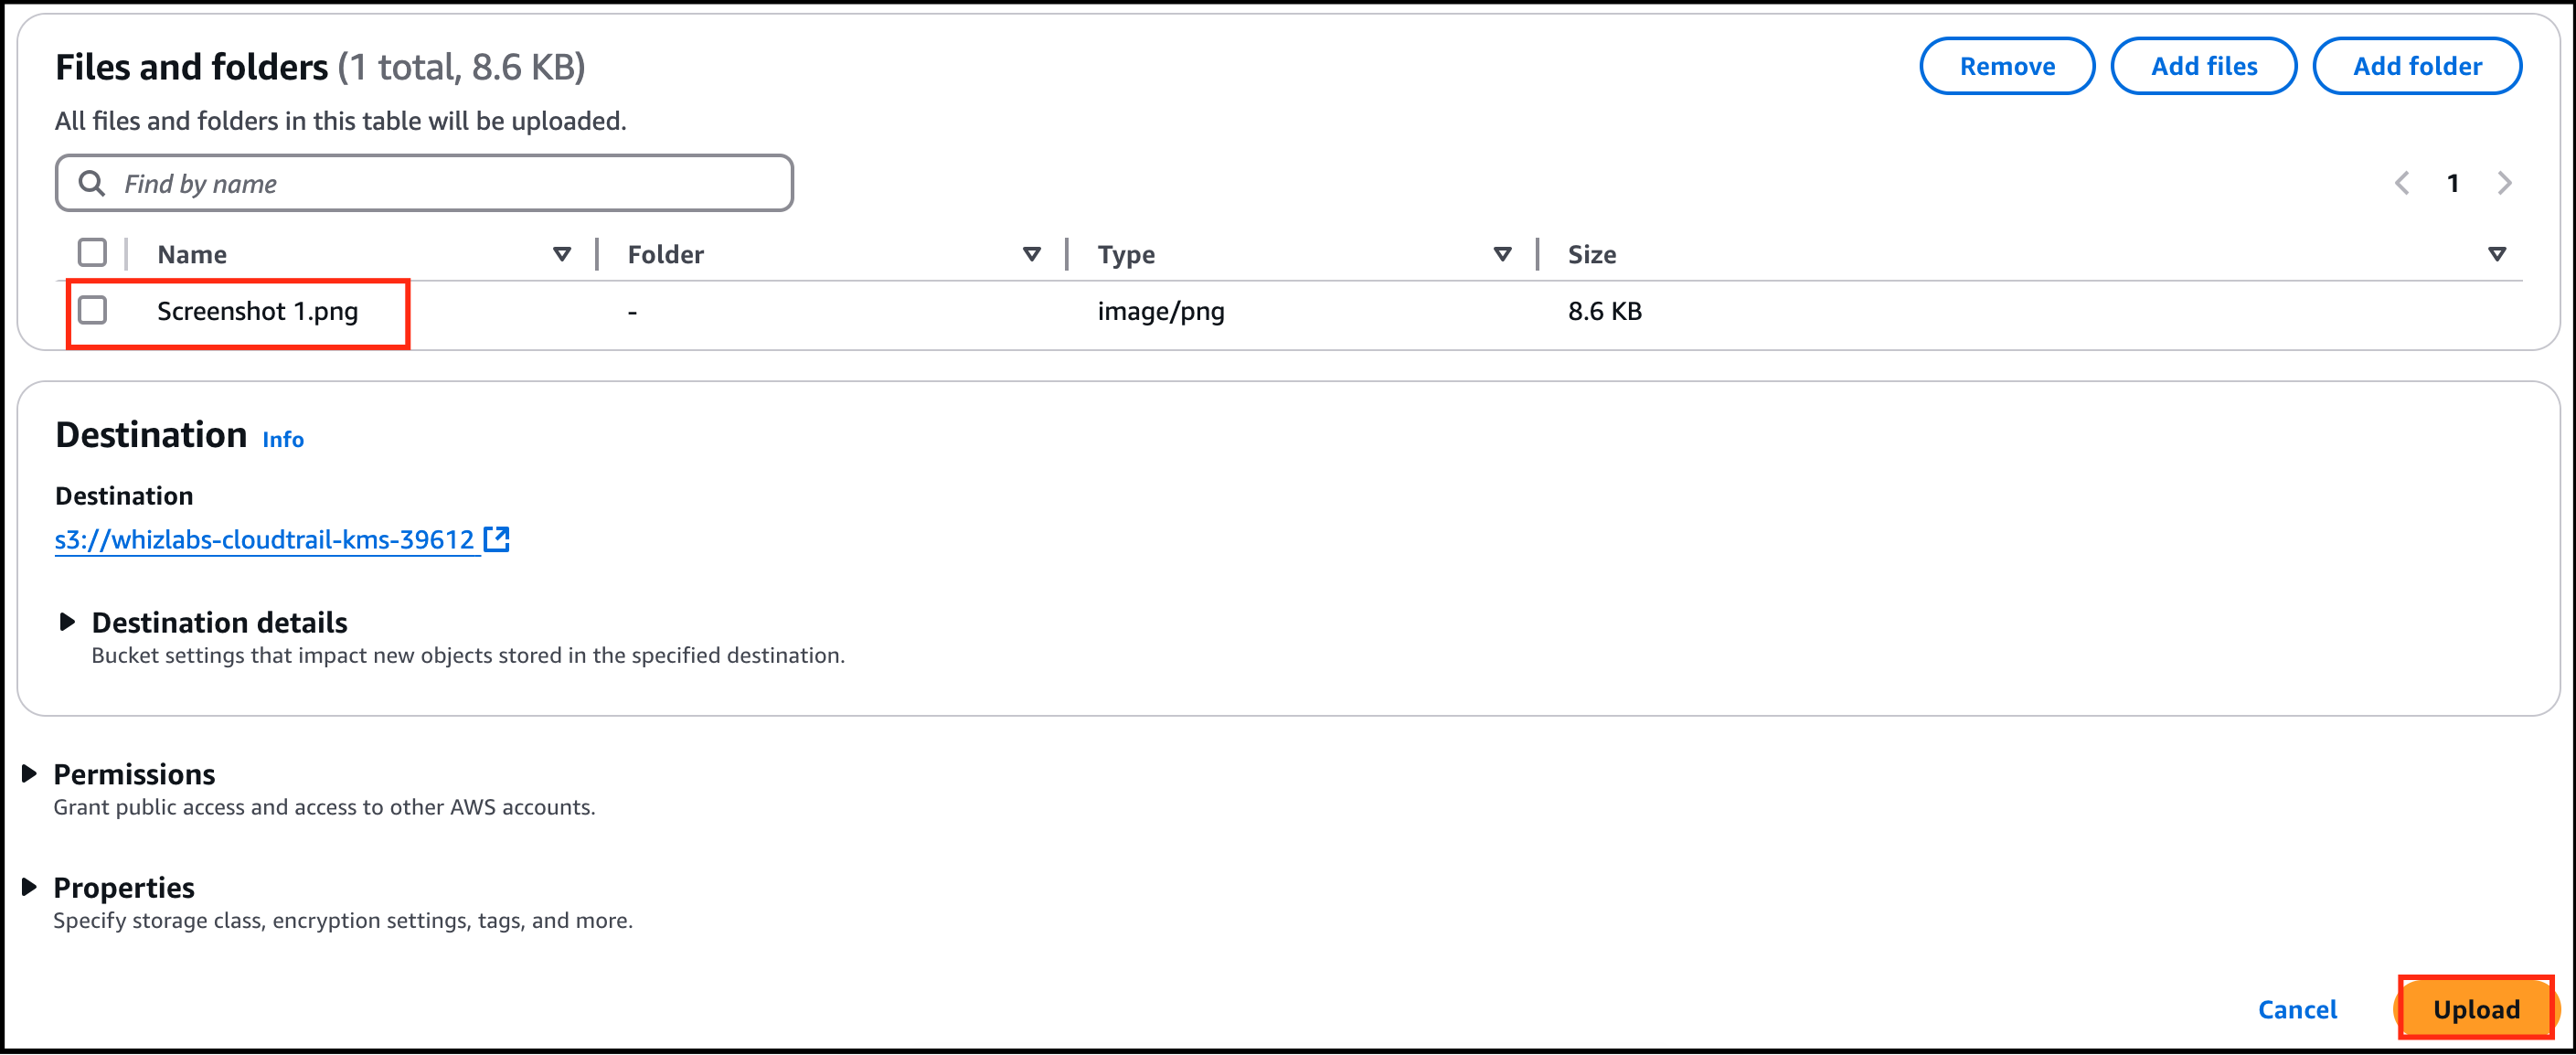
- Click on Add files and choose a picture from your local PC and Click on the Upload button.

- Task 5: Uploading an object and encrypting it

- Click on the object which we have uploaded. Go to the Properties tab.
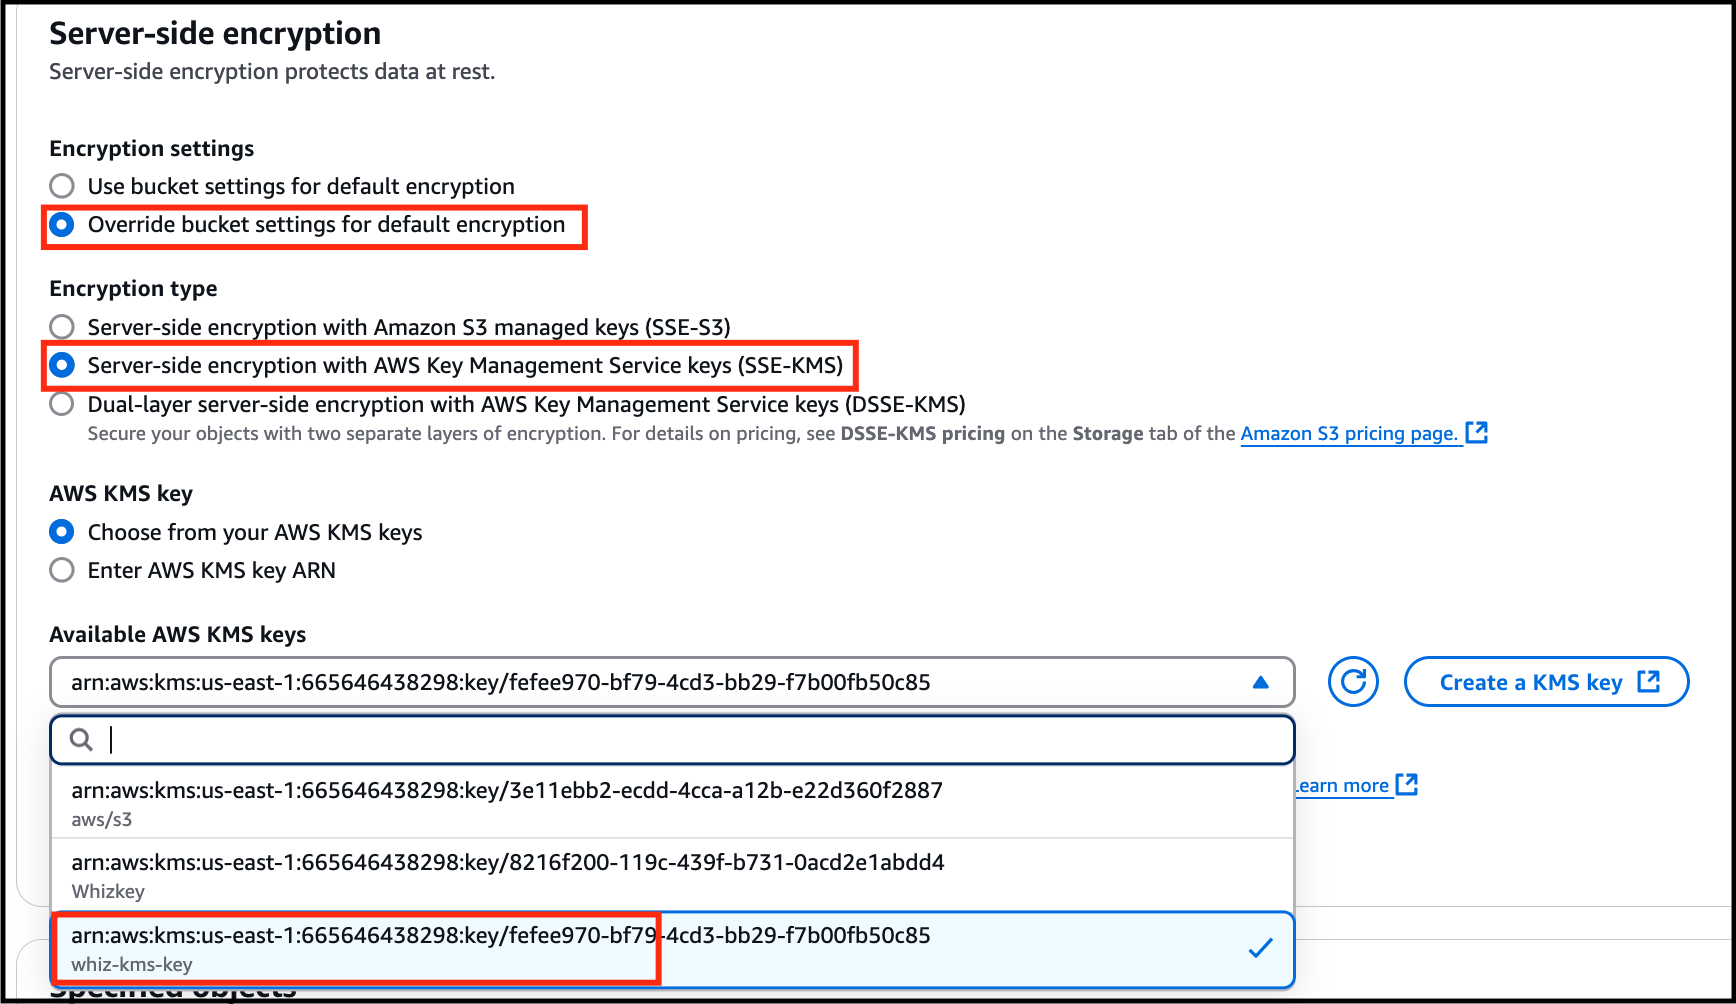
- Scroll down to Server-side encryption settings and click Edit: Encryption settings : Override bucket settings for default encryption Encryption key type : Select Server Side Encryption with AWS Key Management Service key(SSE-KMS) AWS KMS key : Select Choose from your AWS KMS keys and from the drop-down menu select the KMS key we have created i.e whiz-kms-key

- Scroll down to Server-side encryption settings and click Edit:
- Encryption settings : Override bucket settings for default encryption
- Encryption key type : Select Server Side Encryption with AWS Key Management Service key(SSE-KMS)
- AWS KMS key : Select Choose from your AWS KMS keys and from the drop-down menu select the KMS key we have created i.e whiz-kms-key

- Task 5: Uploading an object and encrypting it

- Leave everything as default and click on the Save Changes button.
- Click on close and you will see your uploaded picture under the objects section.
- Note the Last Modified time in the notepad.
- In this task, you will try to access the encrypted object through both S3 console and Object URL.
- Click on the picture you have uploaded and click on Open on the top right side of your screen.

- Task 6: Accessing the encrypted object

- The picture opens in a new tab/window.
- What happens behind the scenes Amazon S3 sends the encrypted data key to AWS KMS. AWS KMS decrypts the key by using the appropriate master key and sends the plaintext key back to Amazon S3. Amazon S3 decrypts the cypher text and removes the plaintext data key from memory as soon as possible.
- What happens behind the scenes
- Amazon S3 sends the encrypted data key to AWS KMS.
- AWS KMS decrypts the key by using the appropriate master key and sends the plaintext key back to Amazon S3.
- Amazon S3 decrypts the cypher text and removes the plaintext data key from memory as soon as possible.
- Close the tab/window that displayed your picture.
- Now copy the Object URL and paste it into a new tab of your browser and hit Enter.
- You will see a page with the message “Access denied.” And that is because by default, the public access is blocked.

- Task 6: Accessing the encrypted object
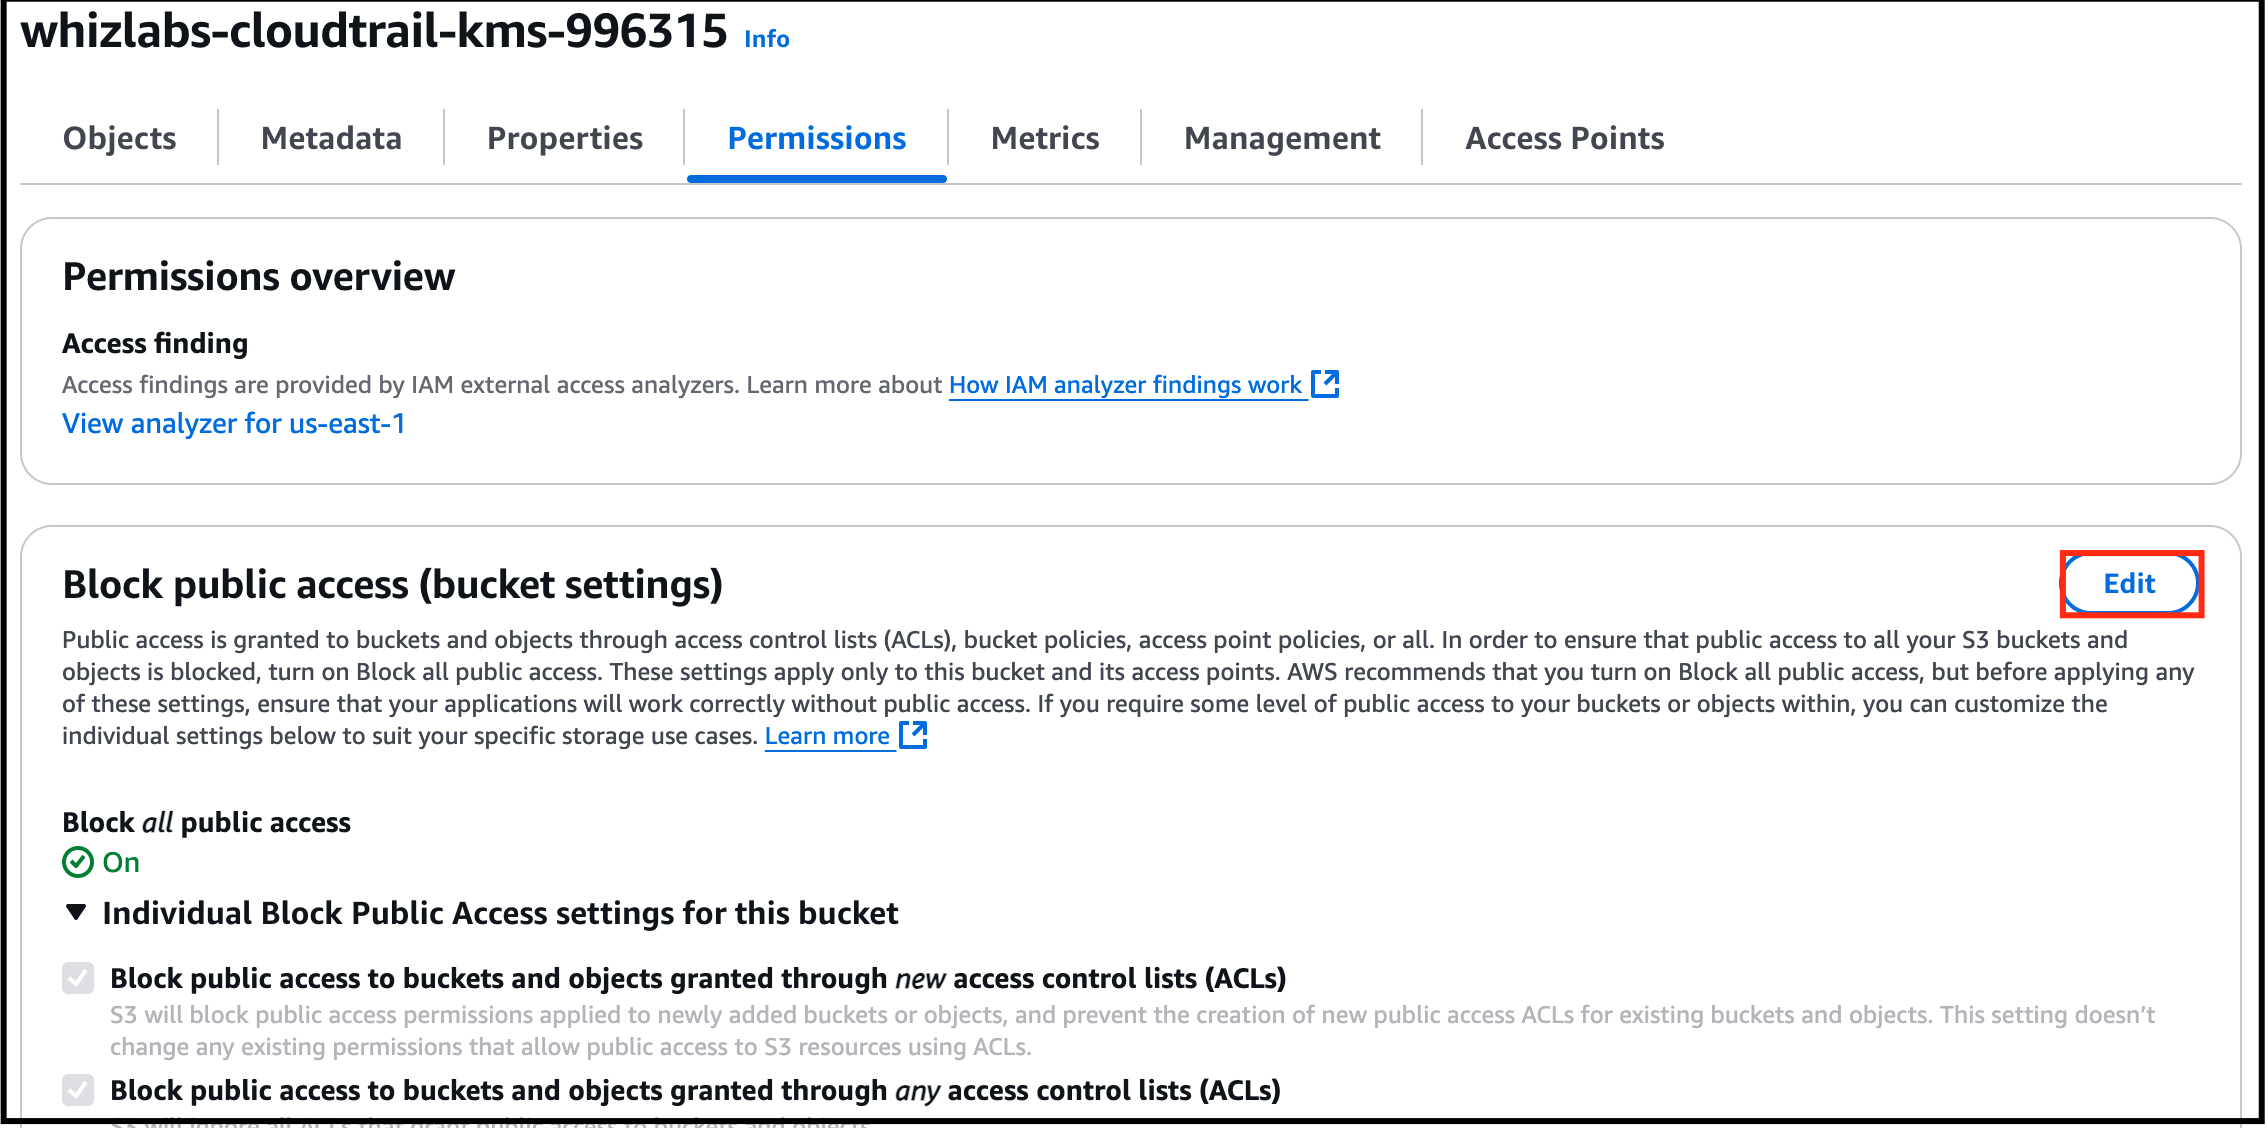
- Go back to the bucket, click on the Permissions section.

- Task 6: Accessing the encrypted object

- Under Block public access, click on Edit and uncheck Block all public access and click on Save changes.

- Task 6: Accessing the encrypted object

- In the next screen, Type confirm and click on Confirm button.

- Task 6: Accessing the encrypted object

- You have successfully edited Block Public Access settings.
- Now go to the Objects tab and click on your object.
- On the top right corner, click the Object actions drop-down menu and click on Make public using ACL.
- Click on Make public button.
- Now refresh the tab where you have pasted the Object URL earlier.
- You should see a message something like this.

- Task 6: Accessing the encrypted object
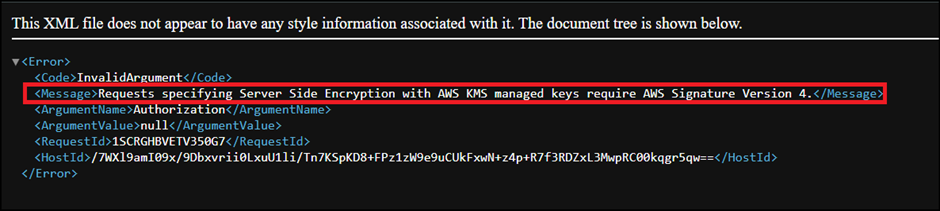
- This is because the picture is encrypted and you are not able to view it using the public link. If you are uploading or accessing objects encrypted by SSE-KMS, you need to use AWS Signature Version 4 for added security.
- In this task, you will access and view our CloudTrail log files in the S3 bucket related to KMS encryption operations.
- Go back to the S3 bucket we have created and you will be able to find one more object with the name AWSLogs/.

- Task 7: Monitoring KMS activity using CloudTrail Logs

- Click on it and click on the next directory too representing your account number.
- Now click on the CloudTrail/ directory and click on us-east-1/.
- In case if you do not see any objects under CloudTrail/, please wait for 5 minutes and refresh the objects.
- Now click on the <year>, <month> and <date> one after the other.
- You will be able to see CloudTrail logs.

- Task 7: Monitoring KMS activity using CloudTrail Logs
- Click on the log file whose Last modified time is greater than the timestamp of the picture when it is uploaded.(Refer your notepad)
- If there is no log file whose Last modified time is greater than the timestamp of the picture when it is uploaded, wait for 5 more minutes.
- Click on the latest log file from the list.
- Click on Open.
- Press Ctrl+F and search for the Key Id you have saved in the notepad and the picture name you have created.
- If you are unable to find them, copy the object URL of the picture you have uploaded again and paste it in the browser and note down the time.
- Wait for some time and now search for the logs whose time is greater than that of what you just noted down.
- Now you will be able to find the Key ID in the log record.
- Encrypting an S3 bucket using AWS Key Management Service (KMS) and monitoring the activities with CloudTrail is a secure way to protect your data and track any changes or access to the bucket. Here are some points to consider for each heading:
- Once the lab steps are completed, please click on the Validate button on the left side panel.
- This will validate the resources in the AWS account and displays whether you have completed this lab successfully or not.
- Sample output :

- You have successfully created a KMS key and an S3 bucket.
- You have successfully created a CloudTrail and configured it to store events in S3.
- You have successfully monitored KMS activity using CloudTrail Logs in S3 bucket.
- Sign out of the AWS Account.
- You have successfully completed the lab.
- Once you have completed the steps, click on End Lab from the lab console.